Tuesday, February 28, 2017

LASSIES AND LADDIES

I played this game as a kindergartener and I always played it with my students this time of year.  It's an "oldie but goodie."

Did You Ever See a Lassie? 
(Traditional Tune)

Children form a circle as you explain that a "lassie" is a girl and a "laddie" is a boy.  A girl is chosen to be the "lassie."  She gets in the middle of the circle and makes a funny motion that the others must mimic as you sing.  The girl then chooses a "laddie" to stand in the middle and make a motion.  The game continues as girls and boys take turns leading in the game.
Did you ever see a lassie, a lassie, a lassie?
Did you ever see a lassie go this way and that?
Go this way and that way,
Go this way and that way.
Did you ever see a lassie go this way and that? 

Did you ever see a laddie...

One of K.J.'s favorite memories from pre-k was St. Patrick's Day.  They got to take off their shoes at nap time and put them in the hall.  When they woke up the leprechaun had left them a Rice Crispie Treat in their shoe.  It's those little things that make memories for our "little things."  Here are a few other "little things" you might want to include in your lesson plans next month.

Hunting for Gold - Spray paint pebbles or rocks gold. (Spread out on newspaper. Spray with gold paint. Dry. Shake. Spray the other side with gold paint. Dry. Shake. Spray a third time.) Hide the pebbles on the playground before children arrive at school. Tell the children a leprechaun hid some gold for them. What fun they will have hunting for the gold nuggets! 
Hint! Need a little bucket for collecting that gold? Hole punch opposite sides of a plastic cup.  Insert a pipe cleaner handle and you’ve got a perfect “pot of gold.”
What If? Have children write stories (or draw pictures and dictate) what they would do if they found a pot of gold. 

Leprechaun Mischief – While the children are at lunch or on the playground, turn over a few chairs, put books on the floor, and mess up the classroom. Sprinkle a little green glitter around. Have the children write stories about what they think happened. 

Catch a Leprechaun - Challenge children to design “traps” to catch a leprechaun in the block center. Give children an empty sack out on the playground and see who can catch a leprechaun. 

Green Snack – Eat foods that are green like celery, broccoli, lime gelatin, snap peas, edamame, etc. You could also use green food coloring to dye cream cheese, milk, yogurt or other snacks. 

Leprechaun Lunch – Purchase miniature peanut butter crackers (Ritz), cookies (Chips Ahoy), and other mini-foods. Serve these on dessert plates with napkins cut in fourths. Milk or juice in medicine cups makes this a perfect snack for “wee folks.” 

Field Trip - Take a field trip (on the internet) to Ireland. Find Ireland on the globe. How could you get there? Could you go in a car? Why or why not? 

Math Manipulatives – Spread out dry lima beans on a newspaper. Spray paint one side gold. Dry. Flip over and spray paint the other side gold. These golden nuggets are perfect for making sets, adding, and subtracting. 

Monday, February 27, 2017

I'M FINISHED! NOW WHAT?

In every classroom you will have racehorses and turtles. Make assignments and by the time you turn around the racehorses are saying, “I’m finished.” Meanwhile, the turtles never seem to make it to the finish line.

Here are several ideas to focus children’s attention and give them something to do when they complete their work. Most of the activities are open-ended and can be adapted to different age levels.

Super Duper Stars

Make a list of 10 things children can do if they finish their work. (Choose from the list below or create your own.) Children start with one and work through the activities in sequential order. 
                   
Note! I did this in my kindergarten and it worked like a charm. Eventually, the children realized there was no reason to hurry through their work because there was more waiting for them as a super duper star!

Bonus Cards 
Write activities on strips of paper and put in a can. Children get to draw a “bonus” card when they complete their work.

                                       
*Here's where you can download the bonus cards:
https://drive.google.com/file/d/0B1SnEagA4jljbHZuSmtxd1BCRXc/view?usp=sharing

BINGO 
Each month draw a “BINGO” grid and write a different activity in each section. Whenever children have extra time, they do an activity and color it in. Who can fill in their whole card by the end of the month? Who can get a line across, down, or diagonally? Each child can win!
*Thanks to Jenny Ianero for sharing this idea she uses with her first graders.

Sunday, February 26, 2017

A "LITTLE" PEP TALK

My "little thing" this Sunday came from Christen Hulgan at Richland Elementary in Memphis years ago.  It's so simple and sweet and could really start your day in a positive way.

During morning meeting the class forms a friendship circle. The teacher asks one child to stand in the middle. Then the teacher says, “Child’s name, there are many things I love about you.” The teacher makes 3 or 4 positive comments about that child. The teacher squeezes the child’s hand on her right. That child says, “I love (whatever they love about that person or something that person has done that was kind).” The child in middle must look them in the eyes and say, “Thank you.” When you have finished going around the circle the teacher says:

     Give child’s name a clap.  (clap hands)
     Give child’s name a cheer.  (fist in air)
     We love you child’s name.  
(hug self and then open arms)
                                        
My circle of friends from James B. Edwards Elementary.

Friendship Lotion (Jennifer Smith)
Write “friendship lotion” on a bottle of lotion or disinfectant. (You could also use an empty bottle.) Children take turns passing it around as they put some in their hands. When everybody has some rub your hands together as you say…”It smells like friendship.”
*This is a perfect way to remind students to be kind to friends. 


Saturday, February 25, 2017

ONCE UPON A TIME....

Tell a Fairy Tale Day is February 26th.  What a perfect opportunity to help children “recognize different types of texts” and be entertained!
                 
Some people think fairy tales are too violent for young children. And I would agree that some of them are a little twisted and dark. However, most of them aren’t any more violent than Saturday morning cartoons. The bottom line is children have enjoyed these stories for hundreds of years. Proof that a good story is a good story! There is usually a protagonist (good character) that struggles with an evil character. The best part of fairy tales is that they always end happily and good prevails. Many psychologists support fairy tales because they believe children will face “dragons” throughout their lives, and fairy tales give them hope, determination, and strength to defeat their problems.  

    
I love this cartoon I found on the internet!
                                         
Let’s see how we can use “Tell a Fairy Tale Day” as a springboard for teaching this week.

Discussion
What is a fairy tale?

What do children know about fairy tales?
Are they fiction or non-fiction? Why?

Brainstorm
How many fairy tales can they name?
Make a list on the board as they call them out.
Go to the library and search for fairy tale books.

Comprehension
Get a storybook (without pictures) and have the children close their eyes as you read to them. Challenge them to make pictures in their brain.
*Stop before the end of the book and ask them to draw pictures of what they think will happen. Compare their predictions with what actually happened by reading the end of the book.

Read several different versions of the same fairy tale and compare and contrast.

Compare different illustrations of the same fairy tale.

Creative Activities
Let children dress up like their favorite character from a fairy tale. Encourage them to retell the story and explain why they chose that character.

Have children make puppets of favorite fairy tale characters from lunch bags, paper plates, or sticks.

Divide children into small groups and let them act out their favorite scene from a fairy tale.
I was a lucky little girl because I grew up before videos and iPads. I do remember my mother reading to us from this storybook every night. Look at the forward I found when I opened the book! 
                                             

This book is my house.
The door is open and I shall enter.

I shall be happy here because my house has so many windows and
my companions are men and women who love me.
Here I will find laughter, love, romance, beauty, and happiness.

If you are reading my blog today I know you are the type of teacher that instills the “love and happiness” from books. Thank you for keeping the joy and love of reading alive!

P.S.  Here's a link to a webinar I did with Vanessa Levin (pre-kpages.com) earlier this week:

Friday, February 24, 2017

SITTER SPOT


I always had a rug in my classroom and it created an intimate feeling when we sat in a circle. I didn’t like assigning seats with messy tape because I wanted the children to sit by different friends. However, there were often two mischief makers that needed to be separated. Sitter spots was an easy “trick” to disperse students and manipulate where they sat.

Cut 7” or 8” circles out of fun foam or felt. Write children’s names on these or let them decorate with permanent markers. Before a story or other activity arrange the spots to create a positive group. Children find their spot and take a seat.

*Let children take turns arranging the spots.

Note! It’s interesting that they now sell these, but I had this idea in a book I wrote over 25 years ago. 

                                 
We didn't do too much sitting when I sang at Stiles Point this week. Talk about a 
great school and great teachers!!!! It's like being a grandmother teacher because 
go in and sing and get them all wound up and then I say, "Good-bye!"

Thursday, February 23, 2017

INTERNATIONAL DOG BISCUIT DAY

You're going to think I'm "losing it" and I'm ready for the loony bin!  Three days of activities with envelopes and now I'm talking about dog biscuits!  Well, I'm not making this up, but this really is International Dog Biscuit Appreciation Day.  I don’t have a pup anymore, but I bought a box of dog biscuits to celebrate the day. (I gave the treats to my neighbor’s dog.)

Make a “Woof! Woof” game. Cut out dog bones and write sight words, math facts, letters, etc. on them. On a few write “Woof! Woof!” Pass the box around and let each child pull out a bone and identify the information. If they select “Woof! Woof!” they have to get down on the floor on all fours and bark like a dog. (They love it!)


Use the dog biscuits for math activities. Add, subtract, make sets, sort… This dog dish with two sections is perfect for tens and ones.


Make a book about pets. Cut the front and back off the box and cut paper the size of the box. Give each child a sheet of paper so they can draw a picture of their pet and write or dictate a sentence about it. (If they don’t have a pet they can draw a picture of a pet they would like to have.) Put their pictures between the covers of the box, hole punch, and you’re ready to read. 
                                 
P.S. I watched the Westminster Dog Show last week and I want a dog sooo bad. My husband says I have to quit traveling before I can have a dog, so I’ll just have to wait a few more years because I am NOT ready to retire. However, I’ve picked out some names for my imaginary dog: Jingles, Buttons, or Twinkie. I’m fascinated by the names people give their dogs like “Heredog” (Here-dog!) and Boozer (St. Bernard). What’s your dog’s name?

Wednesday, February 22, 2017

BUT WAIT - THERE'S MORE!

Now, if you read my blog and you don't do something with an envelope this week you should be ashamed of yourself!  (Just kidding!)  

Here's the video I did yesterday on Facebook if you want to see these activities demonstrated:  http://bit.ly/drjean_classenvelope

Yes-No
This is great for a quick review. Have children write “yes” on one side with a green crayon and “no” on the other side with a red crayon. When you’ve got a few extra minutes have the class use these to answer simple questions. You can quickly gaze around the room and see who has the correct answer.
                           
Question – Statement
Put a period on one side and a question mark on the other side. Children hold up the period if the teacher makes a statement. The question mark is held up for a question.
        
Fact – Opinion
Write “fact” on one side and “opinion” on the other side. As the teacher says facts and opinions, the children respond by holding up their envelope.

Book
Write riddles or questions on the front of envelopes. Put the answers on index cards and insert in the envelopes. Hole punch and bind several to make a book.
                                          
*At the beginning of the school year have children write descriptions about themselves on the outside of the envelope and then put their photo inside.
             
Pull and Read
Cut the left end off the envelope. Write children’s names on 9 ½” sentence strips. Glue their picture on the right side. Pull out one letter at a time for children to predict whose name it could be.
                                   
*Write sight words, vocabulary words, or sentences for children to pull and read.
*Write math equations with the answer at the end.

Word Puzzles
Write words (or children’s names) on the front of an envelope. Write the same word on a sentence strip and cut between the letters to make a puzzle. Place the letters in the envelope for the children to put together.

Skill Cards
Cut envelopes in half. Cut a ½ slit down each side and fold the top section down as shown. Use these to store flash cards of skills children need to work on such as letters, numbers, sight words, math facts, and so forth.
                                    

Tuesday, February 21, 2017

SEALED AND DELIVERED!

                         JOIN ME TONIGHT ON FACEBOOK FOR LIVE AT FIVE!

Letters
Write the uppercase letter on one side and the lowercase letter on the other side.
Sing the “Hokey Pokey” with the letter puppet.
     You put your (letter) in,
     You take your (letter) out,
     You put your (letter) in
     And you shake it all about.
     You make the (letter sound)
     And then you put it down.
                                
Listen Up
Children listen as you say words. If the word starts with that sound they hold their puppet up. If it doesn’t start with that sound they keep their puppet down.

Shapes
Glue shapes to envelopes and pass out to students. Children listen and then respond as you sing this song to the tune of “If You’re Happy.”
     If you have a circle stand up.
     If you have a square stand up.
     If you have a rectangle stand up.
     If you have a triangle stand up.
*Adapt for other shapes, as well as three-dimensional shapes.

*Use shapes to reinforce positional words. Can you put your shape ON your head? Can you put your shape BEHIND you? Can you put your shape UNDER your chin?

I Have - Who Has Numbers?
Seal envelopes, cut them in half, and then write numbers on the envelopes. (You will need one for each child in your class). Pass out envelopes and have the child with 1 say: I have 1. Who has 2?
The child with 2 says: I have 2. Who has 3? And so forth.
*Count backwards: I have 20. Who has 19?
*You can also play this game with alphabet letters.
                        
High Five Words
Write sight words on envelopes. Children walk around the room giving a high five and reading each other’s words.

Missing Fingers
Hide several fingers in the envelope. Can the children tell how many you have in the envelope? How did you know that?

Monday, February 20, 2017

WHAT'S IN THAT ENVELOPE?

If you’ve ever been to my workshops you’ve seen how I take something simple like an envelope and turn it into a learning tool. If you’re running out of ideas this time of year, then I’ve got some new activities for you. Of course, they are simple, inexpensive, open-ended, and hands-on. I’ll go LIVE AT FIVE tomorrow night (Tuesday) to demonstrate them.

PUPPETS
The world keeps changing, but children are the same. They loved puppets over 40 years ago when I started teaching and they still enjoy putting their hand in a puppet and making it come alive. To make an envelope puppet seal the envelope and cut in half as shown. Give children markers, crayons, and other art media and set their creative juices flowing!

Retell a Story

Let children make a puppet of their favorite character from a book and use it to retell the story.
                              
Nursery Rhyme
Make a character from a nursery rhyme and use it to say the rhyme. Encourage children to take the puppet home and say the rhyme to their parents.

Feelings
Make puppets with different expressions (happy, sad, angry, scared, surprised, and so forth). Let children use the puppets to describe when they feel that way.

People Puppets
Have children glue photos of famous historical figures or heroes. Encourage them to use the puppet to talk about why they admire that person.
           
Animal Puppets
Let children make puppets about animals you are studying about in science. Use puppets to describe animal characteristics.

BOOKMARK
Trim off a corner from an envelope. Let children decorate it with their initials or a smiley.
                                                  
*Use the bookmark to show the “top” of the page.
*Mark a favorite page they’d like to read to classmates “top” of the page
*Mark the solution or other key element in a story with the bookmark.
*Write a vocabulary word on the bookmark and place it at the top of the page when they find that word in the book.

BRACELET
Cut a 1 1/2” strip from the envelope and use it like a bracelet.
*Write letters, words, numbers, and other skills on the bracelet.

*Make a holiday or seasonal bracelet.
*Collect stickers on the bracelet.
*Get friends’ autographs on the bracelet.
                                                    
*Send reminder notes home to parents on the bracelet.
*Use at the beginning of the school year to help children remember lunchroom numbers or bus numbers.

Sunday, February 19, 2017

ONE "MORNING" LITTLE THING

Here are two simple little ideas to start each day on a positive note. The first one came from a teacher in Ohio years ago. He said that he adapted this concept from a football coach.

Morning Mantra
     Teacher: What is my job today?
     Children: Your job is to teach us and to love us.
     Teacher: What is your job today?
     Children: Our job is to learn and to love each other.
                                         
During the day if children are behaving inappropriately you can remind them gently by saying, "What is your job today? Are you doing your job?"

This other idea came from my exercise teacher who says this to her two girls each morning. You will remember it from the movie THE HELP. Write these statements on a chart and read over together at morning meeting.


     I am smart. (Point to brain.)
     I am kind. (Hand on heart.)
     I am important. (Hug self.)


Lucky me to be honored at James B. Edwards Elementary Leadership Day last Friday!  The CD (Child Development in SC aka pre-K) decorated their doors with my songs and sang their little hearts out on stage.  My heart was so happy!!!  


Saturday, February 18, 2017

DOING DOTS

Subitizing is the ability to recognize numbers without counting. Dot cards can contribute to children’s understanding of number concepts, counting, composing and decomposing numbers, and a variety of standards. Take a look at all the ways you can use dot cards in your classroom.

Hint! Start with dot patterns up to 6 and then extend it to 10 when they are ready.
*Make sure to download dot cards on card stock or heavy paper.
                                     
One to One
Children match up pompoms, beans, erasers, pebbles, and other small objects with dots on cards.

Dot Flash
The teacher quickly holds up a dot card and then places it face down. The children hold up that number of fingers on their chest. Ask, “How did you know it was that number?”

Clip It
Children use the appropriate number of paper clips or clothespins to attach to the dot cards.

Copy Cat
The teacher holds up a dot card. The children try to reproduce the pattern with their own counters.

Sorting
Sort dot cards by amount.
Sort odd and even cards.

Line Up
Students line up the dot cards in numerical order from largest to smallest or smallest to largest.
              

Matching
Match dot cards with dots on dice.
Match dot cards with ten frames with the same amount.
Make puzzle games where children match dots with numerals or words.

Partner Count
Cards are placed face down on the table. One card is turned over and the first child to say the number gets to keep the card. The partner must count the dots to verify it’s correct.
*To make the game more challenging, ask them to say one more than the quantity of dots, one less, two more, etc.

Memory

Run off two sets of dot cards. Place them face down on the floor. One child at a time turns over two cards. If the cards match they make keep them and take another turn. If the cards don’t match, they are turned back over and the next child takes a turn.

Top It
You will need several sets of dot cards for this game. Shuffle the cards and lay them face down in a pile. One child at a time chooses a card. The child with the largest number of dots wins both cards. If they turn over the same amount they continue to draw cards until one player has a higher number.

It Adds Up
Two children have a set of cards and face each other. They each turn over a card and add up the amount. The first child to correctly say the answer gets to keep the cards.
*Tally to keep score.

                                  
Paper Plates
How about making some dot plates?

Friday, February 17, 2017

ONE MORE - OR LESS???

One math standard that many children struggle with is the ability to understand what is one more and one less. Let’s see what happens when we hop, sing, and move this standard.

Paper Clip (Parisa Ghannadan)
Make a number line on a sentence strip. Use a paper clip to slide to different numbers and the children can see what comes before and after.
                               
Number Line Hop
Draw a number line with chalk on the carpet or use masking tape to make a number line on the floor. Choose different children to hop to a number. What is one less? What is one more?
*Let children roll one or two dice and then hop to that number. What is one more? Less?
*Call two children and ask each to stand on a different numeral on the number line. Which one is more? Which one is less?

Ruler Game
Give children a ruler to use as a number line. Have them point to the numbers as they count on the ruler. Can you find 6? What’s 1 more than 6? What is 1 less than 6?

Counting on a Shoestring
Write numerals 0-20 on a cotton shoestring with a permanent marker. Insert a bead. Children move the bead as they count. They can clearly see what is one more and one less.
       
Ten Little Friends
Ten little friends (Hold up fingers.)
Went out to play (Wiggle.)
On a very bright
And sunny day.
And they took a little walk.
Walk, walk, walk. (Walk fingers in front of your body.)
And they had a little talk.
Talk, talk, talk. (Put fingertips together.)
They climbed a great big hill (Move fingers over your head.)
And stood on the top very still. (Keep hands still.)
Then they all tumbled down (Roll hands around and down.)
And fell to the ground.
We’re so tired, (Hold up fingers.)
They all said.
So they all went home
And went to bed.
10 – 9 – 8 – 7 – 6 – (Put down fingers one at a time as you
5 – 4 – 3 – 2 – 1. count backwards and lower your voice.)
Good night! (Lay head on hands.)

Country Countdown 1-20 (“Totally Math” CD)
All right all you cowboys and cowgirls.
Time to count ‘em up and count ‘em down with me.
1 2 3 4 5 6 7 8 9 10 11 12 13 14 15 16 17 18 19 20
Turn around and count back down.
20 19 18 …..
Let’s do it again…

More or Less Game
Make a grid similar to the one shown. Two children take turns making sets with unifix cubes in the middle section. Their partner has to make sets with “one more” and “one less.”
                                   
Magic Number Countdown
Children stand in a circle. The first child says “one,” and children continue counting around the circle. When you get to ten or a set of ten, that child must sit down. Continue counting until you get to 100 and then start all over again. The last child standing is the winner.

Thursday, February 16, 2017

SKIP COUNTING TIPS

Skip counting is a powerful way to prepare children for multiplication. You can clap, snap, hop, or jump as you skip count by ones, two’s, fives, tens, and so forth.

Whisper Skip Count
You can also try this patty cake technique with a partner. Count by two’s by placing your hands on your shoulders as you whisper “one.” Shout “two” as you patty cake in the air. Whisper “three” as you touch your shoulders and then shout “four” as you patty cake…

For counting by three’s place hands on waist and whisper “one.” Hands on shoulders and whisper “two.” Hands patty cake and shout “three.” Whisper “four” with hands on waist. Whisper “five” with hands on shoulders. Shout “six” and patty cake…

Four’s – knees, waist, shoulders, patty cake

Five’s – toes, knees, waist, shoulders, patty cake

Skip Count Books
Make a “High Five” book with children’s fingers. Trace around each child’s hand on a 6” square and let them decorate it. Attach pages with tape to make an accordion book. Number pages 5, 10, 15, 20…etc.
                             
*Make a “Piggie Book” by tracing around children’s feet. Practice counting by ten’s with this book.

*"Eye" Count by Twos can be made by letting children draw their eyes.


Tunes to Skip Count
Sing and skip count by 2’s to “Twinkle Little Star.”

Practice counting by 3’s to “Are You Sleeping?”

4’s “Row Your Boat”

5’s “The Bear Went over the Mountain”

6’s “London Bridge”

7’s “Ten Little Indians”

8’s “This Old Man”

Macarena Skip Count
You can skip count by any multiple as you do the Macarena.

Wednesday, February 15, 2017

SHOW ME CARDS

It's time to give math a little love with "Show Me" cards.  These cards can be used to reinforce almost any math skill you are working on. They engage all children and give you the opportunity to quickly assess who has mastered a skill and who needs more help.
                                      Make a set of “show me” cards for each child by writing the numerals 0-10 on index cards. Have children store their cards in a zip bag in their desk or cubby. When you have a few extra minutes, have the children get their cards and arrange them on the floor or table in numerical order from 1-10. Use the cards for some of the games below. 

Here's where you can download number cards.  These store nicely in an envelope.
      
https://www.eduplace.com/math/mthexp/g1/visual/pdf/vs_g1_19.pdf

How Many?
Clap, snap, or stomp a set. Show me how many.
How many toes do you have? Show me.

Mystery Number
I’m thinking of a number between 4 and 6. Show me.
I’m thinking of a number two more than seven. Show me.

Math Facts
4 plus 2. Show me.
9 minus 3. Show me.

Number Stories
I had four pennies. I found three more. Show me how many I have in all.


Decompose Numbers – How many ways can you make seven?

Fact Families - Call out numbers in a fact family. Can children write the equations in that fact family?

Odd and Even – Sort the odd and even numbers.

Place Value - Put 3 in the tens spot and two in the ones spot. What’s the number?

Tap Happy
Children sit on the floor facing their partner. Place one set of the “show me” cards on the floor between them. The teacher calls out math facts or number stories. Who can tap the correct answer first? Keep score if you wish.


Hint!  For younger children start with 1-5.  For older children make cards 0-20.

Tuesday, February 14, 2017

I'M JEALOUS!

I'm jealous of all of you today. One of my sweetest teaching memories is the Valentine party. The children would be delighted as they opened their cards. "Oh, look! I got Mickey Mouse from Laura!" Those little paper cards were almost as good as the big expensive toys they got at Christmas.

It reminds me of one of my favorite quotes: "We are so busy trying to give children things we didn't have that we are failing to give them what we did have."

On this day we are giving children a memory that each of us had when we were growing up. A memory of a cupcake or cookie and an envelope filled with love. A memory of a classroom family being happy and enjoying the moment together.

Take a deep breath and enjoy all the LOVE today!!!


Monday, February 13, 2017

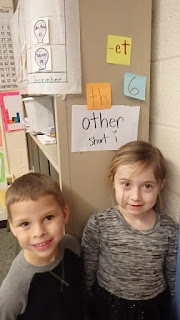
SKILL BASED 4 (SOMETIMES 5) CORNERS

Several weeks ago I wrote a blog about indoor games. Ginny McLay told me how she adapted 4 corners for different skills she was working on. It was such a great idea I asked her to tell you more about it.

This is a fun way to review skills. I place sticky notes and/or pieces of paper in 4 (or 5) corners in the room. I write the skills to be practiced on each paper.  (You can put the 5th corner in the middle of the room or in the middle of the wall.)
                           
For example: short e pattern word endings (en, et, ed, and one corner is labeled "other")

The kids walk to a corner. I close my eyes and pick a word. We tap it out together and then we spell it out loud together. While they are spelling it I type the word on the computer and it shows up on the screen for all to see. If they are in that corner they must sit down. The game continues as the kids move to another corner and I pick another word.
                          
This game can be adapted for other skills, such as short vowels, digraphs, etc.

For math put numerals in the corners and spell number words. For addition facts put the sums in the corner and say the addend.

They don’t even know they are learning!!! They want to play many rounds!!