photo 3am_dj_home_zps919fb85e.png photo 3am_dj_about_zps7cce4c75.png photo 3am_dj_website_zps73051235.png photo 3am_dj_ss_zps6759ec2a.png photo 3am_dj_bs_zps43e27832.png

Tuesday, February 13, 2024

SINGING DIRECTIONS

For some reason children seem to be more eager to follow directions when you sing what you want them to do.

Give Me a Clap
(Tune: “Addams Family”)
Give me a clap. (Clap twice.) Give me a clap. (Clap twice.)
Give me a clap, give me a clap,
Give me a clap. (Clap twice.)
Give me a snap. (Snap twice.) Give me a snap. (Snap twice.)
Now fold your hands and put them down
Into your lap. (Model putting your hands in your lap.)


Na Na Na Na

(Tune: “Land of a Thousand Dances”)
Na na na na, na na na na, (Wave hands in the air.)
Hey, hey, good job. (Hands on hips and then clap.)
Na na na na, na na na na,
Hey, hey, sit down. (Or whatever you want them to do.)


Name on Your Paper
(Tune: "Shine and a hair cut - two bits")
Name on your paper ~ first thing!
Where does it go?
At the top.
Where does it go?
At the top.
Name on your paper~ first thing!

*Add a verse that says, "Date on your paper - second thing!"

Make a Circle
(Tune: “Lassie and Laddie”)
We can make a circle, a circle, a circle.
We can make a circle and hold hands right now.
Hold hands with a friend, a circle never ends.
We can make a circle and hold hands right now.


If You Don’t Know What to Do
(Tune: “If You’re Happy and You Know It”)
If you don’t know what to do look at (child doing the correct thing).
If you don’t know what to do look at ---
She will show you what to do
So you can do it, too.
If you don’t know what to do look at ---.

Monday, February 12, 2024

R & R FOR THE BRAIN

If children are stressed and wound up, these strategies will help them relax and calm down.

Inhale – Exhale MAGIC CIRCLE
Directions: First, have the children take several deep, slow breaths. Ask them to place their hands on their diaphragm so they can feel their lungs expanding and contracting. Ask them to inhale through their noses and exhale through their mouths on a slow count of eight. For example: Inhale 2, 3, 4, 5, 6, 7, 8 ~ and exhale 2, 3, 4, 5, 6, 7, 8.


*Demonstrate how to make a “magic circle” by extending fingers and touching finger tips. Breath in and out through the “magic circle.”

*Pretend to hold a cup of hot chocolate and smell it as they slowly breath in. Pretend to blow out candles on a birthday cake as they slowly breath out.


Tighten and Relax
Directions: Help children release stress by tightening and relaxing different body parts.
Squeeze your hands tight as you can. Tighter. Tighter. Now relax.
Squeeze your toes tight as you can. Tighter. Tighter. Now relax.
Squeeze your arms…
Legs… Shoulders… Mouths… etc.

*Explain that when you say, “soldiers” they should stand as stiffly as they can. When you say, “rag dolls” they should flop over like a rag doll. Alternate saying “soldiers” and “rag dolls.”


“Eye” Can Focus

Directions: Demonstrate how to hold your two index fingers a few inches from your eyes on either side of your head. Look at the right index finger with both eyes and then look at the left index finger. Do this several times to improve attention.

                                      
Make Rain
Directions: Tell the children to do exactly what you do and they’ll get a surprise!
Tap right index finger to your left palm 10 times.
Tap right index finger and middle finger to your left palm 10 times.
Tap right index, middle, and ring finger to your left palm 10 times.
Tap right index, middle, ring, and pinky finger to your left palm 10 times.
Clap hands 10 times.
Clap hands and stomp feet 10 times.
(Reverse movements)
...Place hands quietly in your lap and smile.


Water Please!
Materials: water bottles
Directions: Did you know that every hour the brain needs water? Have children keep a water bottle at their desk and “take a swig” on the hour.


Silent Version
Directions: Lip sinc songs and the noise volume and energy level will decrease.


Sunday, February 11, 2024

HOW ABOUT A THINK PAD?

These THINK PADS are easy to make and can be used in multiple ways.

Stack 6 sheets of paper on top of each other. Staple each of the corners as shown. Cut vertically and horizontally in half to make four “think pads.” Make several dozen of these. To begin give one to each child. Keep the others in the writing center. Explain that if they do a lot of thinking and writing they are welcome to get another pad.


Notes
Children can use these to take notes as they listen to a book or watch a video. They can draw, write words, or simply scribble. Encourage them by commenting, “You’re taking notes just like the big kids do in high school and college! Isn’t it fun to know how to take notes to help you remember?” 


What can you find out?

Collect non-fiction books about a topic that you will be studying in your class. Place the books on a table along with think pads, paper, and pencils. Let two children work together and take notes to look in the books and see what they can find out (learn) about the topic.


Written Response
Older students can use think pads to write the answer to math problems or other questions.


Brainstorm
If children finish their work early they can brainstorm or doodle on their think pads.


Sticky Notes
Children also love sticky notes to write reminders to themselves, notes to friends, etc.
Note! Sometimes physicians or dentists will donate these to your class.

Saturday, February 10, 2024

INTEGRATING ART AND SKILLS

Don't we all need a little more beauty in our lives these days? Art is active, open-ended, and encourages children to think creatively and use their imagination.


Most of the time when we ask children to draw something they pick up a crayon and get going. Here are some tips that might help them plan their illustrations before they begin.

1st Explain that they should think about what they want to draw and plan how they are going to do it. Suggest they close their eyes and get a picture in their brain.

2nd Remind them to add details. Just like we add words to sentences to make them more meaningful, the more details you add to your drawings the more interesting they will be.

3rd An easy rule for children to follow is to ask them to use as many colors as they are in age. If you are five, you should use at least five colors in your picture. If you are six use at least six colors, and so forth. And, of course, “fill in the page” is always a challenge.

Hint! One teacher said she discovered that when she gave her students colored paper they were more likely to fill in the page. (Give it a try and let me know what you think.)

4th Compare and contrast illustrations. Show children several books with different illustrations. What media did the different illustrators use to make their pictures? Which illustrations do they like best? Why?

*Remind your students that they are illustrators, too!

How many different ways can you think of to use common materials like crayons or colored pencils in your classroom?

Skills - Instead of giving children worksheets, give them blank paper and challenge them to illustrate sight words, phonics, shapes, numbers, vocabulary, etc.


Comprehension - Draw what you learned from a science or social studies lesson.


SEL - Let children draw how they feel or express themselves on paper when upset.


Songs - Encourage children to illustrate favorite classroom songs and chants and then put them together to make a book.


Cards and Letters - Write and illustrate cards and letters to friends and family members.


Bulletin Boards - Use children's original work to decorate your bulletin boards, door, hallway, and so forth.

Note! What a clever way to display children's artwork!


Friday, February 9, 2024

EASY PEASY ART

Here are some simple art projects with crayons that can be adapted to any age or teaching situation. Sometimes adults think that kids should only do an art project one time. The interesting thing is that children will enjoy doing these activities several times.

Dancing Crayons
Materials: crayons, paper, music
Directions: Hold a crayon in each hand. Put on some music, and let the crayons “dance” on the paper.
*This would work well at the listening center using a variety of music, such as classical, country, march, lullaby, etc.


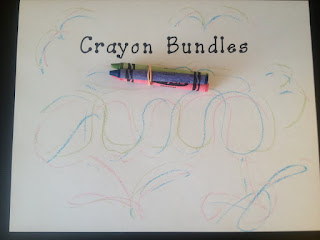
Bundles
Materials: crayons, rubber bands, paper
Directions: Wrap a rubber band around 3 or 4 crayons. Children can hold the “bundle” and draw a design or picture on their paper.


Dot to Dot
Materials: crayons, paper
Directions: Make a specified number of dots (six, ten, whatever) on a piece of paper. Exchange papers with a friend. Connect the dots. What does it look like? Add details to create an object or design.


Wiggles and Squiggles
Materials: crayons, paper
Directions: Have the children close their eyes and make a design on their paper with a black crayon. When they open their eyes, ask them to create something out of their design.
Adaptations: Have children exchange papers with wiggles and squiggles with a friend.


Folded Designs
Materials: paper, crayons
Directions: Have children take a sheet of paper and fold it several times. Next, open it and trace over the creases on the paper with a black crayon. Finally, fill in each section with a different color, design, or pattern.

Thursday, February 8, 2024

ART APPRECIATION

Aesthetic appreciation is probably not one of your standards, but I enjoyed introducing famous artists to my students. And the parents always got a kick out of their children talking about Picasso or Van Gogh. These strategies could easily be adapted to any teaching situation.

Art Appreciation 101

Each week choose a famous artist – anyone from Vermeer to Rockwell to Picasso. You can go online and download prints or check out books from the library. On Monday, give a little background about the artist and show one painting and give the title. Explain that artists always give a “name” or title to their work. “What title would you give this painting?” “What do you see?” “Why do you think the artist painted this?” “What do you think happened before?” “After?” “What do you think the people are saying?” “How does this painting make you feel?” “What materials did the artist use to create this picture?”


On Tuesday show another picture by the same artist. “Do you remember the title of yesterday’s painting? What do you think is the title of today’s painting?” Compare and contrast. “How are they alike?” “How are they different?”

Continue introducing a different painting every day.


*Use paintings to introduce new vocabulary words.
*Use paintings as springboards for writing stories or poems.
*Paintings can also be used for informative writing where children describe details.
*On Friday let children graph which painting they liked best. Why did you like that one? Is there one you did not like?

So, a funny thing happened because I was going to end this blog with an idea about Michelangelo. I was going to suggest you tell the children how he painted the ceiling of the Sistine Chapel on his back. Wouldn’t it be fun to tape paper under the table and let the children draw like Michelangelo? Well, guess what? That’s a myth. He actually stood up as he painted and then they attached the panels to the ceiling. You learn something new every day, don’t you?
*I still think it would be fun to tape paper to the bottom of a table and draw!


TIPS FOR ENCOURAGING YOUR CHILDREN TO EMBRACE THE ARTS!

Here's another great article from Laura Pearson that you can share with your families.

Photo via Pexels


Tips for Encouraging Your Children to Embrace the Arts


As parents, we strive to provide our children with well-rounded experiences that nurture their personal growth and development. One of the most powerful avenues for self-expression and imagination is the world of art. Whether it's painting, music, dance, or theater, the arts offer several benefits, including enhanced creativity, improved cognitive skills, and increased self-confidence. However, in today’s fast-paced world, it can be challenging to steer our children away from screens and towards artistic pursuits. That’s why Dr. Jean & Friends has compiled the following tips to help you encourage your children to embrace the arts.


Create a Multi-Purpose Arts and Crafts Room


Having a dedicated arts and crafts space in your home can go a long way toward fostering your child’s interest in the arts. A multi-purpose arts and crafts room provides an environment where your child can freely explore their creativity, focus on their projects, and immerse themselves in the artistic process. 


When designing your at-home art space, you’ll need to consider functional furniture and storage solutions, adequate lighting and ventilation, and child-friendly workspaces and seating options. You may also need to come up with some organizational solutions for art supplies, using storage bins, containers, or wall-mounted organizers to keep everything orderly. 


As you make further updates and modifications to your multi-purpose arts and crafts room, it's also essential to keep track of these changes for future reference. By documenting the improvements made, you can report them to an appraiser when selling your home in the future. Not only will this help showcase the added value of your property, but it can potentially secure a higher appraisal value by highlighting a dedicated creative space that might appeal to potential buyers.


Preserve and Share Your Children’s Artwork


Preserving your child’s artwork can provide your children with validation, recognition, and a sense of achievement that will encourage them to continue their artistic pursuits. Don’t have enough fridge space for all your children’s artwork? The Simplicity Habit suggests digitizing their creations to ensure they’re cherished for years to come. Scanning artwork is quick and convenient, especially if you want to share your children’s creations with friends and family. Just keep in mind that PDF files are ideal for sharing! Not only will digitizing your child’s artwork make it easier to share, but it will also safeguard their creations and preserve their artistic endeavors as lasting memories.


Explore Various Art Forms and Their Benefits


Exposing your children to various forms of art can help them discover their unique interests. For example, painting and drawing foster creativity, self-expression, and emotional development. Music is known for enhancing cognitive skills, memory, and emotional well-being. Dancing is great for boosting physical coordination and self-confidence, while crafting supports the development of fine motor skills and problem-solving abilities. Finally, acting or theater is fantastic for cultivating communication skills, empathy, and teamwork. 


By encouraging your children to have fun exploring various art forms, you’ll help them discover their strengths, express themselves, and find joy in the artistic journey. To get started, Artwork Archive suggests taking your children to art museums, plays, musical performances, and other displays of art in your community. When your child expresses interest in a specific art form, encourage them to give it a try! This might mean signing them up for private lessons, joining group classes, or simply purchasing some art supplies to use at home.


Encouraging your children to embrace the arts is a great way to nurture their creativity, boost their confidence, and enrich their overall development. By creating a dedicated arts and crafts room, digitizing your children’s artwork, and exposing your children to various art forms, you can help them discover their unique interests and support their artistic passions.


Whether you’re looking for educational tips or you just need a break, Dr. Jean & Friends is here to help! Feel free to post a reply if you have any questions


Wednesday, February 7, 2024

GET ON MY CLOUD!

You can spend a lot of money on science equipment for your classroom, or just go outside and look up in the sky and you’ve got a lesson no matter what your teaching situation might be.

Clouds, glorious clouds! They change daily and are great way for you students to be scientists as they observe, predict, and record.

Let’s Get Started

Ask your students what they know about clouds.

Are all the clouds the same?

Why are there different kinds of clouds?

Why are most clouds white?

What makes clouds move?

HOW CAN WE FIND OUT?
This is a perfect springboard for demonstrating how to find new information by searching on the internet, going to the library, asking their parents, and so forth.

My Cloud Book
Fold 2 sheets of paper in half and staple to make a cloud book for each child. Ask them to write the name of a different cloud on each page and illustrate it. (Older children could write descriptive sentences.) On the last page ask them to name their favorite cloud and tell why they like it.


Class Graph
Each day look at the sky and graph the type of clouds in the sky.

Flip Book
Make a flip book with the four basic clouds. (Put “flip book” in my search engine to see how to make this book.)


Cotton Clouds
Challenge children to make the different types of clouds out of cotton.


Types of Clouds

Cirrus Clouds
Cirrus clouds look like wispy streaks high up in the sky. If the sky is blue with a few cirrus clouds it’s going to be a nice day.

Cumulus Clouds
Cumulus clouds look like puffy white cotton balls in the sky. When they turn dark it means it’s going to rain.

Stratus Clouds
Stratus clouds look like a dark blanket in the sky. Look for rain or snow when it is cold.
Nimbus Clouds (Also known as cumulonimbus)

Nimbus Clouds (Also known as cumulonimbus.)
Nimbus clouds are dark and have rain or snow falling from them.

*FOG
Can you walk through a cloud? Yes, you can! Fog is a cloud on the ground so when you walk in the walk you are walking through a cloud!

Homework
Look at the sky with your parents. Name the cloud formations that you see.