photo 3am_dj_home_zps919fb85e.png photo 3am_dj_about_zps7cce4c75.png photo 3am_dj_website_zps73051235.png photo 3am_dj_ss_zps6759ec2a.png photo 3am_dj_bs_zps43e27832.png

Friday, May 31, 2019

CIRCLE TIME UNPLUGGED

I’m so excited about my June blog posts because it’s like passing on a lifetime to the next generation. You know I’ve been at this rodeo a LONG time, but before they put me out to the pasture, I want to keep all the ideas I’ve gleaned along the way alive and I want them available for you. I am a broken record saying, “THE WORLD KEEPS CHANGING, BUT CHILDREN ARE THE SAME.” The activities I used in my classroom years ago will still work for you today. You can call it circle time, or morning meeting, or anything you want, but the bottom line is it’s a special way to start your day.


What if someone says that circle time is a waste of time?

What would you respond? Do you really think it’s a waste of time? Most of us who have actually sat in a circle with our children to start the day realize it is MAGIC! It is the way to connect with your children, nurture your classroom family, develop social /emotional skills, and set the stage for the day. Since standards and skills are driving education, take a look at these skills that can be nurtured in a natural way at circle time.

Oral language– Children learn to feel comfortable talking in a group and expressing their thoughts and opinions. They also learn to listen to their classmates and respect their ideas.

Literacy skills– Alphabet songs, phonological awareness activities, choral reading, nursery rhymes, finger plays, daily message, and classroom print can be highlighted at circle time.

Math concepts– Talking about the calendar, counting the friends present, comparing sizes, or discussing shapes can be a meaningful part of circle time.

Executive function– As children learn to sit quietly and participate in a group they are developing self-regulation. There is also a beginning and an end to the routine.

Classroom management– This is a time when the teacher can reinforce simple skills, explain classroom activities, review the daily schedule, and model expectations.

Social skills– Learning to take turns and listen to classmates is expected in circle time. As children sing songs together or say rhymes or finger plays they can have fun with their friends. At this group time you can brainstorm classroom problems – tattling, hurting someone’s feelings, pushing in line, etc.

Emotional skills– In circle time all children can be accepted and valued for their individuality. Feelings that we are all different, but that’s O.K., are of primary focus.

Physical skills– Dances and movement songs release wiggles and oxygenate the brain. Cross-lateral activities activate the brain and get it ready to learn.

Science Social Studies– Talking about the weather, the leaves changing colors, the different ways families celebrate, classroom pets, and real events in the children’s world are meaningful topics at circle time. Specific themes and units of study can also be integrated into this large group time.

Fall in Love with Books- Circle time can be used for book walks, talks, themes, and bibliotherapy.


“OLD SCHOOL” CIRCLE TIME TIPS

GET UNPLUGGED - Circle time should be a natural time when you look the children in their eyes and give them 100% of your attention. Let this be an AUTHENTIC time when it’s just YOU and the CHILDREN! Be in the moment!

Harvest These Ideas- Each class is different and unique. Get to know your kids and adapt activities to stimulate them and create interest.

Intentional Teaching– What’s the point? Think of your goals and objectives and then make a plan. What age do you teach? What is their skill level?

Balance – Integrate activities where children sit and then let them stand and wiggle. Sometimes they need to be quiet and listen, and sometimes they can be encouraged to talk.

Hands-on– Try to provide multi-sensory experiences to activate different pathways to the brain. Finger plays, movement songs, handshakes, and real objects will engage children more than watching a video.

Vary the stimulus– Yes, you want to have a basic routine to give children security and help them feel comfortable, but you need a little spark each day to keep them focused and curious.

Model, Model, Model! Children learn more from your actions than your words. Model sitting quietly, listening attentively when a child is talking, being enthusiastic with your facial expressions, and making the motions for the songs and finger plays.

Quit while you are ahead! Don’t make circle time too long! Start with 10-15 minutes and then extend it as the year goes along. They will let you know by their body language when they’ve had enough!

Follow a basic routine.

     Good Morning Song
     Handshake
     Morning Message/Review Schedule
     Calendar and Weather
     Pledge, Rules & Mantra
     Active - Skill Songs
     Concept Lesson – Theme

You might also want to highlight a different area of the curriculum each day of the week.

Marvelous Monday– Teach a new nursery rhyme or finger play. Practice it each day at circle time.

Terrific Tuesday– What’s in the news? Introduce social studies concepts of interest to the children. Discuss friendship and showing kindness. Brainstorm what to do about classroom behavior issues.

Wonderful Wednesday– Focus on oral language with show and tell, echo chants, and phonological awareness games.

Thrilling Thursday–
There’s always something interesting outside your classroom door that your children will be interested in. Each season brings new experiences and objects to observe.

Fabulous Friday– Just for fun! Play a silly game, have a dress up day (silly socks, shirt of favorite sports team, etc.), be DJ and play favorite songs, etc.

During the month of June I’m going to share some activities that I did in my classroom, as well as ideas teachers have shared with me over the years. Pick, choose, adapt, change, delete – they are free and they are yours to do as you will. My hope is that you’ll be a little more excited to start the new school year and have some fun as you make plans so EVERY DAY WILL BE THE BEST DAY EVER!

Thursday, May 30, 2019

LET'S GO CAMPING!

I CAN'T WAIT TO SEE YOU THIS AFTERNOON!
FACEBOOK LIVE AT FIVE!
(IF YOU'RE BUSY YOU CAN CATCH ME LATER.)

The world keeps changing, but children are the same!  They love to build tents, hide in tents, read in tents, and play with friends in tents.  You can make these tents in your classroom or outdoors with your own children this summer.  Give them a blanket, box, pillows, and let those engineering skills begin!

Card Table Tent
Drape a blanket over a card table or picnic table. Spread a sleeping bag on the ground for a cozy retreat.


Porch Railing Tent
Pin one end of a blanket to the railing of a deck or porch. Pull out the opposite end and secure at an angle with bricks or rocks. This is a "cool" place for a game or nap from the summer sun.


Cardboard Castle
An appliance box or other large box can be a "castle" to a child. Cut out doors and a window with a utility knife. (An adult will need to do this!) Let the children decorate with paints, markers, or crayons.

Here's another cool project you can do with a cardboard box.


Car Wash 
Cut the top and bottom out of an appliance box and place it on its side so it looks like a tunnel. Cut the bottom off of a large plastic garbage bag. Cut up the seam on one side to open the bag. Cut 2" strips up from the bottom of the bag stopping 3 inches from the top of the bag. Tape the garbage bag to the top of the box to create the swishers, then let the children ride their toys through the box. 


Back Pack 
You will need a grocery sack, a small piece of Velcro, and two strips of fabric cut 2” by 24” for this project. Cut off three sides of the sack half way down. Fold down the remaining side and secure with Velcro. To add straps, cut four 2 ½” slits on the back. Thread the strips of fabric through that and tie the ends in knots. Let children decorate with markers or crayons. 


Come back tomorrow for some snacks your campers will enjoy.

Wednesday, May 29, 2019

FATHER'S DAY

FACEBOOK LIVE AT FIVE TOMORROW AFTERNOON.
PLUG IN FOR CIRCLE TIME "UNPLUGGED"!

Father’s Day isn't until June 16th, but here are a few ideas for those of you who like to plan ahead.  Your students, children, and grandchildren can all use these to make it a special day.

Breakfast in Bed
Give each child a 2 ½” circle and ask them to draw their father’s face when he is sleeping. Glue this to the top of the flat side of a paper lunch sack. Next, cut 4 ½ ” x 6” pieces of plaid or striped wrapping paper or wallpaper. Let children glue this to the sack under the sleeping head so it looks like their dad is in bed. Finally, let children make a card with this poem:


            Breakfast in Bed
            Since it is Father’s Day
            I have something to say.
            Don’t lift your head.
            Have breakfast in bed!
            In the bag you will see
            Breakfast prepared by me!


Let children make muffins or another breakfast goodie and place it in the bag. Punch a hole in the top and tie on the card with a piece of ribbon.

Shirt and Tie Card
Fold a sheet of paper in half. Cut in several inches from each end about 1” down from the fold as shown. Bend each corner down to look like the collar of a shirt. Add buttons, a tie, and a special message inside.


Belt or Key Rack
You will need scraps of wood (2x4x10 works well), nails, and hammers for this project. Let children decorate the wood with paints or markers. Next, let them hammer 4 or 5 nails in the wood. Attach a hanger to the back.

Tie Holder
Let children cover a cardboard roller from paper towels with masculine wrapping paper. Insert a 24” piece of string and knot the ends so it can be hung from a nail to hold ties.


He’s My Dad  (Happy Everything CD)
Dad-o, dad-o, he’s my dad and I love him so.
Dad-o, dado, he’s my dad and I love him so.
Works all day and he comes home tired,
He’s my dad and I love him so.
Still plays with me in the yard.
He’s my dad and I love him so.
Dad-o, dad-o, he’s my dad and I love him so.
He reads to me and we laugh and play.
He’s my dad and I love him so.
Helps me do my best each day.
He’s my dad and I love him so.
Dad-o, dad-o, he’s my dad and I love him so.
Dad-o, dad-o, he’s my dad and I love him so. 
Note! This is a great opportunity to talk about different kinds of families. Some children may not have a father living with them, so those children can make a gift for a grandfather, uncle, or other special friend.

Tuesday, May 28, 2019

WE LOVE OUR FLAG!

Note! I'm doing June holidays early because I have something very 
SPECIAL for my June blogs!
I'll tell you all about it this Thursday (5/30) when I do
Facebook Live at Five!


We will celebrate Flag Day on June 14, but here’s a song you can sing all year to prompt your class before saying the Pledge of Allegiance.

We Love Our Flag 

(Tune: “Farmer in the Dell”)
We love our flag.
We love our flag.
We love America
And we love our flag.

Red, white, and blue,
The colors of our country’s flag
Are red, white, and blue.


50 stars of white
On a field of blue
Stand for 50 states
Where we live, it’s true. 


Thirteen stripes
In red and white
Stand for the colonies
For freedom they did fight. 


We love our flag…

* Use the words in the song to explain the meaning of the stars and strips.

Here’s the link to download the book:
http://www.drjean.org/html/monthly_act/act_2007/06_Jun/1booksJun/WeLoveOurFlag.pdf


AmeriCANS
Check out this video to learn another song about our flag. The last verse is my favorite:
We are all Americans
And so we always say I CAN!
We try and do our best
Because we are Americans.

https://www.youtube.com/watch?v=yuhI_GXyF90

Flag Etiquette
Teach children flag etiquette and the importance of not dragging the flag on the ground.

Design a Flag
Give children a sheet of white paper and the scrap box and let them design their own flags.


Art Parade
O.K.  If you've read to the end of this blog, I've saved the best idea until last.  Whenever your class completes an art project let them "parade" their creations around the room.  Put on some catchy music and they can walk around in a circle holding up their work.  It's so funny because they really think they are "special."

Monday, May 27, 2019

A DAY TO REMEMBER

I was walking yesterday afternoon and I said, "Happy Memorial Day," to a gentleman as I passed by.  He replied, "You know, it's not a very happy day."  And as I thought about it, I realized it is a sombre day - a day to mourn and remember all those who died for us.  But   
I also think that those who died for us would like us to be happy and enjoy the day...  remember them with gladness because we have FREEDOM thanks to them.

For most of you Memorial Day means that summer is here and it’s time to get out those white shoes, the sprinkler, and the grill. However, I think it’s important to take a minute today and think about the real meaning of this holiday.

Memorial Day was originally called Decoration Day because people decorated the gravesites of those who died during the Civil War. After World War I, it was extended to include all the women and men who died during military service.

The poppy has become a symbol of Memorial Day due to Moina Michael’s Poem “In Flanders Fields” (1915).


     We cherish too, the Poppy red

     That grows on fields where valor led,

     It seems to signal to the skies
     That blood of heroes never dies.


Attending parades, visiting military gravesites, or decorating with flags are traditional ways to remember those who died serving our country.

Check out this website to learn more about Memorial Day:
http://www.va.gov/opa/speceven/memday/


Whoever you are…wherever you are…take a few minutes today to PLAY! Do something that makes you happy! Do something that makes you glad to be alive! And, please, take a few minutes today to remember all the brave men and women who died serving the United States Military so that we could be free and happy today!!!

Facebook Live Thursday at Five
CIRCLE TIME (UNPLUGGED)

Sunday, May 26, 2019

SEA SCIENCE

If you're going to the beach this summer save some shells and sand.  If you're not going to the beach you can still do these science activities.

                               
Sink and Float 
You’ll need a file folder, tub of water, and a collection of small objects (pencil, crayon, paper clip, ball, block, pebble, leaf, etc.) On one side of the file folder write “float” and on the other side write “sink.” Children place the items according to whether they think they will float or sink. They can then test each object by putting it in the water and readjusting where it should go.

Beach Bottle 
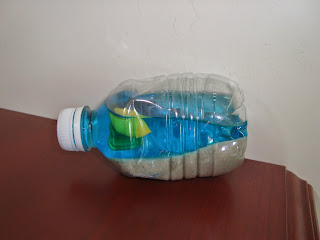
Put ½ cup sand in a bottle. Add some shells and fill half way with water. Add a drop of blue food coloring. Make a small fish from Styrofoam or a water balloon.


Wave Bottle
Fill 2/3 full with water. Add a drop of food coloring. Fill to the top with vegetable oil or Baby oil. Slowly rotate the bottle on its side to make waves.
*Add glitter if you like.
                                                     

Sand Collections 
Collect sand from various beaches in jars or bottles and label. Children can use a magnifying glass to observe the contents. How are they alike? How are they different? 

*They could do descriptive writing about what they see in the bottle.
*A good way to get sand samples is to have children write friends and relatives who live near a lake or ocean and ask them to sand a small bag of sand to their class. (Be aware that there are some restrictions as to sending natural objects into the continental 48 states.)


Research
Purchase a bag of shells from a dollar store and put it out with a book about seashells. Children can look through the book and identify the shells.


Saturday, May 25, 2019

GOING ON A PICNIC

Who wants to go on a picnic this weekend?      


Going On a Picnic
(Children stand and repeat each line.)
We’re going on a picnic. (Slap hands on thighs to the beat.)
We’re going to pack a big one. (Arms out wide.)
With sandwiches, cookies, and lemonade, too. (Pretend to pack in your basket.)
Look over there. (Hand over eyes.)
It’s some tall grass.
Can’t go over it. (Hands up in the air.)
Can’t go under it. (Hands down low.)
Can’t go around it. (Circle hands around in front of body.)
I guess we’ll go through it. (Shrug shoulders.)
Swish, swish, swish, swish! (Brush palms against each other.)

Look over there. (Hands over eyes.)
It’s a lake…
I guess we’ll row across it.
Row, row, row your boat. (Pretend to row a boat.)

Look over there. (Hands over eyes.)
It’s a swamp…
Ooeey, gooey, ooey, gooey. (Pretend to tiptoe through mud.)

Look over there. (Hands over eyes.)
It’s a park. (Pretend to point at different things.)
It’s nice and shady.
It’s got a picnic bench.
We’re all so hungry
Let’s go eat! (Pretend to eat.)
Mmmmmmmm! (Pat tummy.)


*Go to my May, 2013, website post to download a free copy of this song:
http://www.drjean.org/html/monthly_act/act_2013/05_May_css/index.html

Story Map
Let children make a map showing the different places they passed on the way to the picnic.

Picnic Book
Fold a sheet of construction paper in half. Punch two holes by the top fold and insert a pipe cleaner to make a handle. Children can write stories about going on a picnic inside or they can draw foods they’d like to take on a picnic.


Dramatic Play
Prepare a dramatic play kit for a picnic with a tablecloth (or towel), cups, plates, napkins, and plastic cutlery.
*Brainstorm all the fun things you can do on a picnic.

Animal Picnic 
What kinds of food would animals take on a picnic? Write their suggestions on the board. Let children circle the foods that they eat as well. Plan an animal picnic with carrots, celery, apples, nuts, berries, etc. for snack.


Friday, May 24, 2019

OUTDOOR ART

A bucket, a brush, and some water and you'll have one of the best outdoor art experiences ever!!! My kids would spend hours (well, actually minutes) painting playground equipment, trees, the sidewalk, etc. They were very "sincere" about their painting and were totally engaged. The best part was clean up!


Here are a few more art projects that are great to do outside.

Window Painting
Materials: shaving cream (non-menthol)
Directions: Squirt shaving cream on windows and let children fingerpaint. Clean up is easy with a hose.

Bubble Painting
Materials: several bottles of bubbles, food coloring, large sheets of paper, clothes pins
Directions: Clothes pin paper to a fence. Add food coloring to the bottles of bubbles. Children blow the bubbles on the paper and watch them "pop" into designs.

              
Fly Swatter Painting
Materials: ink pad, paper, paint, paper plates, fly swatter, clothes pins
Directions: First, let children make insects by pressing their index finger on the stamp pad and pressing it on the paper. Attach the paper to the fence. Put a small amount of paint on the paper plate. Children get to dip the fly swatter in the paint and swat at their insects.

P.S. I cut a hand shape out of my fly swatter for this activity.
                                                  
Nature Prints
Materials: paper, paint, paper plates, paper towels, flat natural objects
Directions: Fold the paper towels and place them on the paper plates. Pour a little paint on the plates. Encourage children to find flat natural objects, such as leaves, flowers, ferns, feathers, etc. Children press the objects in the paint and then press on the paper to make prints.
                 

Tissue Fade
Materials: tissue paper, white paper, spray bottles of water, sunny day
Directions: Cut or tear the tissue paper into pieces. Place on the white paper. Spray with water and place in the sun. When dry remove the tissue paper to see your faded design.
                                              

Thursday, May 23, 2019

UP IN THE AIR

It’s almost summertime and that means the planes will be full of some happy children, some screaming children, some bored children, and some entertained children!  It befuddles me how some parents don't have a clue when it comes to interacting with their children.  This is a blog I wrote several years ago, but you might want to share it with your families.  What a missed opportunity to just hand an electronic device to a child and miss a wonderful conversation and memory!

An ounce of prevention is worth a pound of cure when you travel with children.  And if you’ll read these tips, I bet your fellow passengers will thank you for being on top of the game!  Take advantage of the one-on-one time with your child by giving them 100% of your attention.  After all, isn’t that what children want most from adults?

Planning Ahead
Several days before the trip start talking about your adventure and give details about what is going to happen.  Have children close their eyes as you describe the trip – checking in at the airport -  going through security -  waiting for your flight to be called – getting on the plane and fastening your seatbelt – taking off – looking out the window – landing – how much fun you’ll have on your vacation, etc.  Explain that there are many other people who will be sharing a small space on the plane and that everyone needs to be respectful and use their best manners and quiet voices.  The pilots and flight attendants are there to keep everybody safe, so you will have to listen carefully to them.


Packing
Let your children pack a bag full of special objects that they want to carry on the plane.  (You’ll have to give some guidelines for this so they don’t try and bring their entire collection of stuffed animals.)  A few books, a tablet and markers, a card game, a bedtime buddy or blanket, and some healthy snacks should do the trick.  You might also suggest a change of clothes, tissues, and bandaids in case of emergencies.
Note!  I did not suggest a computer or IPad.  Parents, you can pack this in your bag and save it for emergencies.  Too often children play with these while waiting for their flights to take off and then they are bored by the time they get up in the air.
                                          

Waiting
After going through security, walk around and look out the windows at the other planes.  Look at all the passengers and guess where they might be going.  Talk about special things that your child hopes to do on the trip.   If the flight is delayed you can play “I Spy,” “Tic Tac Toe,” “Hangman” or another quiet game.  Oh, and don’t forget a last minute stop in the restroom!

Taking Off
When boarding a plane, you’ll find most pilots enthusiastic about meeting children and letting them take a “peek” inside the cockpit.  Can your child find her own seat?  Once seated, encourage your child to explore her space.  (It’s fine to open and shut the window shade a few times, look in the seat pocket, talk about the airsick bag, etc.)   Playing with the flight attendant call button is NOT ALLOWED!  When the boarding door has closed, then everyone must buckle up!


Up in the Air
Once you are in the air, it’s time to open the backpack and read some books, play a game, draw some pictures, or eat a snack.  Too often children have gone through their bag of tricks before they get in the air.   If a beverage is served, show your child how to put down their tray and discuss their selection.  Keep on talking and engaging your child.

O.K.  Now, it’s time to get out the iPad or computer and watch a movie.  Wait until the last possible moment to do this.  This is like the 8th inning stretch on the plane.  (I might also recommend a bag of M & M’s – for emergencies only!)  Before you know it you will hear those magic words, “Please make sure your seatbelt are fastened.  We will be landing shortly.”  

Remember, YOU are the parent and you are directing this event.  With a happy, positive, attitude you’ll have a great flight and the other passengers will as well!  How many opportunities do you have to give your child 100% of your attention?  That may be the best part of your trip! 

Wishing you happy travels!
                                                 

Wednesday, May 22, 2019

A FISHY TALE


How about a “fishy” tale today?

You will need a file folder and 2 orange, 1 red, 1 yellow, 1 blue, and 1 black sheets of construction paper. Trace a fish shape on one side of the file folder and cut it out. Color around the fish so it looks like an ocean. Tape the sides of the folder together. Cut the construction paper into 7” x 9” rectangles. Place the construction paper behind the fish cutout in this order: orange, red, yellow, blue, black, and orange. Glue the words to the story to the back of the file folder so you can read it as you remove one sheet of paper at a time. Encourage the children to join in on the chant.


Once there was an orange fish named Mitch who could change his color with the swish of his tail.  All he had to say was:  
            I’m Mitch the fish.
            I swim and I swish.
            And I can change my color
            If I wish.


One day he was swimming around on the ocean floor and he saw a red lobster.  He thought it would be fun to be a bright color like the lobster so he said:
            I’m Mitch the fish.
            I swim and I swish.
            And I can change my color
            If I wish.

Suddenly he turned red.  (Remove the orange sheet of paper to make Mitch red.)  The lobster said, “I’m the only sea creature who can be red.  I’ll snap at you!”  So Mitch decided he didn’t want to be red anymore.  Just then he saw a yellow starfish and he said:
            I’m Mitch the fish.
            I swim and I swish.
            And I can change my color
            If I wish.

And with a swish of his tail Mitch turned yellow. (Remove the red paper to show the yellow.) The starfish said, “I’m the only creature who can be yellow. I’ll prickle you!” So Mitch decided he didn’t want to be yellow anymore. Mitch saw a blue whale and decided it would be fun to be blue so he said:
I’m Mitch the fish.
I swim and I swish.
And I can change my color
If I wish.

The whale said, “I’m the only creature in the sea who can be blue. I’ll spout water on you!” Mitch thought it might not be a good idea to be blue, so when he saw a shark he decided to be black and he said:
I’m Mitch the fish.
I swim and I swish.
And I can change my color
If I wish.

Well, you know the shark didn’t like Mitch being black and he said, “I’m going to get you!” Finally Mitch said:
I’m Mitch the fish.
I swim and I swish.
And I can change my color
If I wish.

And he turned back into being an orange fish again. Because being yourself is the very best thing that you can be!


https://drive.google.com/file/d/0B1SnEagA4jljR2tvSnFBVHNNcDg/view?usp=sharing

Flying Fish
You can make a little flying fish from a strip of paper cut 8 ½” x 1 ½”. Cut slits halfway through near each end as shown. Hook the tabs together, toss it in the air, and watch your fish fly!


Tuesday, May 21, 2019

BEEN FISHING?

Children are fascinated by the thought of going fishing. Although, most of them won't actually get to put a worm on a hook and catch a fish, they'll still have fun with these activities.

Have You Ever Been Fishing?   (Tune: “Turkey in the Straw” - Keep on Singing CD)
Have you ever been fishing (Pretend to fish.)
On a bright and sunny day, (Circle arms like the sun.)
When you see those little fishies (Fold hands and wiggle.)
Swimming up and down the bay?
With their hands in their pockets (Put hands in front.)
And their pockets in their pants. (Put hands in back.)
All the little fishies do the (Hands on hips and wiggle.)
Hoochie coochie dance!

*Sing fast, faster, and super duper fast!

Catch a Fish
Staple an 18” piece of string to the end of straw. Let children make fish out of construction paper and tie to the other end of the string. They can use these as they sing the song.


Catch and Eat
Give children a pretzel rod, some gold fish crackers, and a spoonful of peanut butter. Children dip the end of the rod in peanut butter and then catch a fish. 


Here's a poem to say as they fish:
     

     Down by the ocean,
     What did I see?
     Five little fishes smiling at me.
     Along came (child’s name)
     With a fishing pole one day.
     He/she caught a fish and ate it right away.


Fish Finger Play 
1, 2, 3, 4, 5, (Slowly hold up one finger at a time on right hand.)
I caught a fish alive. (Clap hands together as if catching a fish.)
6, 7, 8, 9, 10, (Hold up fingers on left hand.)
I let it go again. (Open palms and pretend to release.)
Why did you let that fishy go? (Shrug shoulders.)
Because it bit my finger so. (Hands on hips.)
Which finger did it bite? (Shrug shoulders.)
The little finger on my right. (Hold up pinky on right hand.)

Hint! Talk about double meanings of words by explaining what a "school" of fish means.


Paper Plate Fish
You will need paper plates, brad fasteners, markers, and crayons for this project. Cut a triangle out of the paper plate to be the mouth of the fish. Attach the triangle to the back with the brad fastener to make the tail. Color with crayons or paint with water colors.

Hint!  Tie in "greater than" and "less than" with the fish's mouth.

Five Little Fish
(Tune:  “Down in the Meadow in the Itty Bitty Pool” - Silly Songs CD)
No little fishies swimming in the sea,      (Hold up fist.)
Splishing and a splashing           (Pretend to swim.)
And a rocking to the beat.
Here comes a little fishie, (Wave.)
Oh, say, “hello.”

One little fishie swimming in a row.   (Hold up one finger.)

One little fishie… (Hold up one finger.)
Two little fishies… (Hold up two fingers.)
Three little fishies… (Hold up three fingers.)
Four little fishies… (Hold up four fingers.)
Five little fishies… (Hold up five fingers.)

*Choose 5 children to act out this song.

*Make fish puppets from old socks.  Glue on googly eyes, fins, and a mouth as shown.  Let wear these as they act out the song.

*Make fish out of felt and use on a flannel board to demonstrate addition and subtraction.


Go Fish Game
Everybody knows the “Go Fish” card game, but you can play a similar game to reinforce skills. Tie a 3’ string to a stick. Tie a magnet to the other end of the string. Cut fish out of fun foam or construction paper and write letters, numerals, words, math facts, or whatever skill you are working. Insert a brad fastener for the eye of the fish and spread out on the floor. The children take the pole and pretend to catch a fish. Can they identify the information on the fish they catch?
                          

Monday, May 20, 2019

LET'S MONKEY AROUND!

If you can't beat them - then join them!  I know you've definitely got a room full of monkeys this time of year~

Caps for Sale
This was always one of my favorite books to read to my class. It was such fun to let the children be the monkeys and act out the tale. We did this in the classroom as well as outside on the playground equipment.

Monkey on a Swing
Cut a sheet of paper as shown. Roll down the top section and staple to make the monkey’s head. Decorate with markers or crayons. Glue on a tail. Staple the monkey’s hands to a straw and watch him swing.


https://drive.google.com/file/d/0B1SnEagA4jljN2VCWmU2VkxGOWc/view?usp=sharing

Compare and Contrast
Get several copies of Curious George books. Compare and contrast George’s adventures. How are they alike? How are they different? Could those adventures really happen?


*Show a video of a Curious George book and then read the paper version.  Let children vote on which one they like best.  (You might be surprised!!!)

Five Little Monkeys 
Five little monkeys jumping on the bed. (Hold up five fingers.)
One fell off and bumped her head. (Touch your head.)
Momma called the doctor and the doctor said, (Pretend to hold a phone.)
“That’s what you get for jumping on the bed!” (Point finger.)
Four…three..two…one…
No little monkeys jumping on the bed.
They are sick with broken heads!

*Change the number of monkeys in the song. Children will also get a kick out of saying, "Five little mommies jumping on the bed..."

Monkeys and Alligator  (Dr. Jean & Friends CD)
Five little monkeys swinging from a tree, (Hold up five fingers.)
Teasing Mr. Alligator, “Can’t catch me.”
Along came Mr. Alligator quiet as can be,
And snatched a monkey right out of that tree!
Four little monkeys… (Hold up appropriate number of 
Three…two…one… fingers on hand.)
“Missed me, missed me. (Stick thumbs in ears and tease.)
Now you gotta kiss me!”


https://www.youtube.com/watch?v=gBGvyUG7uNY

Monkey Tail Sandwich
You will need:
     Hot dog buns
     Bananas
     Peanut butter (or substitute)

      
1.  Wash your hands.
2.  Spread peanut butter in the bun.
3.  Peel the banana and insert it in the bun.
4.  Yum! Yum!


Hint!  We usually made these with half a banana and hotdog bun because it was too big for the children to eat for snack.

Sunday, May 19, 2019

ANIMAL CRACKERS

Some things like animal crackers never go out of style!

Animal Crackers 
By Dr. Holly
Lions, and tigers, and bears, oh, my!
In my box that’s what I spy.
Take them out.
Should I run?
No, I’ll eat them!
Yum! Yum! Yum!

Descriptions
Pass out an animal cracker to each child. Encourage them to write descriptive sentences about their cracker. I see… I smell… I feel… I hear… I taste!


Tag Along Book
Cut the front and back off a box of animal crackers. (Be sure and leave the string attached.) Cut paper the size of the box. Give each child a sheet and ask them to draw a zoo animal or write a description of a zoo animal. Put their pictures between the front and back of the box and staple to make a book.
Hint! This is called a tag along book because they can hold it and it will tag along with them!

Math
Use zoo animal plates for simple addition. Children make sets in each ear and then join them together and count the sum. You can use math counters, buttons, popcorn, or cereal.


Vocabulary
What does it mean to be a carnivore? Herbivore? Omnivore? What are you? Do some research to find out eating habits of different zoo animals.

Sorting
Use animal crackers, toy animals, or pictures to sort zoo animals. Ask children what sorting rule they used. Can they think of another way to sort the animals?

Put Me in the Zoo
Do a language experience chart where children fill in the sentence:
If I were in the zoo I would be…
Let them draw pictures of which animal they would like to be. Why did they choose that animal?

Zoo Treats
                                   
You will need graham crackers, animal crackers, and peanut butter to make this snack. Children put a small amount of peanut butter on the graham cracker and stand animal cookies up on it.


*You can using icing or cream cheese for children with peanut allergies.

Saturday, May 18, 2019

WE'RE GOING TO THE ZOO - WON'T YOU COME, TOO?

I love to go to the zoo.  Our family is actually going to the San Diego Zoo for vacation this summer.  I can't wait!!!  Whether you take a field trip to the zoo or an imaginary trip on the internet, I've got some activities that children will enjoy.  Many of these ideas could be adapted to literature (poems or riddles about zoo animals) or informative writing and science (habitats, body covering, babies, food).

We’re Going to the Zoo
(Tune:  “The Bear Went over the Mountain”)
We’re going to the zoo.
Won’t you come, too?
                                            
The elephants swing their trunks.  (Stick out one arm like a trunk
The elephants swing their trunks.   and stomp from side to side.)
The elephants swing their trunks.
And we can do it, too.

*Insert other animal names and these motions:

Kangaroos jump around…  (Bend elbows like paws and jump.)
Bears put all fours on the ground…(Put hands and feet on ground and walk.)
Giraffes walk on tippy toes…(Stretch neck and walk on toes.)
Zebras gallop to and fro…(Gallop in place.)
Snakes slither and wiggle…(Wiggle as you go up and down.) 
Penguins wobble and jiggle…(Palms out by sides and wobble.)


Guess Who?
Let children take turns pantomiming different zoo animals as their friends try and guess who they are.
                                                  
(I couldn't resist using this picture. My mother made this lion costume for my son when he was four. K.J. and Kalina both had fun playing in it when they were little.)

Zoo Animal Puppets
Let children create their favorite zoo animal from a lunch bag, paper plate, craft stick, or envelope.
               

Animal Cheers
Seal of Approval – Extend arms in front of you and cross them over each other.  Clap as you make a barking noise.
Elephant Cheer  - Stick one arm out straight from under your chin.  Put top lips over bottom lip as you blow and make a trumpeting sound.
Snake Cheer – Palms folded together next to your chest.  Keeping them together wiggle them out as you make a “Ssssss” sound.  Stick your tongue quickly in and out of your mouth.
Tiger Cheer – You’re GGGRRREEEAAATTT!  (Stick fist in the air.)

Imagination Bag
Give each child an empty lunch bag.  Demonstrate how to open the bag and ask them to do the same.  Explain that you are going to take an imaginary trip to the zoo.  Ask them to look in their bags to see what they can find.  Encourage children to name the animals in their bag as they create an imaginary zoo on the floor in front of them.

Matching Game
Make a matching game where children match up mother zoo animals and their babies.  Can they tell you the names for the different animal babies?  
*You could also play a memory game with these cards.
Hint!  I found my pictures at google images.