photo 3am_dj_home_zps919fb85e.png photo 3am_dj_about_zps7cce4c75.png photo 3am_dj_website_zps73051235.png photo 3am_dj_ss_zps6759ec2a.png photo 3am_dj_bs_zps43e27832.png
Showing posts with label science. Show all posts

Monday, May 18, 2026

WRITE RIGHT OUTDOORS

What better place to do REAL writing about REAL experiences than out on the playground!

Cameras
Cut 5" off the top of lunch bags. Give children scrap paper and markers to decorate like a camera. (Oops! Some of them might not know about cameras any more so you might need to explain that to them!!) Punch holes and tie on string so the camera can be worn around the neck. Cut 4 1/2" squares and place inside the camera. Take children on an nature walk and invite them to take "photos" of things they see. When you return to the classroom ask them to draw their favorite thing on the paper in their camera. Next, ask them to write or dictate a sentence about their "photo."

*Note! Tie this into science themes by having them take "photos" of signs of summer, animal homes, living objects, and so forth.


Opinion - What I Like to Do Outside

Make blank books by folding two sheets of paper in half and stapling the side. Give children the books, something to write on, and inspire them by sitting under a tree on the playground. 


Descriptive – My Senses 

Prepare a worksheet with the following:


I see _______. 
I hear _______. 
I smell _______. 
I touch ______. 


Give children a clipboard and encourage them to explore the playground as they fill in the blanks (write or draw pictures). Let children share their findings with classmates and then put their pages together to make a class book.


Narrative - Cartoon

Prepare cartoon frames for children with 3 or 4 sections. Have them use the cartoon frames to illustrate something they have done outside. Demonstrate how to add dialogue bubbles so the characters can talk.


I Wonder Research

Make “thinking pads” for children by cutting paper into fourths and stapling several sheets together. Explain that you will take a “wonder walk” on the school grounds. If they see something they’d like to know more about, they can draw a picture or write it on their thinking pads. Let children share what they recorded when you return to the classroom. Brainstorm how they can find out more about their topic. 
*Let them do “research” with their parents for homework.

Monday, May 11, 2026

LET'S EXPERIMENT!

I KNOW A SCIENTIST - AND YOU CAN BE ONE, TOO!


Download all the activity cards for most recent blog posts here:


You'll be amazed by these experiments you can do with simple materials around your home.

Pepper Scatter

Shiny Pennies

Happy Face Balloon

Magnetic Mouse

What’s Up?

Funnel Phone

Growing, Growing

Feely Socks


A pdf file with all of these cards is available with the link above.


.

Friday, April 17, 2026

ARBOR DAY

April 24th is Arbor Day, but every day we should look outside and appreciate trees. These websites have some great information and activities for kids at school or at home.

https://www.arborday.org/kids/

https://www.arborday.org/celebrate/educational-resources.cfm

Brainstorm
Divide children into small groups and let them brainstorm all the products we get from trees.

*THE GIVING TREE by Shel Silverstein is a wonderful book to share, but my little kids always wanted to know, "Why did he have to get old?" (I wonder the same thing sometimes!!!)


TREEmendous Writing
Let children look out the window or sit under a tree and write descriptions. Think about the colors in the tree. Are there animals in the tree? What are the parts of a tree?
*For creative writing, ask children to complete this sentence: If I were a tree I would...


Tree Identification
Download information about leaves similar to the one below.

Take a nature walk and challenge the children to identify the trees on the school grounds.

How are leaves different?

How does the bark on trees vary?

*Hint! Give children a clipboard and let them draw their favorite tree.

*Let them do rubbings of leaves from different trees and compare.


Plant a Tree
Contact your local cooperative extension service, Forestry Services, or National Arbor Day Foundation for free seedlings. Discuss what your tree will need to thrive. Prepare the soil, water your tree, and record its growth.


Vocabulary
What's a deciduous tree? What's an evergreen tree?
Sing this song to the tune of "London Bridge" to help your students learn how about deciduous and evergreen trees.

If your leaves fall to the ground,
to the ground,
to the ground.
If your leaves fall to the ground
You're deciduous.
If your leaves stay green all year,
green all year,
green all year.
If your leaves stay green all year,
You're an evergreen.


ADOPT A TREE

A Louisiana teacher shared this sweet story about what happened when she let her class "adopt" a special tree on the playground. They named their tree Maggie and hugged her, drew pictures of her in different seasons, read stories and sang songs under her, wrote descriptions...you get the idea. One day as a group of children were playing, one child snapped a branch off another tree. A little boy started to cry because he said, "You're hurting Maggie's friend." I'm not sure "adopting a tree" was in their state standards, but it's a beautiful story about instilling a love of nature in children. And, it's so easy just to take a moment every now and then to focus on trees and all the living things this time of year.


A SPECIAL NEW VIDEO ABOUT FRUIT TREES FOR ARBOR DAY!


Monday, April 13, 2026

GREEN TEAM

Who wouldn't want to be a super hero on the green team? How about some membership cards?

The Green Team (Tune: “When Johnny Comes Marching Home”)
We are on the Green Team. (March in place as you swing your arms.)
Hoorah! Hoorah! (Fist in air as if cheering.)
We can recycle every day. (March in place as you roll your arms around.)
Hoorah! Hoorah! (Fist in air as if cheering.)
Aluminum, glass, tin, (March in place.)
Put paper and cans in recycle bins. (March in place.)
Join the Green Team, (March in place.)
Defend the earth and keep it clean. (Put both fists in the air like a hero.)

We are on the Green Team. Hoorah! Hoorah!
We can reduce what we use. Hoorah! Hoorah!
Turn off water and the lights.
Walk, take a bus, or ride your bike.
Join the Green Team.
Defend the earth and keep it clean.

We are on the Green Team. Hoorah! Hoorah!
We can reuse many things. Hoorah! Hoorah!
Share old toys and old clothes, too.
Give away what you don't use.
Join the Green Team,
Defend the earth and keep it clean.

We are on the Green Team. Hoorah! Hoorah!
We can keep our planet clean. Hoorah! Hoorah!
Pick up all the trash you see.
Protect wildlife and plant new trees.
Join the Green Team.
Defend the earth and keep it clean.

*Put out scrap materials in the art center and encourage children to make “Green Team” badges. You can also let them decorate sheets of newspaper and staple them around their necks to make “Super Green Hero” capes. Let children dramatize what they would do if they were a “Super Green Hero.”

*Make a language experience chart of children’s suggestions for what it means to be on the “Green Team.” Have children dip their thumb in green paint and “sign” it on the list to signify that they are going to join the “Green Team.”


*Walk around the school and encourage the children to draw pictures or write suggestions for conserving energy and making the learning environment “green.” Compile results and ask the principal to visit your class and discuss improvements that can be made.

*Make a naturalist kit by recycling a detergent box or similar container with a handle. Make binoculars by cutting a cardboard paper towel roll in half. Tape the halves together and hole punch at the top. Tie on a piece of string so children can easily take the binoculars on and off their heads. Add a magnifying glass, field guide, tweezers, film canister (for collecting specimens), paper, pencil, etc. Talk about what naturalists do. Can you be a naturalist? Divide children up into groups of two and let them take turns playing “naturalist” on the playground.


Monday, April 6, 2026

IT'S RAINING! IT'S POURING!

Rainy Day Reads

Make a special place to read on rainy days by opening a large umbrella and putting it in a cozy corner in your classroom.  Put some books and stuffed animals under it and your children won't be able to resist!  
Note!  Limit two at a time and they'll be lining up for their turn!


The Water Cycle (Tune: “My Darlin’ Clementine”)
Evaporation (Push palms up.)
Condensation (Hands together in air.)
Precipitation all around (Wiggle fingers down.)  
Accumulation (Sweep arms in circle.)  
Evaporation (Push palms up.)  
The water cycle goes
Round and round (Make circles with arms.)


Rain in a Jar Experiment

Fill a large glass jar with very hot water. Set a pie pan full of ice cubes on top of the mouth of the jar and observe what happens. Encourage students to draw observations.


Story Bracelet
Children will be able to retell the water cycle with this bead bracelet. Have them string on the following beads as they repeat the water cycle:
Evaporation - clear bead
Condensation - white bead (cloud)
Precipitation - blue bead (rain)
Accumulation - brown bead (puddle)
Sun - yellow bead
Evaporation - clear bead


Make Rain
Make “rain” as a transition activity to quiet children. Hold up one palm and tap with one finger from the other hand. Next, slowly add another finger and tape with two, then three, four, and five. (At this point you can also stomp your feet to make thunder.) Reverse the process by tapping with five fingers, then four, three, two, one. Quietly place your hands in your lap. It will really sound like a rain storm is coming and then going away. 

Saturday, March 28, 2026

PARTS OF A FLOWER

Learning to recognize and label plants, insects, and other objects they study about is a good way to integrate writing and science. With this song learning the parts of a flower will be much easier. Children will also be amazed about the parts of a flower that they eat!

Parts of a Flower (Tune: “Head, Shoulders, Knees, and Toes”)
Flower (Hands around face.)
Stem (Point to neck.)
Leaves (Stick out arms.)
And roots (Touch feet.) –
Leaves and roots.
Flower, stem, leaves, and roots –
Leaves and roots.
All it takes is sun (Hands up in circle over head.)
And showers (Wiggle fingers down.)
And a seed (Hold out palm.)
Grows into a flower. (Spread fingers of right hand up through left fist.)


Flip Book
Make a flip book where children can label the parts of a flower. To make a flip book fold a sheet of paper into eighths. Open and fold in half. Cut down the three creased lines to the middle to make flips. Turn vertically as shown. Write “Flower," "Stem," "Leaves," "Roots” on the four sections from the top to the bottom. Open and draw the appropriate part of the plant under each label. Don’t forget to draw the seed!


Eating Plants
Discuss what parts of a plant you eat. What roots do you eat? What leaves? What stems? What flowers? What seeds?
*Divide a sheet of paper into fourths and label, “seeds,” “roots,” “stems,” “flowers.” Have children write or draw different foods they eat from each category.


Dirt Pie
Yeah, I know this isn't very healthy, but I'm sure somebody out there would like to do it at home or summer camp.


HOW ABOUT A BUNNY TALE TO TELL THIS WEEK?

https://www.youtube.com/watch?v=V3Nw_IGoa3Q


https://www.youtube.com/watch?v=dL0Gw0yc3rY


Friday, March 27, 2026

"SEEDY" STUFF

All over the country people are planting their gardens. There's still a little magic when a seed begins to sprout. I remember eating a popsicle with my older cousins when I was a preschooler. They told me if I dug a hole and put my popsicle in it then it would grow into a popsicle tree. I'm still waiting!!! I also enjoyed letting my students brainstorm different objects we could plant, like jelly beans and pennies. 

Hint! If you line a plastic up with a paper towel and fill the center with sand you can insert items and watch what happens.


The Planting Song
(Tune: “The Farmer in the Dell”
Let’s all plant some seeds, (Pretend to dig.)
Let’s all plant some seeds.
Hi, ho, it’s spring you know,
Let’s all plant some seeds.

The rain begins to fall… (Wiggle fingers down.)
The sun warms the earth…(Arms over head.)
The seeds begin to grow… (Pretend one arm is a plant.)


Growing, Growing!
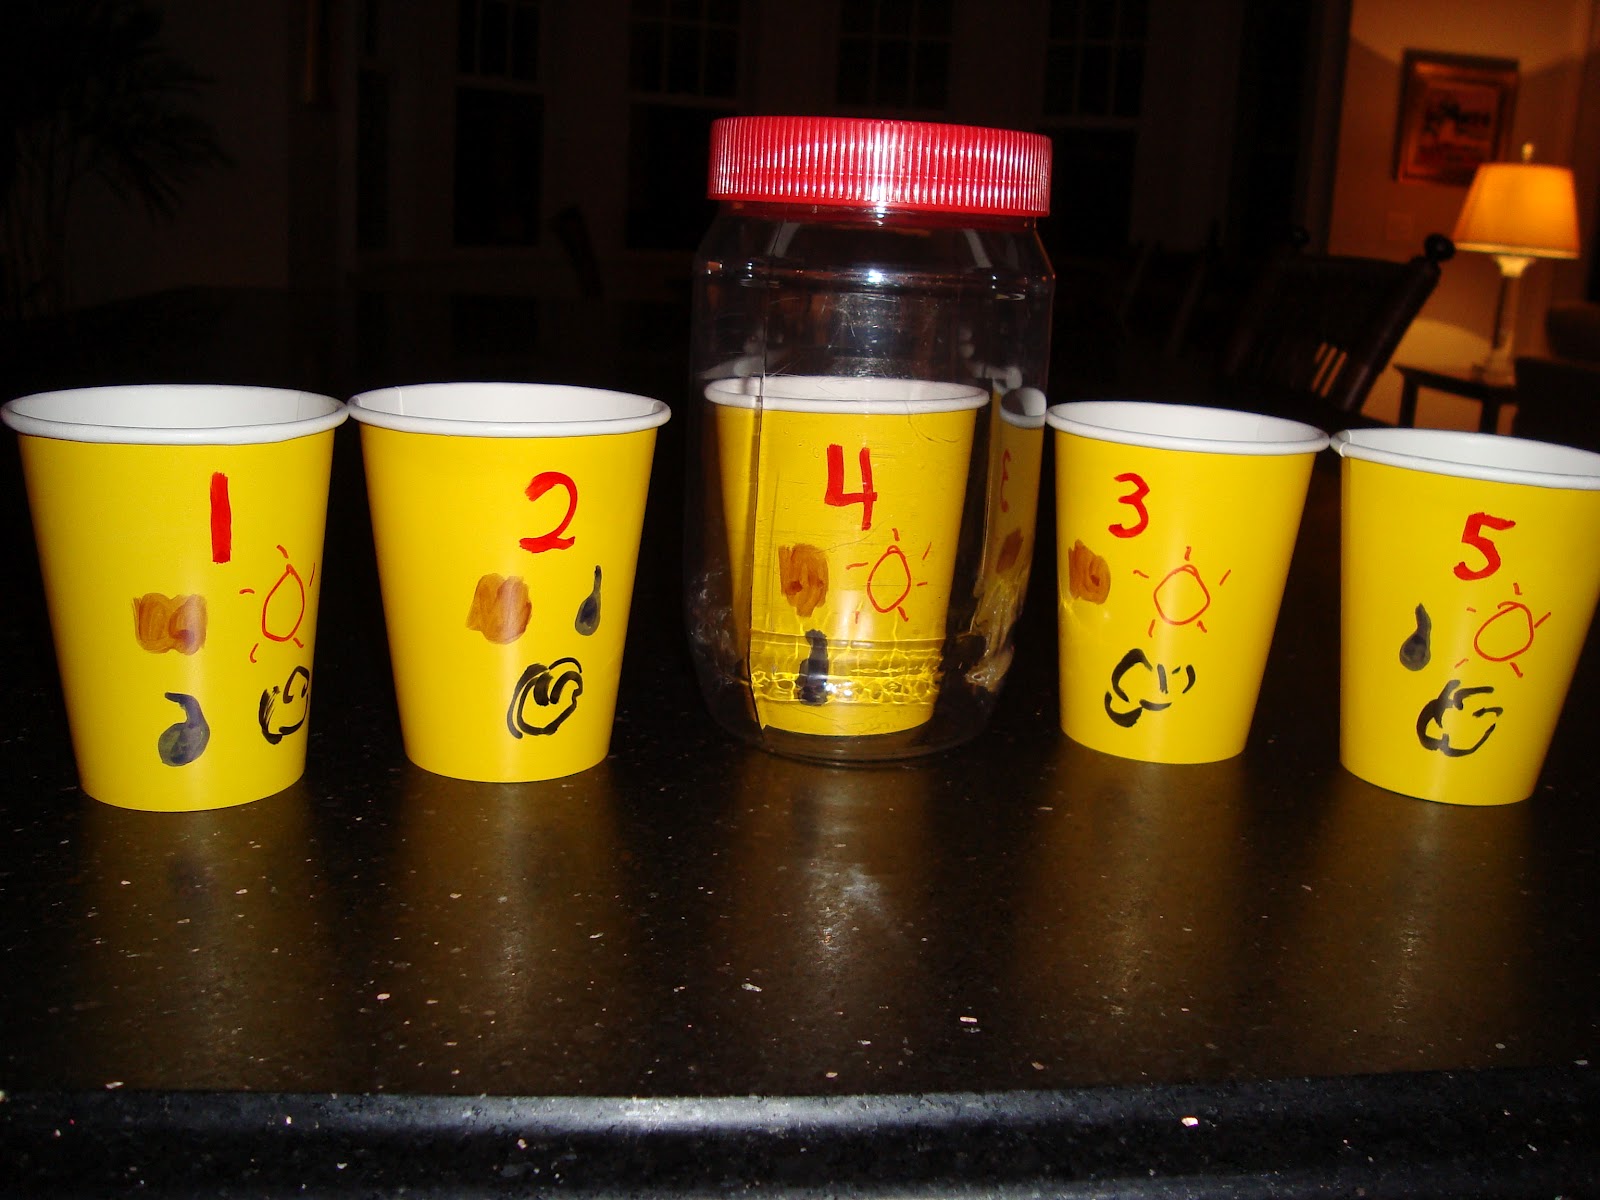
What does a seed need to grow? Brainstorm with the children and write their responses on the board. Take five cups and draw the following as shown:
soil, water, sun, air
soil, water, air
soil, water, sun
soil, sun, air
sun, air, water

Plant several bean seeds in each cup. Encourage the children to predict what will happen. Observe. Evaluate predictions after several weeks.


Seed Hunt
Brainstorm different seeds that come from foods we eat, such as apples, oranges, sunflowers, avocados, popcorn... Challenge children to look in their kitchens at home and bring in seeds. Plant the seeds in clear cups and label. Place in a sunny window, water, and you might be surprised at what comes up!

Saturday, March 21, 2026

EGG-STRA, EGG-STRA!

WOW!  How many ways can you use plastic eggs in your classroom ?

Write an upper case letter on one half with a permanent marker and the lower case letter on the other half.
*Children can match letters. They can also write words or draw pictures of things that begin with that sound and put them in the egg.


Write onsets (consonants or blends) on one half and rimes (word endings) on the other half. Children twist around and read words. You could also ask children to write the words.


Practice making and reading two letter words by writing a letter on each half. Ask children to write the words or use them in a sentence.


Write numerals or number words on the eggs. Children fill with the appropriate amount of beans or paper clips.
Can they write all the different ways they can make five?


Make compound words with eggs.

Let children draw pictures of all the animals that come from eggs.


Write a poem about spring on a small sheet of paper. Fold it up and put it in the egg.

Practice addition and subtraction with eggs.


Write sight words or spelling words on the eggs. Write the same word on a 1” x 4” sheet of paper and cut between the letters to make a puzzle. Place puzzle pieces in the egg. Children shake and then open and put the pieces together to make the word.
*You can also put random letters in the egg and ask children to see how many words they can make and write from the letters.


Hint! I have tried both Sharpies and permanent markers and they rub off. I would suggest just putting clear tape on top of the marker.

Saturday, March 14, 2026

LEARN ABOUT BUTTERFLIES DAY

I bet you didn't know that March 14 was LEARN ABOUT BUTTERFLIES DAY. Find out more at: http://allthingsbutterflies.com


No matter how old you get, the life cycle of a butterfly will always be nature's magic! There are so many learning opportunities from caterpillars and butterflies: comparing and contrasting fiction and non-fiction books, saying finger plays, writing books about the life cycle, art projects, dramatizations... Let's get started with a song.

Butterflies
(Tune: Up on the Housetop)
First comes the butterfly (Hook thumbs and flutter fingers.)
Who lays an egg.
Out comes a caterpillar (Wiggle index finger.)
With many legs.
Then the caterpillar
Spins and spins (Roll hands around.)
A little chrysalis
To sleep in. (Place head on hands.)
Oh, oh, oh! (Fingers around eyes.)
Look and see.
Oh, oh, oh!
Look and see.
Out of the chrysalis, (Hook thumbs and flutter fingers.)
My, oh, my!
Out comes a (Move butterfly fingers all around.)
Beautiful butterfly!

Here's a video my webmaster made with photographs of the life cycle:
http://bit.ly/drjeanCaterpillar

Here's a video with illustrations:
https://www.youtube.com/watch?v=In_akp9Fxbc


Drama
Let children act out the life cycle of a butterfly. First, they lay on the floor in a ball. Next, they crawl around like caterpillars. Can they spin around and make a chrysalis? Finally, they can spread their wings and FLY!

Baggie Butterfly
Make a butterfly by tearing up little pieces of colored tissue paper and putting them in a zip lunch bag. Gather up in the middle and twist on a pipe cleaner to make the body and antennae. Attach a string for flying.


Smoosh Painting

Cut butterfly shapes out of newsprint. Fold in half. Let children drop paint with a spoon or eye dropper on one half. Fold and rub. Open to view your butterfly.


Life Cycle Flip Book
Make a flip book for the children to illustrate the life cycle of the butterfly.


Tell the lifecycle of the butterfly with a stick, a bean, and pasta. First, take children on a nature walk and ask them to find a stick that is as long as their arm from their wrist to their elbow. Glue the bean to the left of the stick for the egg. Next comes a spiral pasta for the caterpillar. Then a shell pasta for the chrysalis. Finally, a bow shaped pasta for the butterfly.

Saturday, January 24, 2026

SNOWING ARTS AND CRAFTS


Snow Dough

You can use any play dough recipe for snow dough. Simply omit the food coloring and let the children knead in iridescent glitter to make it sparkle. (My favorite dough is: 2 cups flour, 2 cup salt, 2 TB. cream of tartar, 2 TB. vegetable oil, and 2 cups water. Mix ingredients together in a pan until smooth. Cook over medium heat, stirring constantly until the mixture forms a ball and sticks to the spoon. Cool and knead. Store in airtight containers.)
Note! Make sure children wash hands before and after playing with dough.


Snow Flakes
Let children fold coffee filters in half, then fourths and eighths. Cut little “bites” out of the folded edges. Open. You can make colorful snowflakes by coloring the coffee filters with water soluble markers before cutting them.

Hint! Make snowflakes out of newspaper, tissue paper, wrapping paper, and other types of recycled paper.


Snow Prints
Let children draw winter scenes on blue construction paper with crayons. Give them white paint and a sponge or Q-tip to “make it snow.”


Positive and Negative
Fold a sheet of construction paper in half. Cut three semi-circles similar to the one shown on the fold. Open. Explain the positive and negative shapes. Use the snowman cutouts for some of the games mentioned yesterday. Tape wax paper to the the back of the negative design as shown. Let children decorate and the hang on a window.


Ice Skating
Give each child 2 paper plates. Demonstrate how to place these on the floor and put one foot on each plate. Slide your feet as if skating. Put on some waltz music and let the children skate, twist, and turn. Play “freeze.” When you stop the music children must “freeze” in their positions. When the music begins again they may continue to skate.


Snow People
Instead of drawing snow “men,” encourage children to paint or draw snow ladies, snow children, snow pets, and other characters.


Sock Snowman

You will need a white tube sock and some fiber fill for this project. Children stuff 3 large handfuls of fiber fill into the toe of the sock to make the snowman’s body. Tie off with yarn or string. Stuff 2 large handfuls to make the middle section. Tie off. Stuff 1 large handful for the head and tie off at the top. Invert the top of the sock and pull over the head for a hat. Children can decorate with markers, felt scraps, etc. Encourage them to name their snowman and tell a story about what they would do if it were real.

Icebergs
Fill plastic containers with water. Add food coloring and freeze. Place these in your water table and tell the children they are icebergs. Add walruses, polar bears, and other plastic arctic animals.

Friday, January 23, 2026

SNOWING SKILLS

Use snowmen as a springboard for oral language, writing, math, reading, and science.

I’m a Little Snowman
(Tune: “I’m a Little Teapot”)
I’m a little snowman (Bend knees.)
Short and fat. (Extend arms in a circle.)
Here is my broom and (Hold out right hand.)
Here is my hat. (Touch head with left hand.)
When the sun comes out (Slowly melt to the ground.)
I’ll melt away.
But I’ll be back another day!

I’m a snow lady, (Bend knees.)
White and round. (Extend arms in a circle.)
In my hat and apron (Touch head and waist.)
I don’t make a sound. (Index finger on lips.)
When the sun comes out (Slowly melt to the ground.)
I’ll melt away.
But I’ll be back another day!
*Download this book at drjean.org.


How To
Let children discuss how to make a snowman. Dramatize making a snowman by rolling a big ball, and then a middle size ball, and then a small ball for the head. Fold two sheets of paper in half and staple. Have children write a book about how to make a snowman.


Before and After
Have children fold a sheet of paper in half. Ask them to draw a picture of a snowman before it melts on the left. Can they draw a picture of the snowman after it melts on the right? What makes a snowman melt?
*Give children cartoon frames to illustrate a snowman melting.


Snowman Addition
Draw snowmen on poster board similar to the one shown. Laminate. Children make sets (or write addends) in the top two balls and then put the sum in the bottom ball.


Snowball Math
Fill a clear jar with snowballs/cotton balls. Let each child estimate how many snowballs are in the jar and write their name and answer on a sheet of paper. At the end of the day count the snowballs. Who guessed more? Who guessed less?
*Let the children use the “snowballs” to make sets or to do addition and subtraction problems.


Frosty’s Magic Hat
Make flashcards for letters, numerals, words, math facts, or other skills. On several cards draw a black hat. Explain that when Frosty’s magic hat appears the children get to stand up and dance around. This is an easy game that you can play during transitions if you only have a few minutes.


Snowball Seriate

Cut different sizes snowballs (circles) out of cardstock. Let children seriate them from largest to smallest.


Counting Snowmen

Cut out 10 or 20 snowmen from heavy paper. Write the numerals 1-10 (or 20) on their bodies. Mix up the snowmen and then have the children put them in order.


Melt a Snowman Science Experiment
*This is such an easy science experiment, but your kids will get a kick out of it.
Give each child a clear cup with an ice cube in it. Ask them to draw a picture of what it looks like. Have them predict how many minutes it will take their ice cube to melt. Encourage them to draw what it looks like after five minute intervals. Whose ice cube melted the fastest? Whose lasted the longest?

Monday, December 15, 2025

READY FOR WINTER?

December 21st is known as the winter solstice or the first day of winter. It is the shortest day and longest night of the year. Although your students will probably have sugar plums dancing in their heads this week, you might want to add a touch of science to your lesson plans with these ideas.


Science
Ask your students what causes winter. (Accept their answers without judging.) Have one child pretend to be the sun and stand in the middle of the circle. Use a globe to demonstrate how the earth rotates around the sun. It takes 365 days or one year for the earth to go all around the sun. Demonstrate how the earth tilts on its axis away from the sun to cause winter. Why? What happens when the earth tilts toward the sun?


Signs of Winter
Brainstorm signs of winter. What happens to the temperature in winter? What happens to the plants? What happens to animals?


Vocabulary
Make an attribute web of winter words. Include winter clothing, sports, holidays, etc.


Animals Adapt
How do animals adapt in the winter? What animals hibernate?
What animals migrate? How do human beings adapt?


Habitats
Some habitats are very cold in the winter with ice and snow. Other habitats are warmer in the winter. Use a map of the United States and have children identify their state. Do they have ice and snow in the winter? Can they find a state where it’s warm and sunny in the winter? What do they think causes the difference?


Internet Search
Visit a weather site, such as weather.gov, to compare regional weather.

Nature Walk
Go on a nature walk and look for signs of winter. Let each child take a digital photograph of a sign of winter. Put these together to make a class collage.


Trees
Explain that evergreen trees stay green all winter. Deciduous trees lose their leaves in the winter. Can they find evergreen and deciduous trees on the playground? Can they find them in their yard at home?

Make a Book
Staple two sheets of paper and let children use descriptive writing to make a book called “Winter Is…”

Creative Writing
Invite children to write a story about “Old Man Winter.” I found this great writing paper free at www.teach-nology.com.


Read a Book
What’s your favorite winter book to read to your class?