photo 3am_dj_home_zps919fb85e.png photo 3am_dj_about_zps7cce4c75.png photo 3am_dj_website_zps73051235.png photo 3am_dj_ss_zps6759ec2a.png photo 3am_dj_bs_zps43e27832.png

Tuesday, April 7, 2015

LET'S GET WEBBING!

Let’s explore how to use another popular graphic organizer today. You could model using webs for large group instruction, assign them for independent work, or use them for partner or small group projects.  
                       
Webs can be done on any topic from science to literature, phonics, math, special friends – you name it! Webs can be done as a traditional bubble with lines coming off, or you can make webs that reflect your theme. For example: a spider shape, flower, tree, etc. Webs are open-ended and encourage creativity and thinking outside the box.

Brainstorm – concept in the middle and then add comments

Phonics – letter in the middle and add words or pictures

Numbers – number in the middle and different ways to make that number

Shape – shape in the middle and objects that are made with the shape

Vocabulary – word in the middle with synonyms

Affixes – prefix or suffix in the middle with words made with the affix

Science or social studies– topic in the middle with facts

Writing prompt - facts to include

Special friend – child’s name in the middle with positive comments around

Assessment – This is a fantastic strategy to show individual learning. When you start a unit give children a sheet of paper and ask them to do a web about what they know on the topic. Date and save. At the end of the unit ask them to make another web with everything they’ve learned about the topic. Date and staple with the initial one. Send home with a note to the parents that says: “These webs show what your child has learned during our study of _____.”


How can you use a web today instead of a worksheet???

Monday, April 6, 2015

MAPS FOR THE MIND

Graphic organizers are super simple and super challenging for any grade level or any content area. These visual graphics can help children organize, brainstorm, and problem-solve. They also enable children to classify and visually “see” how things fit together. Think of them as putting a picture in the brain. And, they are perfect for differentiated instruction!

I found several good (free) websites where you can download graphic organizers and explore some of the skills they can reinforce:
     eduplace.com/graphicorganizers
     edhelper.com/teachers/graphic_organizers
     teachervision.com

Today, let’s take a look at TIC-TAC-TOE: THIS IS WHAT I KNOW!  (aka Lotus Diagram)

                              
Phonics – put a letter in the middle and draw objects or write words that begin with that sound

Math – put a number in the middle and write different combinations that equal that amount

Tasks – children write the activities they need to do each day or during the week (They can color them in as they complete assignments.)

Affixes – write the prefix or suffix in the middle and then write words using the affix

Vocabulary or Spelling – children write words in each section and then the teacher calls out words for children to color in

Facts – write a science or social studies topic in the middle and then write facts about it in each frame

Directions – children listen and follow directions (For example: Put a smiley in the upper right hand corner. Draw a star in the middle section on the left. Write your middle name in the middle, and so forth.)

                       
Word Bracelet
I was getting ready to throw away an empty tape dispenser when I remembered this idea. Write words (or letters or numbers or shapes) you are working on around the cardboard roll. Children who can read all the words get to wear the bracelet for the day. (Yea, dumb I know, but I bet your kiddles might like it!

Sunday, April 5, 2015

BE BLESSED!

Last Tuesday I skyped with some precious children at St. Mary's Catholic School in Salem, SD. Mr. Basil Knebel, their teacher, asked them to sing this blessing for me. I thought it would be a wonderful blessing for all of you on this Easter Day.

http://youtu.be/Fs5VS3-SOyg

Saturday, April 4, 2015

EGG-STRA, EGG-CELLENT, EGG-CEPTIONAL!

I know you'll be busy today dying eggs, hiding eggs, and getting your bonnets all set for the Easter parade. Tomorrow evening you're going to be asking yourself, "Now what am I going to do with all these plastic eggs?" Take a look at this blog I wrote several years ago and your dilemma is solved.

Write an upper case letter on one half with a permanent marker and the lower case letter on the other half.

*Children can match letters.  They can also write words or draw pictures of things that begin with that sound and put them in the egg.

Write onsets (consonants or blends) on one half and rimes (word endings) on the other half. Children twist around and read words. You could also ask children to write the words.

                              
Practice making and reading two letter words by writing a letter on each half.  Ask children to write the words or use them in a sentence.

Write numerals or number words on the eggs. Children fill with the appropriate amount of beans or paper clips.

Can they write all the different ways they can make five?
                             
Make compound words with eggs.

Let children draw pictures of all the animals that come from eggs.

                           
Write a poem about spring on a small sheet of paper. Fold it up and put it in the egg.

Practice addition and subtraction with eggs.

                          
Write sight words or spelling words on the eggs. Write the same word on a 1” x 4” sheet of paper and cut between the letters to make a puzzle. Place puzzle pieces in the egg. Children shake and then open and put the pieces together to make the word.
*You can also put random letters in the egg and ask children to see how many words they can make and write from the letters.

Hint! I have tried both Sharpies and permanent markers and they rub off. I would suggest just putting clear tape on top of the marker.

Friday, April 3, 2015

MARCO POLO

Do you remember playing that game in the swimming pool with your friends? It’s a good example of a call back that you can use in your classroom to focus the children’s attention. Whenever the teacher says something, the students respond. Call backs are a “gentle” way to say “pay attention and look at me!” 

Here are a few that teachers have shared with me. I’ve actually used many of them when I volunteer in schools, and they really do work. It might be helpful to introduce one each Monday and use it throughout the week. Write it on a sentence strip and use a picture clue to help put it in the brain. If you’ve got other call backs that work in your classroom, please email them to me and I’ll post them on my blog. 

                              
Teacher says: Criss cross.
Children respond: Be your own boss. (Cross arms and sit up straight.)

Teacher says: All set? (Snap fingers twice.)
Children respond: You bet! (Snap fingers twice.)
*If they are not ready they respond “not yet.” Keep saying “All set?” until the entire class is responding “You bet!”

Teacher says: Hands on top.
Children respond: Everybody stop! (Put hands on head and freeze.)

Teacher says: Macaroni and cheese.
Children respond: Freeze please! (Freeze and look at the teacher.)

Teacher says: Ready?
Children respond: Spaghetti! (Stand up straight.)

Line Up Tip
Teacher says: Locket. (Pretend to lock lips.)
Children respond: Pocket. (Pretend to put the key in their pocket.)

Teacher says: Hips (Put one hand on your hip.)
Children respond: And lips. (Put index finger on lips.)

Teacher says: Standing straight?
Children respond: Check!
Teacher says: Hands to self?
Children respond: Check!
Teacher says: Mouth closed?
Children respond: Check!
Teacher says: Ready for the hall?
Children respond: Check!

It’s also fun to play the “Marco Polo” game as you wait for children to get ready to go home, clean the room, and so forth.

Teacher: Marco
Children: Polo

Teacher: Okeedookee
Children: Artichokee

Teacher: Peanut butter
Children: Jelly

Teacher: Mickey
Children: Minnie

*Challenge children to create their own call backs.


Thursday, April 2, 2015

LET'S PLANT SOME JELLY BEANS AND PENNIES!


The Planting Song
(Tune: “The Farmer in the Dell”
Let’s all plant some seeds, (Pretend to dig.)
Let’s all plant some seeds.
Hi, ho, it’s spring you know,
Let’s all plant some seeds.

The rain begins to fall… (Wiggle fingers down.)

The sun warms the earth…(Arms over head.)

The seeds begin to grow… (Pretend one arm is a plant.)

Growing, Growing! 

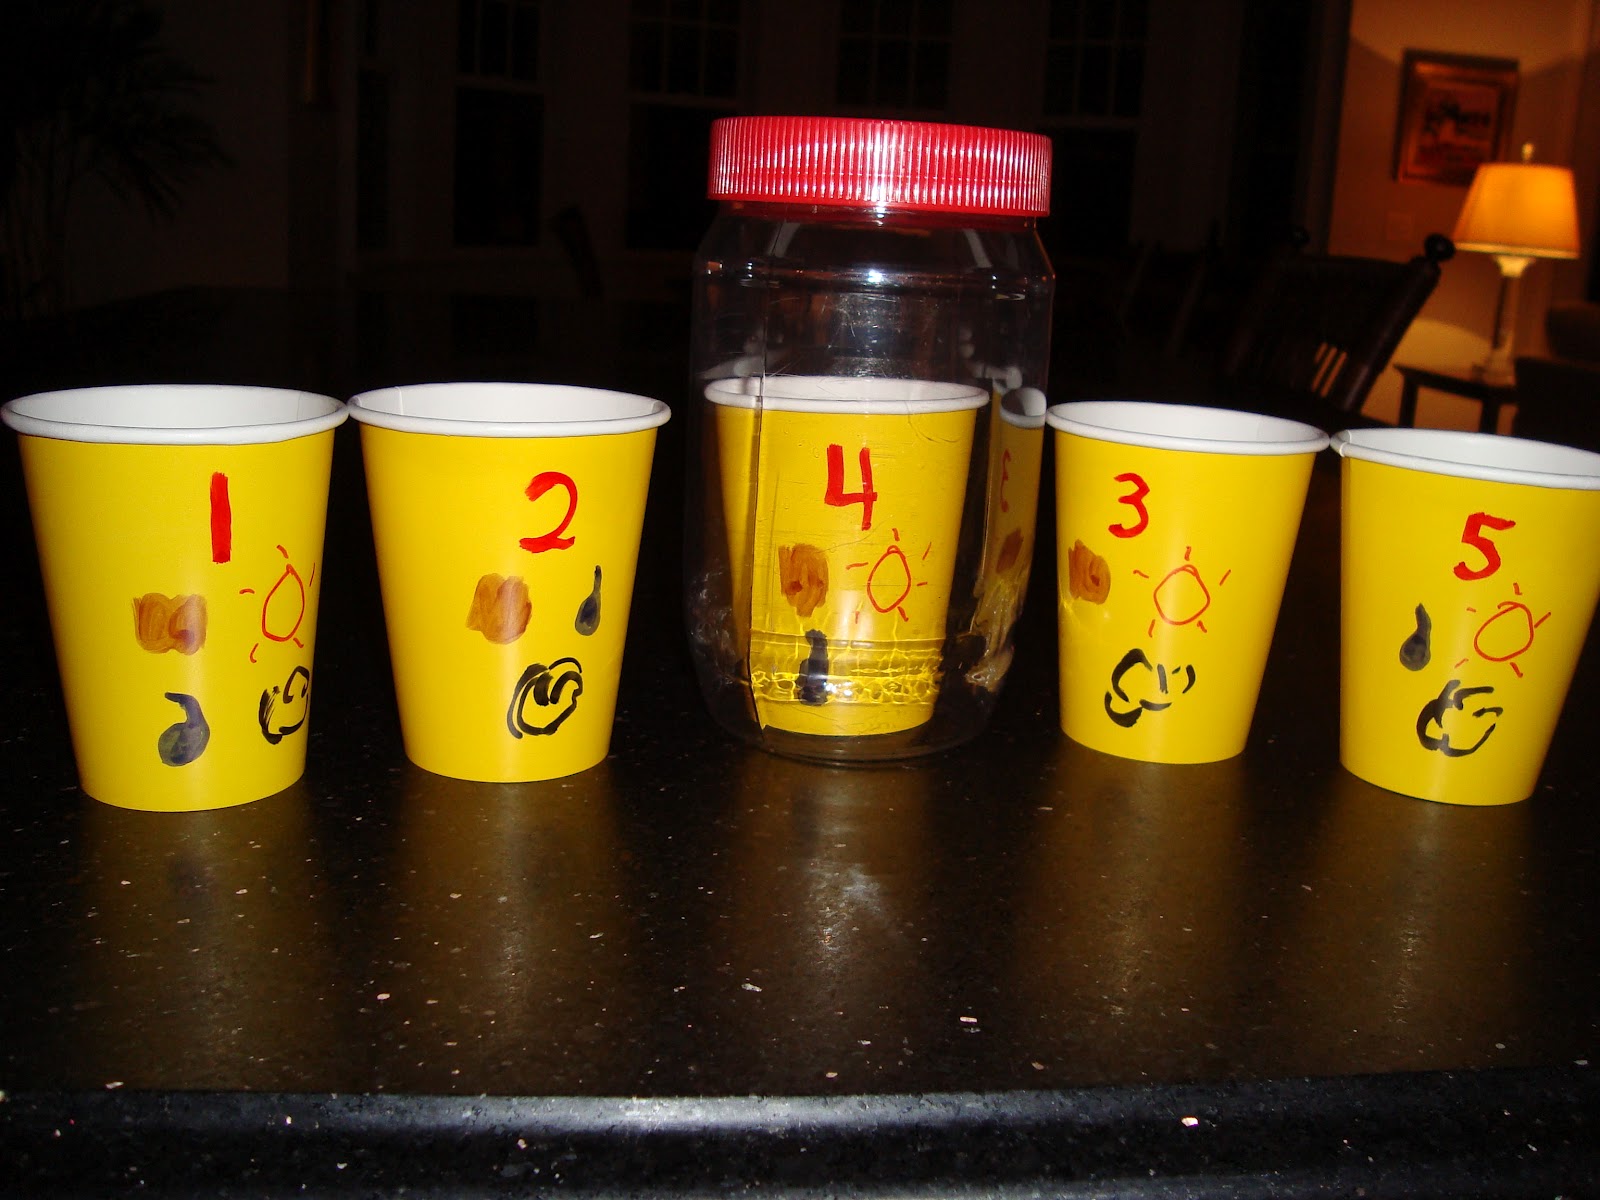
What does a seed need to grow? Brainstorm with the children and write their responses on the board. Take five cups and draw the following as shown:
soil, water, sun, air
soil, water, air
soil, water, sun
soil, sun, air
sun, air, water

Plant several bean seeds in each cup. Encourage the children to predict what will happen. Observe. Evaluate predictions after several weeks.


Seed Hunt
Brainstorm different seeds that come from foods we eat, such as apples, oranges, sunflowers, avocados, popcorn...  Challenge children to look in their kitchens at home and bring in seeds.  Plant the seeds in clear cups and label.  Place in a sunny window, water, and you might be surprised at what comes up!
*We also planted jelly beans and pennies, but alas, they never grew.  It was fun experimenting and thinking about eating those jelly beans and spending those pennies!

Wednesday, April 1, 2015

NO FOOLIN!

It’s April first and I'm not foolin' around with the “green” ideas for you on my website this month. How about a free song download and flip book my webmaster created? 

What Will I Be When They Recycle Me?
(Tune: “Oh, Dear, What Can the Matter Be?”)
What will I be when they recycle me? (Roll hands in a circle.)
What will I be when they recycle me?
I’ll come back to life—you will see! (Clap your hands and then point your finger.)

I am an empty soda can (Pretend to hold a soda can in front of you.)
Made of precious aluminum.
I can save lots of energy
If you will recycle me. (Roll hands in a circle.)

I’m an old bottle of plastic (Pretend to hold a plastic bottle.)
But I could be fantastic!
Toys, pipes, car bumpers, and much more—
That’s what my plastic is for. (Roll hands in a circle.)

A pile of used boxes and papers we (Make an invisible square in the air.)
Come from the precious wood of trees.
Recycled we’ll be as good as new (Roll hands in a circle.)
And save some other trees, too.

I am a fine jar made of glass— (Cup hands to make a bowl.)
Please don’t treat me like plain old trash! (Shake head “no.”)
I’ll make new jars again and again
Recycle me—yes you can! (Roll hands in a circle.)

Though we may look like old used stuff, (Open palms.)
Stop, wait! Please don’t give up on us! (Make sign language for “stop.”)
Think of the great possibilities— (Put index finger on your head and tap.)
Recycle us, set us free! (Roll hands in a circle and then throw up hands in the air.)

You’ll have to take a look at all the things you can recycle for classroom games and craft activities. You’ll never be able to throw away a plastic bottle, cereal box, paper towel roll, or bottle cap again!