photo 3am_dj_home_zps919fb85e.png photo 3am_dj_about_zps7cce4c75.png photo 3am_dj_website_zps73051235.png photo 3am_dj_ss_zps6759ec2a.png photo 3am_dj_bs_zps43e27832.png

Thursday, April 30, 2015

STORY GRAPHICS


Lines and symbols can tell a story similar to words. An activity like this can also develop print connections (left to right and top to bottom) and small motor skills.

Materials: paper, pencils, story download

Give each child a sheet of paper and explain that their pencil is going to “talk” and tell a story. Demonstrate the symbols as you tell the story so your students can follow along.

Begin the story by saying, “It’s a beautiful day. Let’s go for a walk.” (Walk your pencil across the page with horizontal strokes.)
“Look at the birds flying.” (Make a wavy line from left to right.)
“See the clouds rolling in the sky”….continue the story as you make the different strokes. End the story by “running home” and then the “sun comes out.”
Challenge the children to retell the story using their symbols.
*Use a different color (markers, crayons, or colored pencils) for each symbol.
*Can the children make their own story using symbols?

Here's a link so you can download the directions:

https://drive.google.com/file/d/0B1SnEagA4jljc0NhRWFLWEwwV1E/view?usp=sharing 

Wednesday, April 29, 2015

CARTOON TIME

What child doesn’t like cartoons? And what child wouldn’t be thrilled to have the opportunity to create their own cartoon? 

Save your funny papers from the Sunday newspaper and take them to share with your class. (All of them will not be appropriate, so select the ones you think your children will enjoy.) Explain how cartoonists use “bubbles” to let you know what the characters are saying. Tell the children that they will get to draw their own cartoons and they can use bubbles to let their characters talk.

                     
Attached are cartoon frames with 2, 3, and 4 sections. Start off by giving them copies of the cartoon frame with 2 sections. Tell them to think of a story that has a beginning and an end and draw it. 

                       
Next, let them think of a story with a beginning, middle, and end.

Finally, challenge them to create a story with 4 sections.

*Use cartoon frames to recall the sequence of a story.

*Use cartoon frames for the life cycle of a butterfly, the water cycle, plant growth, and so forth.


*Let them draw a picture of you and make a bubble with something you frequently say coming out of your mouth.  You might be surprised!!!!
 
Here's a link so you can download the blank cartoon frames?

Tuesday, April 28, 2015

MOTHER'S DAY

A Mother's Day tea, a song, a handmade gift, or a card will all be appreciated on May 10th by someone special in a child's life.

A Box for Mommy (Tune: "Polly Wolly Doodle" - HAPPY EVERYTHING CD)
I wish I had a little box (Pretend to hold a box in your hands.)
To put my mommy in. (Pretend to put something in the box.)
I’d take her out and go (Take something out of the box
(kiss, kiss, kiss) and kiss in the air.)
And put her back again.

If my mommy were in my box
Were in my box, then she would always know.
School or play, night or day,
How I love her so! (Cross arms over chest.)


I made this box for mother’s day, (Pretend to hold a box.)
It’s full of love for you.
When we’re apart, hold it to your heart, (Put hands over heart.)
And know I’m thinking of you.

Box of Love Necklace
You can collect small boxes that jewelry come in or use matchboxes for this project. Spray paint the boxes and then let the children decorate them with stickers, glitter pens, etc. Glue a small picture of the child inside the box. Punch a hole and attach a ribbon so it can be worn around the neck. Teach children the song and let them present their necklaces at a Mother’s Day tea, or send the boxes home with the words to the song.

My Mom Can
Let each child make a predictable book about all the things their mom can do.


Hats for Moms
These are adorable hats from paper plates that children can make for their mothers. Cut the inner section out of the plate. Decorate the outer rim with markers. Cut 4” squares out of tissue paper and wad up and glue on the rim to look like flowers. Punch a hole in each side and tie on a 16” piece of string or ribbon. Place the hat on your head and tie under the chin.

Monday, April 27, 2015

THE EARTH BOOK

“The Earth Book” will take a little time to construct, but I guarantee you the children will be thrilled to read it and share it when you are finished. I would stretch this out over 2 or 3 days so the children don’t get frustrated. 
*You can also easily adapt this book to informative writing, science, and other skills. 

Materials: construction paper (2 orange, 1 blue, 1 green, 1 yellow, 1 purple, 1 brown)
Directions: Cut squares using the attached pattern out of the orange and purple construction paper. Cut a circle out of one of the orange squares. Using the patterns cut the green tree, blue water, yellow sun, and brown mountains. 


To construct the book place down the orange square for the back of the book. Place the “purple sky” on top of this, then the “brown mountains,” “yellow sun,” “blue water,” “green tree,” and finally the front cover with the circle cut out. Staple on the left side. Younger children can read this as a wordless book. Older children can write descriptive sentences on each page.


Download the patterns with this link:

Sunday, April 26, 2015

IT'S RAINING! IT'S POURING!

April certainly brought "showers" to us this year! Can't wait to see all those May flowers! 

Rain (Traditional Tune)
It’s raining, it’s pouring, (Make rain by wiggling fingers
The old man is snoring. in a downward motion.)
He went to bed,
And he bumped his head, (Pretend to bump hand with palm.)
And he couldn’t get up in the morning. (Shake head “no.”)

Make Rain
Make “rain” as a transition activity to quiet children. Hold up one palm and tap with one finger from the other hand. Next, slowly add another finger and tape with two, then three, four, and five. (At this point you can also stomp your feet to make thunder.) Reverse the process by tapping with five fingers, then four, three, two, one. Quietly place your hands in your lap. It will really sound like a rain storm is coming and then going away. 
Rain in a Jar Experiment
Fill a large glass jar with very hot water. Set a pie pan full of ice cubes on top of the mouth of the jar and observe what happens. Encourage students to draw observations.

The Water Cycle (Tune: “My Darlin’ Clementine”)
Evaporation (Push palms up.)
Condensation (Hands together in air.)
Precipitation all around (Wiggle fingers down.)
Accumulation (Sweep arms in circle.)
Evaporation (Push palms up.)
The water cycle goes
Round and round (Make circles with arms.)

Rain Bracelet
Children will be able to retell the water cycle with this bead bracelet. Have them string on the following beads as they repeat the water cycle:
Evaporation - clear bead
Condensation - white bead
Precipitation - blue bead
Accumulation - brown bead
Evaporation – yellow bead (sun) to evaporate the water

Saturday, April 25, 2015

TAKE ME OUT TO THE BALL GAME

It’s springtime and off we go to a College of Charleston baseball game this evening. (I think I’m looking forward to the popcorn and hotdog more than the game, but don’t tell anyone!) 

Many of my students played T-ball this time of year and were motivated to play “baseball” games in the classroom. You can make these games as competitive as you like.

Let’s Play Ball!
Write “1st,” “2nd,” “3rd,” and “Home” on paper plates. Place the plates in a diamond shape on the floor. Divide the class into two teams. Let them “huddle” and come up with a team name. The first team lines up and one player at a time stands on “home” as the teacher “pitches” a flash card to them. (Flashcards with words, letters, math facts, etc. can be used.) If the student can identify the information on the flash card they can walk to first base. The game continues as different players on the team come up, identify the flash card, and move around the bases. Tally points on the board. The second team then has a turn at bat.
Note! If they don’t know the answer you can call them out. I did this when I taught first grade, but with kindergarten I let the other players on the team help them. The great thing about being the teacher is that you are the baseball commissioner and you can change the rules to work for you!!!

Batter Up
Cut 4” circles out of cardstock and draw baseball stitching on them. Write words, letters, math facts, etc. on most of the baseballs. On a few write “out” and on a few write “home run.” Mix up the balls and place them in a bag. Children take turns choosing a ball and reading the word. If they select “out” they are out of the game. If they select “home run” everybody cheers.

Friday, April 24, 2015

TEN MORE IDEAS FROM TENNESSEE

The Book with No Pictures (Andrew Thompson) 
This book by B. J. Novak is a fabulous read aloud that will have pre-k through 5th grader laughing and catching a little “reading fever.”
(Of course, I had to go right out and buy it. Kalina and K.J. are in Australia now, but I read it to them when we skyped the other night. I also read it to a Flat Stanley someone sent me.) 

                           
Air Writing (Lisa Callis)
Go from large to small as you practice air writing letters, numerals, shapes, etc.
Stick out one arm and write with your finger.
Hold your shoulder with the opposite hand as you write with one finger.
Hold your elbow and write.
Hold your wrist and write.
Hold finger and write.

Cup Game (Julie Larmer)
Write addition and subtraction problems on the top of a plastic cup. Write the answer on the inside on a dot sticker. If the student gets the answer correct they get to use the cup to build a tower.
*Use cups for spelling words to read and spell.
*Sort odd and even.
*Use for greater than and less than. (One cup has a greater than sign, less than, and equal sign. The other cups have numbers.) The student picks out 2 cups and places the correct sign between the numbers.

Transitions (Shamara Myers)
Moving to the Carpet
Criss cross applesauce
Criss cross for me.
Criss cross applesauce
Won’t you criss cross for me
In 1 – 2 – 3!

Standing on Letter Carpet
(Tune: “We Just Got a Letter” from Blue’s Clutes)
Two feet on one letter
That’s where you should be
In 1 – 2 – 3!

Moving to Tables
Pencil, pencil in the air
I see pencils everywhere.
 

Compound Word Cheer ((Shelby Steele)
“2 words” (hold up 2 fingers)
(clap your hands) and say “put together”
(1 hand on your hip and 1 finger in the air) “to make one word”
“A compound word is…
2 words put together to make one word.”

You’re on a Roll Cheer (Shelby Steele)
Say, “You’re on a roll!” as you roll your arms back and forth.

Smart Chickens and Cowboys (Laura Wensell)
Turn off the lights and flash up words for children to read. Insert a few pictures of chickens and a few of cowboys. When the chicken comes up children flap their arms and cluck. When the cowboy appears they stand up and say “yee haw”!
Record the time as the kids get faster and faster.

Check out this video to see how Erica uses sign language to dismiss tables to line up.


Thursday, April 23, 2015

T IS FOR TENNESSEE

T E Double N E Double S Double E (clap clap) Tennessee! (fist bump) 
That’s the Tennessee cheer I learned last week when I was in Murfreesboro. The teachers also taught me some other cool things. 

Magnetic Fun (Tonya Baijo & Jean Burnette)
Cut pieces of pipe cleaners and put them in an empty plastic bottle. Use magnets to drag the pieces around.
*Use a magnetic wand with cut up pieces of pipe cleaners. Draw a face on the wand and you’ll have a silly willy.

Silent Signals (Katie Adams)
Students can give a “silent signal” while the teacher is teaching. The teacher can signal back without stopping the lesson and shouting out.
Restroom – sign language “R”
Water – sign language “W”
Pencil Sharpener – sign language “P”

Getting to Know You (Brandy Marti)
Send parents “homework” on the first day of school. Ask them to write a letter telling you all about their child. Explain that this is the time to brag about their child and tell you what they what you to know about their child. (The parents think its great.)

Positive Postcards (Margaret Moore)
Give your class list to the last year’s teacher. Have them highlight their students and give one positive descriptive word. Send postcards to the students saying, “Mrs. ___ told me you are so artistic. I’m so excited you are in my class! You can be our class artist for the year.”

Family Facebook Page (Denise Gaither)
Set up a CLOSED Facebook page where parents can check out pictures of activities, newsletters, announcements, links to research, skills, and so forth.


Check out this video where Erica uses sign language to encourage her students to make a straight line.

Wednesday, April 22, 2015

KINDERGARTEN DAY


Yesterday was Kindergarten Day. How did I miss that one? We’ll just do a “Belated Kindergarten Day” today. Froebel started the first kindergarten in Germany in 1837, and his birthday was April 21. Kindergarten originated to help children adapt to learning and social interactions in a fun way. Froebel believed in self-directed play, singing, dancing, blocks…a “garden” where children could grow! He’d probably roll over in his grave now if he saw what was going on!!

As I write this I am remembering my kindergarten teacher Mrs. Myers. I LOVED her! I mean I worshipped her! She was a fairy godmother and the center of my world. She seemed ancient to me at the time, but I’m probably way older now than she was when she taught me. Thank goodness for hair dye and make up!!!

I remember playing “The Farmer in the Dell” and other circle games. I also remember the finger play “Here are grandma’s glasses…” We had sugar cookies with a hole in the middle that we would put on our finger as we ate and we also had orange kool-aid. (Oh, my goodness! The sugar police would get Mrs. Myers for sure!!!) My favorite activity was painting. I especially liked to paint princesses. Back in those days the only princess I knew about was Cinderella, but I longed to be like her. One day as I was at the easel I painted a stripe down my leg. It looked so good I painted another…and another…and another…until my legs had beautiful stripes all over them. Mrs. Myers could have squelched my creativity right then and there, but she just laughed and said, “Don’t do it again.”

Another memory I have is learning to tie my shoes. I wore corrective saddle oxfords I feared would come untied at school and then what would I do? Everyone would know that I couldn’t tie shoes!!! Well, one day they came untied and Mrs. Myers said, “You’re a smart girl. Now, you just sit down and figure it out.” And you know what? I did!!!! She knew when to coddle and when to push.


And incredible as it may seem, although all I did was PLAY in kindergarten I can actually read and write!!

Note! Although I’m focusing on “kindergarten” today, this message holds for all early childhood teachers from preschool through first grade.


WHAT’S THE POINT? By Dr. Jean

If you cover every objective in the curriculum, but don’t have time to play outside or take field trips—
What’s the point of kindergarten?

If you do every page in the workbook, but don’t have time to laugh, do show and tell, or sing a song—
What’s the point of kindergarten?

If you know all your letters and sounds and numbers and sight words, but don’t know how to be a friend or share—
What’s the point of kindergarten?

If you score high on the standardized test, but don’t like school—
What’s the point of kindergarten?

If you master every skill and have 2 hours of screen time, but don’t have time to play in the block center or housekeeping or do puzzles—
What’s the point of kindergarten?

If teachers are so overwhelmed by the demands, expectations, and assessments they are given that they don’t have time to hug, smile, read, cheer, cherish, and look in the eyes of those wonderful little children in their classroom---
Then what’s the point of being a kindergarten teacher?

But we know that five is a magical time, and children only have one chance in a lifetime to be five. SHUT YOUR DOOR and hold hands, sing, dance, paint, tell stories, make believe, play outside, and continue to give children happy memories! And only you can do that because YOU are a kindergarten teacher and YOU are SPECIAL and AMAZING just like the children you teach!


Love always,  Dr. Jean

Tuesday, April 21, 2015

POETIC ART

Poems are a perfect partner for creative activities in your classroom.  Take a look...

Illustrations – After listening to a poem, have children close their eyes  and make a picture of it in their heads. Then let them draw that picture on paper with crayons, markers, or colored pencils.
*Let children illustrate poems with water colors, chalk, or other media.

Collage – Let children choose a favorite poem and make a collage with magazine pictures, photographs, natural objects, or art media.

Pennants and Banners– Cut pennant and banner shapes out of construction paper and let children write or illustrate poems on them.

Puzzle Poems– Cut cardboard or tag board into 12” squares. Let children write original poems or copy poems on the cardboard. Then give them makers and crayons to illustrate their poems. Finally, have them cut the square into puzzle shapes. Store in a zip bag. Let children exchange puzzles and put them together and read.

Poetry Quilt - Give each child a square and let them write an original poem or rhyme on the square. Let them decorate a frame around their poem with crayons. Glue the children’s squares to a large sheet of bulletin board paper. Be sure to leave at least an Inch between the squares. Take 12” pieces of yarn and tie them in bows. Glue the bows between the squares so it will look like a quilt. 

                                
Puppets, Sculptures, and Bookmarks – Let children use a “scrap box” or “junk box” to create other “artful” objects for poems.

Monday, April 20, 2015

WE'RE POETS AND WE KNOW IT!

Ask the children, “What do poets do?” As they respond comment, “You know, we can do that, too. We can all write poems and be poets!!!” Here are some simple activities to start your students on the road to writing poetry. 

ACROSTIC
An acrostic is an easy way to begin writing poetry. Model how to do this on the board by writing a word vertically. Have children to think of a word that begins with each letter. Read over what you have written, and you have a poem.
Name Acrostic – Children think of a word that describes them for each letter in their name.
Holiday or Season- Write the holiday or season and then add an adjective that begins with each letter.
Non-fiction – Write a vocabulary word from a unit or theme and then
challenge children to write a word that begins with each letter. 

                    
BLANK POEM
Write several lines of poetry, leaving blanks at the end of each line. Encourage the children to fill in words that rhyme. Have them help you sound out the words as you write them. For example:
I saw a pig
Who could ______.
I saw a cat
Who could ______.
I saw a sheep
Who could ______.
And I can rhyme
Any time!

*Use similes for blank poems. For example, children could fill in the line to “Hungry as a _____. Quiet as a______. Sleepy as a ______. Mad as a _______. Good as _______. Sweet as ______.” And so on.

PREDICTABLE POEMS
Give children predictable sentences similar to the ones below. All children have to do is fill in a missing word, and they’ll have a poem.
Hint! They can use words that rhyme, nonsense words, or words that don’t rhyme.
I like_____.
I like _____
I like _____.
Do you like____?

I can _____.
I can_____.
I can_____.
Can you_____?

*I know….I wish….My mom is…Dogs can….Spring is….Green is…. And so forth!
*Write predictable poems using the five senses. It looks like…It sounds
like…It tastes like… It smells like…It feels like…It’s a ….

Sunday, April 19, 2015

POETRY POWER

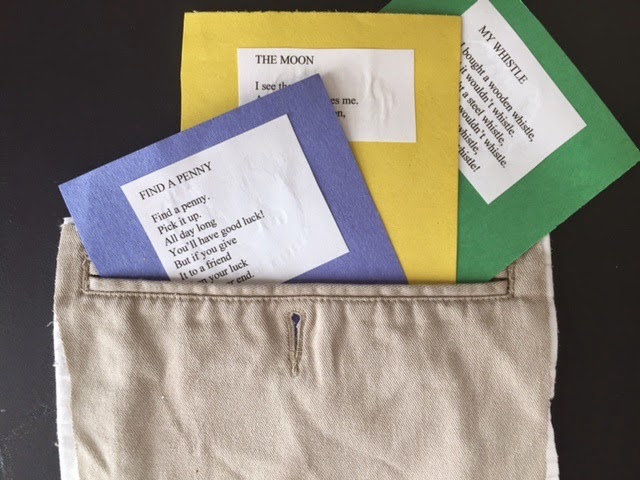
Cut a pocket off an old pair of pants and staple it to a bulletin board.  Store favorite poems in the pocket so the children can read them over and over.  Take a look at some other ways you can reinforce reading skills with poetry. These activities are much more multi-sensory and engaging than a worksheet or computer program!!!

Syllables – After reading a poem with your students, read it again clapping the number of syllables in each word. You could also snap, stomp, hop or make other movements for the syllables.

Rhyming Words – Following a reading, mention that you heard words that sounded alike at the end. Repeat two of the words that rhyme. Let’s read the poem again and see if you can listen for other words that rhyme. As children find words that rhyme, highlight them on the poem with highlighting markers or tape. Write sets of words that rhyme on the board. Underline the letters that are the same. Have children think of other words that have the same sound at the end. Write the rhyming words on the board as the children call them out.

Alliteration – Read poems that have strong alliteration. Ask children to identify words with the same beginning sound. Highlight the words in the poem or list them on the board. Can children add other words to the list that begin with the same sound?

Sound Scramble – Just for fun, choose an initial consonant sound and alliterate each word in a rhyme. For example: Bumpty Bumpty Bat Bon Ba Ball. Bumpty Bumpty bad ba breat ball…

Decoding Skills – As you come to unknown words in poems, stop and model how to sound them out by blending the sounds.

Predicting – Before reading a poem, encourage the children to look at the title or illustrations and predict what the poem might be about.

High Frequency Words
– Highlight word wall words that are in poems. Pass out flash cards with words and challenge children to match them with words in the poem.

Parts of Speech – Ask children to identify verbs, nouns, and other parts of speech in poetry.

Comprehension – After reading a poem, ask appropriate questions that will develop comprehension skills. Is there a main character? What was the setting? When did the poem take place? What happened at the beginning? Middle? End? Was there a problem or resolution? What will happen next? What was the main idea?

Genres of Literature
– Help children recognize different types of literature through poetry. Could the poem really happen or is it pretend? Poems and books that are pretend are called “fiction” and those that are real are called “non-fiction.” Is the poem humorous or serious? Does it tell a story (epic) or is it just a rhyme?

Mental Imagery
Being able to visualize what is happening in a story, poem, or text is a strategy for improving comprehension. Have children close their eyes as you read different poems to them. Encourage the children to make a picture in their brains to go along with what they hear. After listening to the poem, encourage the children to discuss the pictures that they made in their heads.

Saturday, April 18, 2015

A POEM

A Poem
By Dr. Holly

A poem, a poem
Is a very special thing.
It takes the words
And makes them sing.

A poem is a present,
A poem is a treat
With words piled like ice-cream
In your bowl to eat!

A poem, a poem
Is a treasure and an art
So always carry one
With you in your heart.

Let children make a pocket and keep their favorite poem in it. Encourage them to exchange poems with classmates and read to each other.
Hint! To make a poetry pocket seal an envelope, cut it in half, punch holes and tie on a string. Children can decorate these and then wear them around their neck.

Here are some other ideas for celebrating poetry month in your classroom:

A Poem a Day
Choose a poem and read it to your class at the beginning of each day. You can read it and “let it be.” Or, you could use the poem to introduce vocabulary or to spark a discussion. 

*Assign each child a different day to be responsible for bringing in the poem. This would be a good activity for children to do with their parents.

Poetry Club
Write “Poetry Club” on the poster board and decorate with glitter and glue. Explain that anyone who stands up in front of the class and recites a nursery rhyme or poem can be a member of the poetry club. (You might want to model reciting a poem for them.) After they’ve recited their poem, let them sign their name on the poster.
*Design a membership card for the poetry club and run off on cardstock.
Present one to the children after they’ve recited a poem.

Poetry Café’
Plan a poetry party for your students called the “Poetry Café.” Involve children in planning refreshments, making decorations, writing invitations, etc. Encourage each child to learn and practice reciting a poem. Explain that in the coffee houses instead of clapping, the audience would “snap” their fingers for the poets.

Friday, April 17, 2015

BLOOMING WITH POEMS!


When your give children a song and rhyme, 
                               You give them a gift that will last for all time! 
It’s true! We keep songs and poems that we learn when we are young in our hearts and minds all of our lives. Some of the first words we heard were lullabies and lap rhymes that our parents said to us as infants. April is National Poetry Month, so over the next few days I’ll explore ways you can integrate poetry with standards.

Here are eight great reasons for using poetry in your classroom:
1.  Poetry develops oral language.
2.  Poetry develops auditory memory.
3.  Poetry helps children make print connections.
4.  Poetry develops phonological awareness (rhyme, rhythm, alliteration).
5.  Poetry enhances fluency.
6.  Poetry develops vocabulary.
7.  Poetry sparks children’s interest in reading.
8.  Poetry helps children fall in love with language.

Although we teach in an educational system that is skill-based, it is O.K. to include something in your curriculum just because it brings you JOY!

Say them, read them, sing them, chant them, clap them, snap them, but above all, ENJOY them!


Thursday, April 16, 2015

NATIONAL HIGH FIVE DAY!

It’s April 16th and it’s National High Five Day! Start the day by greeting each other with a high five. 
                                  
Teach children how to give themselves a “high five” for a job well done. Hold up both palms facing each other in front of your chest. Pretend to wave with one hand. “Hi 5!” Get it?

Pat on the Back
Trace around each child’s hand on construction paper and let them cut it out. Write a positive comment about each child on the hand and tape it to their back at the end of the day. Parents will be proud when they see their child’s “pat on the back.”

Pickle Tickle Partner Game

Up high. (Give a high five up in the air.)
Down low. (High five down by knees.)
Cut the pickle. (One child touches fingertips horizontally as the other child pretends to slice in between.)
Give a tickle. (Gently tickle each other.)

High Five to Martha Tavarez
Oh, how I loved the teachers in El Paso that I met last week at their Great Beginnings Conference! Martha Tavarez, a kindergarten teacher at Barron Elementary, told me about a book that she made with her class called “How to Cheer Up a Friend.” She sent the book to Scholastic and she’s a finalist for the prize given for the best book created by children for children. Good luck!!!

Here’s a link so you can find out more about “Kids Are Authors.”
http://www.scholastic.com/bookfairs/articles/kidsareauthors

Wednesday, April 15, 2015

DO YOU COMPREHEND?

Comprehension is the reason for reading…Good readers are both purposeful and active. (National Institute for Literacy.)

Good readers are always looking for information and trying to make connections. Talking, writing, dramatizations, and art are just a few of the ways children can demonstrate what they have read (or heard as young learners).

Who? What? Where? When? Why?

Sing this song to the tune of “Ten Little Indians” before reading a story so children will be looking for the information: 
     Who? What? Where? When? Why?
     Who? What? Where? When? Why?
     Who? What? Where? When? Why?
     Ask questions when you read.

I’ve Got the Whole Story in My Hands 

Hold up your hand as you sing to the tune of “He’s Got the Whole World in His Hands:”
     I’ve got the whole story in my hand,
     I’ve got the whole story in my hand,
     I've got the whole story in my hand,
     And I can read.
     I’ve got the who, what, when, where, why…
     And I can read!
*Write story elements on the fingers of a cloth glove and use them to recall details.  In addition to "who, what, where, when, why" you could write "somebody" "wanted" "but" "so" "then."  You could also write "title" "author" "beginning" "middle" "end."

Story Sticks
You will need large craft sticks and a sock for this project.
Write a different story element (characters, setting, problem, resolution, etc.) on each stick with a marker. Place the sticks in the sock and throw the sock over your shoulder before you begin to read. It will be a reminder to your class to focus on those things. After reading the story, let different students choose a stick and tell that part of the story.
*Write story elements on index cards and put them in a sack.

Mama Mia
Make a pizza out of cardboard and felt. Write story elements under slices. Children pick a slice and tell about it.

Tuesday, April 14, 2015

CAVEMAN DRAWINGS TO EMOJI

 
Before there was an alphabet people recorded events with drawings and symbols. Thousands of years later we have embraced pictographs – aka emoji. Emoji originated in Japan and literally means “picture” + “character.” Each character has a specific name and meaning. Many of the symbols are specific to Japanese culture and many are not appropriate for children.

There was an interesting article in the New York Times 4/6/2015 by Tess Felder titled “The Way We Write Today!?!” Although the author states that many people think we are losing the art of writing and spelling because of “digital laziness,” she suggests that people are just sending messages in ever-changing ways. Emojis are an example of a way to express our emotions. Think of it as a new vocabulary to explore in your classroom.

Children are always interested in the adult world and many of them may already be familiar with emoji from playing with their parents’ phones and other devices. Show children some of the emoji symbols and encourage them to tell you what they already know about them. Why do people use the symbols? Download some of the most popular symbols and let children brainstorm what they mean.

Here are two sites that I found helpful for decoding the meanings of the symbols. 


http://www.emoji-cheat-sheet.com/ 
http://emojipedia.org/

If you want a specific symbol try typing “emoji with heart eyes” or whatever you are looking for in your search engine.

You could use these symbols for classroom management. “When I hold up the monkey with his hands over his mouth that means to stop talking and listen to me.”

*Run off several beating hearts and pass them to children who are being kind friends.

*Make a flashcard game with words, math facts, letters, etc. Add a few “upset emojis” (children pretend to cry) and “heart eyes” (children hug themselves).

*Make worksheets or games where children match symbols with the written word.

*Let children create their own symbols or write stories or sentences with the symbols.

Funny thing, it just dawned on me that emoji are very similar to rebus pictograms that we used years ago when teaching children to read. Life is a revolving door for sure!!!

I’m off today for Murfreesboro, TN, and then Dover for the Delaware AEYC Conference, but I’ve got blogs ready for you each day. I hope your week is not only half full, but overflowing!!! 

                         
Isn’t this the cutest thing you’ve ever seen? My friend Janice Vincci sent it to me and it’s a reminder to all of us that the glass is always more than half full!

Monday, April 13, 2015

MY MESSY HOUSE

Several weeks ago I shared an idea that Lorraine Clark gave me called “My Messy House.” I made the game for Kalina when she visited and she LOVED it! She wanted to play it over and over again, and I knew it would be a “winner” with other kids and other skills. 

Thanks to my friend Carolyn Kisloski, I’ve now mastered the “art” of attaching a pdf to my blog. Well, kiss my brain! Now it will be easier for you to take these activities and implement them in your classroom. 
                      
https://drive.google.com/file/d/0B1SnEagA4jljSDk1Z2ZjUldqSlU/view?usp=sharing

Materials: cardstock or heavy paper, spring clothes pins, string

Directions: Cut clothes out of paper using the attached pattern. Write skills on the clothes and place them on the floor. Tie a string between two chairs to make your clothesline. Children choose a piece of clothing, identify the information, and then hang it up on the clothesline.

This game can be used with the whole class, a small group, or in a learning center. Here are a few skills you could reinforce:

Letters – Write letters on clothes and children can hang them up as they say the letter and make the sound.
*Write uppercase letters and lowercase letters on clothes and children can match them and hang them up.
*Hang letters in alphabetical order.

Numbers – Write numerals on clothes for children to hang up in order.Z
*Write math facts on some clothes and numerals on others for children to match and hang up.

Words – Children can hang up words they can read. Can they make a sentence with their word?
*Hang up words in order to make a sentence.
*Write antonyms or synonyms on words for children to match.

You’ll have a CLEAN HOUSE for sure with these games!
P.S.  If you've still got plastic eggs you don't know what to do with, here's an idea Ms. Setzer sent me.  She sends home an empty egg with each student along with a note asking them to find something to put in the egg and write three clues about it.  They share their clues at school the next day as classmates try to guess what it is.  
Hint!  Parents could write clues for younger children and older students could write their own clues.  Great reading, writing, speaking, and listening activity!!!

Sunday, April 12, 2015

ROAD TRIP!

Who’s ready for some summer fun? WOW! You can visit Orlando, Charleston, Indianapolis, Detroit, or Austin and learn at the same time. That’s what I call a win/win!!! 

June 17    Reading, Writing, Math, and More
               Orlando, Florida http://www.sde.com/ReadWriteMath2015/ 

                   
June 18 & 19 College of Charleston Early Childhood Summit
                Crossing the Bridge to Active Learning
                Charleston, SC     
http://ecsummit.cofc.edu/ 

June 22 & 23 Dr. Jean’s PreK-1 Summer Camp
               Indianapolis, IN http://www.sde.com/PD-Events/Seminars/1381

July 13 & 14 Dr. Jean’s PreK-1 Summer Camp
               Livonia, MI (Detroit Area)   http://www.sde.com/PD-Events/Seminars/1381

August 6 & 7 Dr. Jean’s PreK-1 Summer Camp
               Austin, TX http://www.sde.com/PD-Events/Seminars/1381


Pack your bags and I'll see you this summer!!

Saturday, April 11, 2015

"HANDY" IDEAS

Okeedookee!  This is the last day I'm going to talk about graphic organizers, but I hope you've gleaned a few ways to use them to put "pictures" in your students' brains and to use them instead of a worksheet.  

What child doesn't like to have you trace around their hand?  But did you realize that children's hands could also be used as learning tools?
Hand of Thought 
Children trace around their hand. They put the main idea of the story on the hand with supporting details on the fingers.

Children write the title of the story on the hand with “Who?” “What?” “Where?” “When?” “Why?” on the fingers.

Children write a number on the palm and things that equal that amount on the fingers.

Children write their name in the middle and 5 tasks they need to complete that day.

“Five”ness and “Ten”ness
Trace around children’s hands on cardstock and cut out. Glue the palm to another sheet of paper so the fingers can bend up and down as shown.
*Let younger children use five fingers to count or do finger plays.

*Older children can use two hands for addition and subtraction.
*Do you know how to multiply by nine using fingers?  The fingers on the right will represent tens and the ones on the right will represent ones.
1 x 9 = 9  (Put down left pinky and 9 ones will remain.)
2 x 9 = 18  (Put down second finger on left and you'll have one ten and eight ones.)
3 x 9 = 27  (Put down third finger and you'll have two tens and seven ones.)

Friday, April 10, 2015

VENNS AND TIME LINES

Did you know that John Venn conceived the Venn diagram around 1880 to teach elementary set theory?  The Venn remains a useful tool to compare and contrast in our classrooms today.

Children can compare and contrast themselves with a friend. How are they different and how are they alike?

Children can demonstrate primary and secondary colors with Venns.

How about comparing books or characters with a Venn?

Animals (frogs and toads), plants (palm tree and cactus), or foods (apples and oranges) can be explored with Venns.


Letters (curves, lines, lines and curves) can even be sorted with a Venn diagram.

Time Lines
Time Lines are a visual way for children to recall the sequence in a story.

Time lines can be used to illustrate the life cycle of plants and animals.

Children can record the day’s events with a time line or use a time line to organize tasks that they must accomplish at school.

Time lines can also be used for history lessons or as an autobiography.
(What was I like when I was a baby…what am I like now…what will I be when I am grown.)

Hint for Pre-K teachers!  Model using these graphic organizers with your students.  It will increase their print awareness and be useful (prior knowledge) when used in future grades.

Thursday, April 9, 2015

FIT TO A "T"

T-Charts can fit any lesson to a “T.”  Here are a few ways children could do them instead of doing a worksheet:

Fact/Fiction
Singular/Plural
Antonyms
Synonyms
= a number/doesn’t =
Healthy foods/Junky foods
Acceptable behavior/Not acceptable
Friend/Bully
Compound words

Wednesday, April 8, 2015

NAME YOURSELF DAY

I'd like to interrupt my blogs on graphic organizers today with this special announcement that will make your week a little more fun....

Have you ever wished that you had a different name? Well, according to holidayinsights.com tomorrow, April 9th, is the day we can all change our names. And, wouldn’t your kids get a kick out of changing their first name for the day?

Tell them about it today so they’ll have time to make their decision. (They’ll probably sort through dozens of names before choosing one.) Start tomorrow morning by having each student tell their classmates their new name and explain why they chose it.

Sing this good morning song to the tune of “Good Night, Ladies” using their new name.
Hello, (new name).
Hello, (new name).
Hello, (new name).
We’re glad you’re in our room.

Let them make nametags, necklaces, bracelets, or crowns with their new name. Their new name could also be the catalyst for a story about an adventure they might have. 

                    
And you should probably change your name tomorrow as well. How about Queen ___ or King ____?


Tuesday, April 7, 2015

LET'S GET WEBBING!

Let’s explore how to use another popular graphic organizer today. You could model using webs for large group instruction, assign them for independent work, or use them for partner or small group projects.  
                       
Webs can be done on any topic from science to literature, phonics, math, special friends – you name it! Webs can be done as a traditional bubble with lines coming off, or you can make webs that reflect your theme. For example: a spider shape, flower, tree, etc. Webs are open-ended and encourage creativity and thinking outside the box.

Brainstorm – concept in the middle and then add comments

Phonics – letter in the middle and add words or pictures

Numbers – number in the middle and different ways to make that number

Shape – shape in the middle and objects that are made with the shape

Vocabulary – word in the middle with synonyms

Affixes – prefix or suffix in the middle with words made with the affix

Science or social studies– topic in the middle with facts

Writing prompt - facts to include

Special friend – child’s name in the middle with positive comments around

Assessment – This is a fantastic strategy to show individual learning. When you start a unit give children a sheet of paper and ask them to do a web about what they know on the topic. Date and save. At the end of the unit ask them to make another web with everything they’ve learned about the topic. Date and staple with the initial one. Send home with a note to the parents that says: “These webs show what your child has learned during our study of _____.”


How can you use a web today instead of a worksheet???

Monday, April 6, 2015

MAPS FOR THE MIND

Graphic organizers are super simple and super challenging for any grade level or any content area. These visual graphics can help children organize, brainstorm, and problem-solve. They also enable children to classify and visually “see” how things fit together. Think of them as putting a picture in the brain. And, they are perfect for differentiated instruction!

I found several good (free) websites where you can download graphic organizers and explore some of the skills they can reinforce:
     eduplace.com/graphicorganizers
     edhelper.com/teachers/graphic_organizers
     teachervision.com

Today, let’s take a look at TIC-TAC-TOE: THIS IS WHAT I KNOW!  (aka Lotus Diagram)

                              
Phonics – put a letter in the middle and draw objects or write words that begin with that sound

Math – put a number in the middle and write different combinations that equal that amount

Tasks – children write the activities they need to do each day or during the week (They can color them in as they complete assignments.)

Affixes – write the prefix or suffix in the middle and then write words using the affix

Vocabulary or Spelling – children write words in each section and then the teacher calls out words for children to color in

Facts – write a science or social studies topic in the middle and then write facts about it in each frame

Directions – children listen and follow directions (For example: Put a smiley in the upper right hand corner. Draw a star in the middle section on the left. Write your middle name in the middle, and so forth.)

                       
Word Bracelet
I was getting ready to throw away an empty tape dispenser when I remembered this idea. Write words (or letters or numbers or shapes) you are working on around the cardboard roll. Children who can read all the words get to wear the bracelet for the day. (Yea, dumb I know, but I bet your kiddles might like it!