photo 3am_dj_home_zps919fb85e.png photo 3am_dj_about_zps7cce4c75.png photo 3am_dj_website_zps73051235.png photo 3am_dj_ss_zps6759ec2a.png photo 3am_dj_bs_zps43e27832.png
Showing posts with label Creative Activities. Show all posts

Sunday, August 16, 2026

MAKE AND READ ALPHABET BOOKS

IF THEY MAKE IT, THEY WILL WANT TO READ IT!

Home School Alphabet Book
This book will provide a hands-on activity that will encourage parents to talk to their children about school and alphabet letters. Write different letters of the alphabet on cardstock. Give each family a letter and ask them help their child draw pictures or cut out pictures of things that begin with the letter. Put their pages together to make a book for your class.


I Can Read!
Take 26 large sheets of paper (12” x 16”) and write a different letter on each page. Put pages between construction paper to make a book called “I Can Read My ABC’s.” Hole punch and bind with book rings. Invite children to bring in words from food labels, stores, catalogs, etc. that they can read. As childrenbring in their words, help them match up the first letter with the same letter in the book and glue their word on that page. 


Alphabet Art
Write large letters of the alphabet on paper. Give each child a letter and challenge them to create a picture around their letter. “What does your letter look like? Does it remind you of something? Can you use your crayons to turn it intothat object? Try to ‘camouflage’ it so no one knows what your letter is.” Put their drawings together to make a book.


*Challenge older children to turn their letter into an object that begins with the sound their letter makes.

Alphabet in My Mouth
Use the words and tune to “He’s Got the Whole World in His Hands” to make thisbook.

I’ve got the whole alphabet in my mouth.
I’ve got the whole alphabet in my mouth
And I can read.

I’ve got A /a/ /a/ in my mouth.
I’ve got B /b/ /b/…

First, take a close up photo of each child with their mouth wide open and their tongue stickingout. Next, cut letters out of construction paper and glue to the tongue on theirpicture. Write words for each page to go with the picture, such as “I’ve got A /a//a/ in my mouth.”

AlphaBODY Book
Challenge children to make letters with their bodies. Or, divide children into small groups and ask them to make letters.


Themes
Make alphabet books that relate to different themes, seasons, holidays, or concepts you are working on. For example:

Pets Foods We Like
Insects Friends Oceans
Transportation Scary Things
Things We Love ABC’s of Spring
Our Country Sports


CLASSROOM ALPHABET
Instead of putting up the traditional alphabet cards, use one of these ideas to create a unique alphabet.

Children’s Photos
Use children’s first or last names to make an alphabet. If several children have names that begin with the same sound, then group them together. If you don’t have names for letters, then use the school helpers’ names or other common objects.


Sign Language

Cut hands out of felt and glue them to make the manual signs for letters.


Real Objects
Glue small objects that begin with letters to make alphabet cards.


Environmental Print
Use labels from food products or clothes to make an alphabet.
Hint! Give each child a letter and ask parents to send in environmental print for that letter.


Giant Letters
Cut out giant cardboard letters for the first letter in each child’s name. Let them decorate these at home with their families. They could use family photos, pictures of things that are important to them, or drawings to decorate their letters.

Saturday, July 20, 2024

BACK TO SCHOOL - CLASSROOM MAKEOVER


If you’re stressed about getting your room decorated for the first day of school, I've got a great idea for you!!!! Wrap yellow caution tape around your door and post a sign that says “Under Construction.” Explain to the parents that you are trying to develop a classroom community and you want your students to decorate their own learning environment. Invite parents to come back at the end of the week to see what their children have created!

Clare Ashford has a great idea to take “under construction” one step further.
“Before Meet the Teacher night (before school starts), I wrap all my bookcases, computers, etc. in butcher paper and then put an ‘under construction’ sign on them. It serves 2 purposes. 1- that way kids don't get into things while I'm busy talking to people! and 2- we ‘unwrap’ the items together as a class when we're ready to use whatever it is. It is very helpful and makes for an organized start to the year!”

Here are some crafts your students can make to decorate the classroom.

Welcome to the Neighborhood

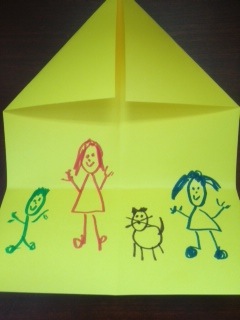
Make a house from construction paper for each child. Fold the paper in half vertically. Open. Fold in the top corners to the middle. Fold up the bottom. Let children write their name on the front of the house. They can open the house and draw their family. You could also ask child to bring in a photograph of their family. Add some trees and a school and you have a great bulletin board.


Class Quilt
Use group art to create a visual representation of the “community” in your classroom. Give each child a 9” square and have them decorate it with pictures of themselves, drawings of their families or favorite things, collage materials, etc. Punch holes in the corner of each square and tie together with yarn to make a quilt to display in the classroom or hallway.


Friendship Chain
Give each child a strip of construction paper to decorate with their name, symbols of favorite things, or designs. Children sit in a circle and one at a time give the teacher their strip to staple and make a chain. Remind the children that your classroom is just like that chain. Everyone must work together to keep it connected and strong. Drape the chain over the doorway.


Banners, Pennants, and Name Plates
Use construction to let children create banners or pennants that reflect them. They might include hobbies, favorite foods, pets, family members, goals, etc.


Fit Like a Puzzle
Take a large sheet of poster board and cut it into puzzle shapes. (You will need one puzzle piece for each child in the room. Mark the back of the piece with an “X” so they will know which side to decorate.) After the children have decorated their piece, challenge them to put their pieces together to make a puzzle. Glue pieces to another sheet of poster board to create a picture puzzle for your classroom.

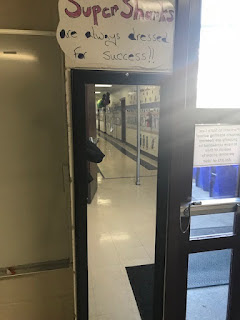
Isn't this a great sign for your classroom door?


Mirror, Mirror!
You know how much kids love to look at themselves in a mirror. Each day put a positive word or note on your classroom mirror to remind the children how special they are!


Lights, Camera, Action!
I loved this idea from KIRPC Head Start in Indiana. The teacher said she bought sheets, tied the ends with ribbons, and then hung them on hooks around the smart board. Taaa daaa!


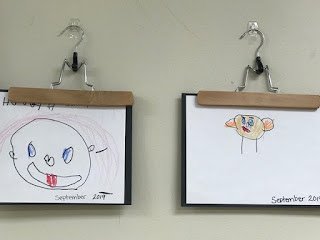
P.S. LOOK AT THIS COOL IDEA FOR DISPLAYING CHILDREN'S ARTWORK OR WRITING USING A PANTS HANGER.


Thursday, October 26, 2023

THE DOT

If you've never read THE DOT by Peter Reynolds you can find out more about it by visiting www.thedotclub.org.


I think we’ve all had experiences similar to the child in the book where we think, “I can’t draw.” “I can’t sing.” “I can’t dance.” “I can’t do statistics.” “I’ll never be able to cook.” Etcetera, etcetera. The book is a beautiful lesson for children about just getting started and TRYING!

THE DOT also reminded me of some simple art activities we can do with our students. These activities are open-ended and can be used with any age or integrated with a unit of study.

Sticky Dot
Materials: sticky dots, paper, crayons or markers
Directions: Give each child a sheet of paper and a sticky dot. Ask them to place the dot anywhere they’d like on the paper. Next, challenge them to create something out of the dot.


Dot to Dot
Materials: 2 dice, paper, crayons
Directions: Children roll the dice and add up the dots. They take a black crayon and make that number of dots randomly on a sheet of paper. Can they connect the dots and create something out of it?


*Have children make dots and then exchange papers with a friend.

Negative Space
Materials: paper, scissors, markers or crayons
Directions: Cut a hole out of the middle of each sheet of paper. Ask children to look at the hole and then create an object out of it.

*Extend the activity by having children write about their pictures.

Wiggles and Squiggles
Materials: crayons, paper
Directions: Have the children close their eyes and make a design on their paper with a black crayon. When they open their eyes, have them turn their paper all around and try to create something out of their design.


*Have children exchange papers of wiggles and squiggles with a friend.