photo 3am_dj_home_zps919fb85e.png photo 3am_dj_about_zps7cce4c75.png photo 3am_dj_website_zps73051235.png photo 3am_dj_ss_zps6759ec2a.png photo 3am_dj_bs_zps43e27832.png
Showing posts with label Small Motor Skills. Show all posts

Saturday, August 8, 2026

SNIP SNAP CUT IT OUT

A friend who is a pre-K teacher always asks her children these questions at the beginning of the school year:
1. How many of you have a television in your home? How many of you have your own television in your bedroom?
2. How many of you have a computer in your home? How many of you have your own computer?
3. How many of you have your own pair of scissors?

Yep! You’re right! Most every child has a television or computer, but only a few have a pair of scissors. Many parents think scissors are dangerous, but they let their children watch violent television programs. I don’t get it? Anyway, here’s a great idea to share with parents.

Cutting and Tearing Tub
Get a plastic tub from the dollar store and fill it with junk mail, catalogs, old greeting cards, scrap paper, etc. Put a pair of children’s safety scissors in the tub and they can cut, tear, and be creative.

More! Add a hole punch or decorative scissors to the tub.

Demonstrate and Model
We have to remember that some children have never had a pair of scissors in their hands before. It’s important to take your time, model, and give explicit directions on basic tasks.

Thumbs on Top!
Remind children when they cut to think about "Tooty Ta" and put their thumbs up. Hold a sheet of paper in one hand and take "little bites" with the scissors.


Elbows In
Another trick an occupational therapist taught me was to give children two wadded up sheets of paper to hold under their arms. This will give them more control when they begin to cut. Another trick from an OT was to have the children lay on their tummies and cut.


Cutting Song (Tune: "The Caissons Song")
Cut it out! Cut it out!
With your scissors cut it out.
Snip, snap, and cut it out.

Thumbs on top,
Take small bites.
Hold your page in the other hand tight.

Cut it out! Cut it out!
With your scissors cut it out.
Snip, snap, and cut it out.


https://www.youtube.com/watch?v=DGhhRqqVzXE

Tuesday, June 30, 2026

FINGER PLAYS FOREVER

https://drive.google.com/file/d/1i6sEb-2mtP3WlVSB-xCCBruLXd1eAQWU/view?usp=sharing

I've heard people say, "Finger plays are old fashion." Well, you might call them that, but then you'd have to call chocolate chip cookies and mashed potatoes and BINGO and swings and hugs...old fashion as well. Let me share just a few things children can learn when you do a finger play. (You might want to enlighten some administrators or supervisors or parents with this information. Sometimes they just don't "get" what we do!)


Engagement – Doing a finger play is a natural way to engage children’s attention and help them focus.

Oral language – Repetition of finger plays builds oral language skills.

Auditory memory – Children activate their short term memory as they memorize finger plays.

Comprehension – Most finger plays have a simple story plot for children to follow.

Imagination – With so much time spent in front of a screen, finger plays encourage children to make pictures in their brains.

Sequence – Remembering the sequence in finger plays can help children retell stories.

Phonological awareness – Finger plays build a foundation for rhyme, rhythm and alliteration.

Eye-hand coordination – Visual connections with finger plays are important for writing and reading.

Small motor skills – Doing finger plays is like sending the fingers to the gym to exercise.

Active Learning - Multiple senses are engaged as children watch and wiggle their fingers and repeat rhymes.

Purposeful Practice for Automaticity (aka repetition) - Children will enjoy saying these rhymes over and over.

Brain Breaks - Children will be oxygenating the brain and crossing the midline as they do finger plays. Memorizing poems and rhymes is also good for short term memory.

Executive function – Children develop self-regulation and impulse control when they participate in finger plays.

Social skills – All children can be successful with finger plays with this group experience.

State Standards
– You got it! Speaking, listening, comprehension, phonological awareness all rolled into one!

Transitions - Finger Plays can be used to entertain children during transitions or any time you’ve got a minute or two.

Here's a video where you can watch me do a few finger plays:


https://www.youtube.com/watch?v=Zmszqroq1pM

Monday, June 29, 2026

PLAY DOUGH POWER

Oh, happy day!  It's summertime and you have a chance to put your feet up for "a few days" before it's time to start all over again.  I am so happy that the pendulum is swinging back to "hands-on" and PLAY.  You'll find some free downloads on my blog each day that I hope will remind you how much fun teaching can be! 

Although play dough wasn't invented until the 1950's, molding materials, such as clay, have been an integral part of early childhood programs forever. For thousands of years children have joyfully played with mud and sand. In this book you'll see how play dough can be used as a learning tool - just a whole lot more fun than worksheets or a computer game!


WHY?
When children tap and swipe on a device or sit passively gazing at a big screen there is little sensory input in the brain. We know that the only way information can get IN the brain is through the senses. Think about how much more input there is when children touch, see, talk, and hear when they are using play dough.

Small Motor Skills
Pinching, squeezing, rolling, and molding dough is like sending little fingers to the gym. Many children's small muscles are not developed and they struggle to hold a pencil and write. Play dough is a natural way to strengthen those little hands.


Social Skills
All you have to do is put out some play dough for a small group of children and observe. They will learn to share and spontaneously communicate with their friends about what they are making. They'll also challenge their friends to be creative.

Emotional Skills
Play dough is a great release for children who are stressed or have the fidgets. As they manipulate the material they can release pent up energy and calm themselves.

Imagination
So many crafts and things we give children have steps and a "model" for them to reproduce. Play dough is a blank canvas that can be turned into anything! Whatever the child creates is theirs and represents the "process" rather than the "product."


The Play Dough Song Tune: “Row, Row, Row Your Boat” 
(Children make the motions with the play dough as they sing.) 

Squeeze, squeeze, squeeze play dough (Children squeeze dough.) 
Feels so good to me. 
Squeeze, squeeze, squeeze play dough 
It’s easy peasy! 


Poke – Poke fingers in the dough. 


Pinch – Pinch off pieces of the dough. 

Roll – Roll the dough into a snake. 


Pat – Pat like a pancake. 

Thursday, August 21, 2025

BIG SKY WRITING

Occupational therapists are some of the smartest people I know. I’m always picking their brains for ideas that will help children learn. One thing they’ve taught me is to practice making big strokes, shapes, and letters in the air before asking children to do it on paper. Think outside the box with these strategies to help children at all age levels.

Note! Even second graders would enjoy writing their spelling words on their “palm pilot” or tummies.

Sky Writing (aka "invisible writing")
Keep arm stiff and extend index and middle fingers. Make lines, circles, slants, pushes and other strokes in the air.

Note! The teacher will need to reverse movements if doing it in front of the class.


Air Writing (Lisa Callis)
Go from large to small as you practice air writing letters, numerals, shapes, etc.
Stick out one arm and write with your finger.
Hold your shoulder with the opposite hand as you write with one finger.
Hold your elbow and write.
Hold your wrist and write.
Hold finger and write.


Writing Wand
Staple ribbon to a straw or tape tissue paper to a craft stick to make a writing wand.


Noodles
Cut swim noodles into 8” sections and let children use these to write in the air.


Tummy Writing
Have children lie on their tummies and extend their index finger above their head. Practice making shapes, letters, etc. on the floor. (This technique will help children start writing “at the top.”)

*Let children practice cutting, drawing, and reading on their tummies to give them control as they build upper body strength.


Body Parts
Let children suggest different body parts, such as elbows, noses, toes, etc. to write with.


Palm Pilot
Hold up one palm. Write on it with the index finger from the other hand. Be sure and “erase” in between letters!


Back to Back
Children stand in a circle and then turn right so they are all facing in the same directions. The teacher begins by making a letter, shape, numeral, etc. on the first child’s back. The first child draws the same thing on the second child’s back. Continue around the circle as every has a turn.


Wet Sponge
Let children dip a small piece of sponge in water and write with it on a chalk board.


Rainbow Writing
Make a large letter or shape on a chart. Children trace around it with different colors of crayons or markers.

Sunday, August 17, 2025

READY TO WRITE

We are putting THE CART BEFORE THE HORSE when it comes to having children write. Believe it or not, we didn't even teach children to write in kindergarten in the "old days." Lined paper and handwriting were part of the first grade curriculum. Children's hands and small motor skills haven't changed, but our expectations certainly have!!

There are several basic strokes that children need to draw before expecting them to make a letter or number. In order of development, the strokes are a vertical line, a horizontal line, a circle, a cross, a square, a diagonal line, an X, and a triangle. Here are some multi-sensory materials where children can experiment and practice making the pre-writing strokes.


Sensory Tub
Fill the bottom of a plastic tub with sand, rice, salt, grits, or another sensory material. Encourage children to make the strokes in the tub.


*Squirt shaving cream on a laminated table top or lunchroom tray. After free exploration, encourage children to practice making strokes.


Play Dough Book
Use file folders to make this book. On one file folder write “Can you make lines?” and draw lines. On another folder write, “Can you make curves?” and draw curves.


Write “Can you make shapes?” on another file folder. Make other objects and shapes for children to reproduce on additional folders. Laminate. Hole punch and bind the folders with book rings.

*Let children use play dough, Wikki Stix, and other materials to reproduce lines, curves, and shapes.


Connect the Dots
Use a marker to make dotted strokes. Put a drop of glue on top of each dot. Dry. Children trace over the dots of glue with their finger.

Hint! Make the first dot green and the last dot red to indicate where to start and stop.


Plastic Needlepoint Canvas
This plastic material that looks like screen can be purchased at most craft stores.


Place a piece of paper on top and then make strokes and shapes with a crayon. Press firmly for best results. Trace over with your finger.


Rainbow Writing

Make strokes with a black marker. Children take different colors or crayons or markers and trace in multiple colors.


• Make giant pre-writing strokes on chart paper and tape to a wall. Encourage children to work together to make “rainbows” from the shapes. 


Sidewalk Chalk
Provide children with chalk so they can practice strokes, shapes, and letters on paved surfaces.


Flashlight
Turn off the lights, give children a flashlight, and let them make shapes and letters on the wall.

Horizontal, Vertical Song
(Carrie O’Bara and Terri Miller) (Tune: “Where Is Thumbkin?”)
Horizontal, horizontal, (Forearms held up horizontally in front of chest.)
Vertical, vertical. (Forearms bent at elbows to form right angles.)
Horizontal, horizontal, Vertical, vertical.
Then diagonal, then diagonal. (Right arm slants in front and then left.)
Add a curve. Add a curve. (Make a “c” with right hand and then left.)
Then diagonal, then diagonal.
Add a curve. Add a curve.

Tuesday, July 22, 2025

ART CENTER

WHY?

When you set up an open art center in your classroom children will have the opportunity to plan and create their own unique ways. They’ll also be using engineering skills as they design what they want to create and technology skills as they use the tools (scissors, brushes, glue, etc.) They’ll be able to make choices, experiment, solve problems and be truly creative. It’s important to provide a wide variety of materials that they can get out and clean up independently


Materials:

Shelves

Easel

Tables and chair

Drying rack

Smocks

Brushes

Paints, water colors, finger paint

Hole punch

Paper (scrap, construction, cardboard, newspaper, tissue paper)

Scissors

Crayons, colored pencils, markers

Lunch sacks, paper plates

Paper cups

Glue, glue sticks

Material scraps, buttons, yarn

Stapler

Tape

Junk scraps (paper towel rolls, egg cartons)

Magazines, catalogs

Chalk

Paper clips, brads

Clay, play dough

Craft sticks

Pipe cleaners

Natural objects (flowers, leaves, rocks, shells)

Hint! Store materials in clear containers and label with words and pictures of the objects.


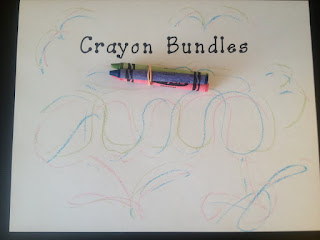
Bundles
Materials: crayons, rubber bands, paper
Directions: Wrap a rubber band around 3 or 4 crayons. Children can hold the “bundle” and draw a design or picture on their paper.


Friday, December 6, 2024

HOLIDAY SNACKS

Let's get cooking with some of these recipes!

Snowman Soup
You’ll need instant hot chocolate with miniature marshmallows, zip sandwich bags, wrapped candy canes, and red ribbon to make this treat. Put the package of the instant hot chocolate in the zip bag. Tie on a candy cane with these directions:

Here’s a little snowman soup –
Complete with stirring stick.
Add hot water, sip it slow.
It’ll warm you up real quick!”


Hint! This would be a great gift for school helpers and volunteers.


Wreath Sandwich
You will need bagels, cream cheese, green food coloring, and fruit loops to make this snack. First, dye the cream cheese green. Spread it on the bagel and add red fruit loops for berries.


Menorah Snack
Children will need a small banana, pretzel sticks, and a piece of red licorice to make this menorah. Peel the banana and insert a piece of red licorice in the middle. Insert 4 pretzel sticks (candles) on either side.


Reindeer Sandwich
You will need bread, peanut butter, pretzel twists, raisins, and a red M & M to make this yummy sandwich. Cut the bread into two triangles. Spread peanut butter on the bread and then decorate with raisin eyes and a red candy nose. Break pretzels in half and add for antlers.


Note! If children have peanut allergies spread with cream cheese or another topping.


Reindeer Oats 
Put a few tablespoons of butter in a flying pan. Add a few cups of Cheerios and stir over low heat. Sprinkle with salt.
*You can also sprinkle on cinnamon sugar for a sweet snack.

Saturday, November 30, 2024

SMALL MOTOR CENTERS

Keep those little hands busy with these materials.

Cookie Cutters
Materials: cookie cutters, pencils, scrap paper, scissors


Children trace around the cookie cutters on scrap paper and then cut out with the scissors.


Children can hole punch and then use the shapes to make ornaments or a necklace.


Paper Plate Sewing Cards
Materials: holiday plates, hole punch, yarn


Punch holes around the outside of the plates. Let children “sew” yarn through the holes.

*You can also make sewing cards out of old greeting cards.


Play Dough Writing

Let children make a pancake with the play dough and then write with a golf tee. This will strengthen those little fingers as they practice writing letters, numbers, shapes, words, etc.


Bells
String bells on pipe cleaners and string to make jewelry.


Gifts for the Birds

Materials: pipe cleaners, cereal with holes

Let children string cereal on pipe cleaners. Twist the ends to make a circle and hang outside for the birds.


Cut It Out
Materials: catalogs and advertisements


Put catalogs, coupons, advertisements, etc. in a center with scissors, glue, and paper.
Children can cut out objects they would like to “get or give” and glue them on a paper.


Sunday, August 18, 2024

CUT IT OUT

Here's a blog and Youtube video I made to help parents work with their children on scissor skills.

*You might even find an idea or two that you can use in your classroom!


Helping Your Child with Scissor Skills

WHY?

Fine motor skills involve the small muscles in the hands. Learning to control their hands is important for eye-hand coordination and every day tasks such as dressing, eating, brushing teeth, etc. Small motor activities also nurture bilateral coordination – using both sides of the body at one time to perform a task. Cutting may sound simple to an adult, but using both hands to do different things as you cut is a complex skill for young children.

Providing children with a wide variety of activities and multiple materials at home will help them feel competent and capable when they start school and they are expected to write, draw, and cut with scissors. Blocks, dressing toys, puzzles, stringing beads, play dough, crayons and markers, sand and water toys, cooking activities, construction toys, and clapping games and finger plays are meaningful ways that children develop small motor skills naturally as they play.

Observe children as they are engaged in cutting and other small motor activities. You can almost see their brains “firing off” as their minds and bodies work in unison. You’ll often see their tongues moving as they concentrate. As children cut, draw, and work with their hands it’s good for their brains, self-regulation, and a sense of competence.

Many teachers have noticed a decline in children’s fine motor skills over the years. “Tap and swipe” just doesn’t activate the brain and hand muscles like cutting and drawing and building and stringing. Activities involving scissors and fine motor skills can be a fun way for parents to interact with their children. In addition, they are a great balance to “screen time” because they are real, active, and hands-on!

You want your child ready for success at school by purchasing the backpack, school supplies, packing their lunch, and dressing them properly. You can also help your child get ready for this big step by practicing scissor skills.


Tips!!!

*Supervise! Make a cutting tub for your child with a plastic tub and a pair of safety scissors. (Act like it is a gift for your child when you present it to him or her.)


Model, model, model! Demonstrate these activities and get the child started by engaging with them and carrying on a conversation. Vary the materials in the tub to keep them interested.

*Once the child is familiar with the cutting tub you can take it out upon their request or to entertain them when you are busy.

*Discuss rules for using scissors. No cutting hair, clothes, or anything that is not in the cutting tub.

*Set realistic expectations. Children have to crawl before they can walk, and they have to do a lot of tearing and snipping before they can cut out a shape. Follow their lead and let natural development unfold.


Getting Ready

Picking up a pair of scissors is probably something you don’t have to think about, but children will need some guidance is how to hold scissors correctly.

Thumbs Up – put a sticker or draw a face on the thumb to remind them to keep it on top. Put a ribbon or colorful tape on the hole where the thumb should go.


Helper Hand – Explain that one hand will cut and the other hand will be the “helper” and hold the paper. “Show me your cutting hand. Show me your helper hand.”

Open and Shut – Practice opening and shutting the scissors and pretending it’s an alligator taking little bites. (Working with tongs or tweezers can help this motion.)

Flying Elbows – Children have a tendency to flap their arms when they cut. Encourage them to keep their elbows at their sides. You can also wad up a sheet of paper to go under each arm to stabilize the forearms.


Tearing – Children need opportunities to tear before we ask them to cut. Start with thin paper like tissue paper and magazines and progress to thicker paper like cardstock, cardboard, and paper plates.


Encourage children to make small tears to make confetti. Let them fill a water bottle with the little pieces to make a shaker. Or, let them glue the confetti to a paper plate to make a collage.

Snipping– Give children thicker paper (such as construction paper, index cards, or grocery bags) to begin snipping. They can practice opening and closing the scissors as they make fringe.


*Strengthen muscles by cutting play dough.

*Give them 1” strips so they can snip through.

*Let them snip straws or yarn.


*Offer paper plates, greeting cards, wrapping paper, food boxes, and other types of paper in keep children interested.

*Collect natural objects like pine straw, leaves, and flowers for them to cut.

Lines– Draw lines on heavy paper for children to practice cutting lines.

*Draw “paths” about 1” to ½” wide for children to cut between.


*Make dots (use stickers) for children to follow and cut lines.

*Cut up junk mail into strips.

*Ask children to cut out triangles, squares, and shapes with straight lines.

*Have children cut coupons out of the newspaper.


Curves- Have children cut on curved lines.

*Let them cut out complex shapes or objects from magazines or advertisements. (Toys are always fun!)

*Have children trace around cookie cutters and then cut out the shapes.


*Encourage children to do creative activities by providing them with paper, markers, yarn, and a wide variety of art media.

It’s the Process, Not the Product!

Early childhood teachers will agree that when it comes to drawing, cutting, and creating it’s the process, not the product. Your child might not be Edward Scissorhands, but she’ll certainly feel more comfortable and competent when she’s handed a pair of scissors at school!