photo 3am_dj_home_zps919fb85e.png photo 3am_dj_about_zps7cce4c75.png photo 3am_dj_website_zps73051235.png photo 3am_dj_ss_zps6759ec2a.png photo 3am_dj_bs_zps43e27832.png

Friday, March 18, 2016

BUTTERFLY WINGS

Is there anything more magical or amazing than the life cycle of a butterfly? We may grow older, but we're still children at heart when we see a butterfly. There are so many learning opportunities from caterpillars and butterflies: comparing and contrasting fiction and non-fiction books, saying finger plays, writing books about the life cycle, art projects, dramatizations...

Butterflies 
(Tune: Up on the Housetop)
First comes the butterfly (Hook thumbs and flutter fingers.)
Who lays an egg.
Out comes a caterpillar (Wiggle index finger.)
With many legs.
Then the caterpillar
Spins and spins (Roll hands around.)
A little chrysalis
To sleep in. (Place head on hands.)
Oh, oh, oh! (Fingers around eyes.)
Look and see.
Oh, oh, oh!
Look and see.
Out of the chrysalis, (Hook thumbs and flutter fingers.)
My, oh, my!
Out comes a (Move butterfly fingers all around.)
Beautiful butterfly!
https://www.youtube.com/watch?v=In_akp9Fxbc


Drama
Let children act out the life cycle of a butterfly. First, they lay on the floor in a ball. Next, they crawl around like caterpillars. Can they spin around and make a chrysalis? Finally, they can spread their wings and FLY!

Baggie Butterfly
Make a butterfly by tearing up little pieces of colored tissue paper and putting them in a 
zip lunch bag. Gather up in the middle and twist on a pipe cleaner to make the body and antennae. Attach a string for flying.


Smoosh Painting
Cut butterfly shapes out of newsprint. Fold in half. Let children drop paint with a spoon or eye dropper on one half. Fold and rub. Open to view your butterfly.

                                      
Life Cycle Flip Book
Make a flip book for the children to illustrate the life cycle of the butterfly.
                                                                                   
I've got a special free song download called "Caterpillar's Story" for you on my website on April 1st - and that's no joke!

Thursday, March 17, 2016

BABY BIRD STORY

Top of the morning to you!!  Don't forget to wear something green!  I hope you find a pot of gold!!
                                     
Here's a a "cut and tell" story I 'll be sharing at the VAECE Conference (Virginia Association for Early Childhood Education) in Richmond today.  Adults seem to love the story as much as the children.  

Materials: construction paper, scissors, marker
Directions: Begin this story with a sheet of paper, scissors, and marker in your lap. Follow the directions as you tell the story. (You can either cut the paper or tear it.)

It was spring time and mother and father bird decided to build a nest. Who can tell me some of the things they might have used to make their nest?
(Fold the paper in half and cut accordingly.)

Mother bird sat on the nest and laid a beautiful egg.
(Open the nest to reveal the egg shape.)

Now, mother bird could not leave the egg. She had to sit on it and keep it warm and safe. Even when it rained and the wind blew hard, mother bird had to sit there and protect her egg. Fortunately, two little bugs who lived in the tree made friends with mother bird and kept her company. This is one little bug. His name was _____. (Use a child’s name in the class.)
(Draw a little dot for the bug.)
This is the other little bug. Her name was _____, (Use another child’s name in the class.)
(Draw another little dot on the opposite side.)

One day as mother bird was sitting on the egg, she heard a little cracking sound. She looked down and saw a little crack in her egg.
(Cut a little slit on the fold slanted toward the eyes.)
Then she heard a great, big cracking sound.
(Cut around the eye and slit as shown stopping before
you get to the end of the egg.)

And guess what mother bird saw coming out of the big crack in her egg? 
She saw her baby bird!
(Open the egg and bend up the beak as shown.)

Hint! You can also cut this story out of a paper plate.

Wednesday, March 16, 2016

HAPPY "BIRD" DAY!

Some of you have probably made this nest from a paper bag with me at my workshops. All you have to do is open the bag and then slowly roll out and down to create the nest. Recently, a teacher added to that by telling me about the tissue birds she makes with her class. Wad up one tissue and wrap another tissue around it. Tie a string to make the head and fluff up the rest to be the body and wings. (An adult will need to do this part.) Children can add eyes with a marker and glue on a beak. The teacher said it’s so cute to see the children put the bird in the nest and carry it gently as if it were real.
*Good time to introduce vocabulary words like “fragile” and “delicate.”
*How about informative writing? How to build a nest.
*Creative thinking - What would you do if you were a bird?
                                           
Two Little Blackbirds
Two little blackbirds sitting on a hill. (Stick up both thumbs.)
One named Jack (Wiggle right thumb.)
And one named Jill. (Wiggle left thumb.)
Fly away Jack. (Put right thumb behind back.)
Fly away Jill (Put left thumb behind back.)
Come back Jack. (Bring back right thumb.)
Come back Jill. (Bring back left thumb.)

Opposite variations:
One named Happy and one named Sad… (Say happy and then sad.)
One named Loud and one named Soft… (Say loud and then soft.)
One named Fast and one named Slow… (Move one fast and one slow.)
Continue letting children think of names and motions for the birds.

                                             
Bird Puppet
One more little bird day project that’s made with felt, glue, and a wiggly eye.                                                                                                   Cut out two bird bodies similar to the one shown. Cut out the wings on the fold. Glue around the edges leaving a 2” opening in the bottom where you can insert your finger. Cut a 2” slot in the top and insert the wings. Add a beak, eyes, and you’re ready to fly.
*Call it “Word Bird” and let children wear it to read words.
*Use it to track from left to write as you read chorally or count on the calendar.
*Play the “quiet game” with word bird. One child wears the bird and says:

         Blue bird, blue bird, how quiet can you be? (Insert whatever color.)
         Fly to a quiet friend, one, two, three.
The child passes the bird to a quiet friend who comes to the front of the room and the game continues.

Birdies  (Happy Everything CD)
Way up in the sky (Put hands in arm pits and flap arms
The big birdies fly. like a bird.)
Way down in the nest (Make a nest by cupping hands.)
The little birds rest.
With a wing on the left, (Wiggle left arm like a wing.)
And a wing on the right, (Wiggle right arm like a wing.)
The little birds sleep (Put head down on palms as if sleeping.)
All through the night.
SHHHHHH! (Put finger over lips.)
DON’T WAKE UP THE BIRDIES!
Then up comes the sun. (Put arms over your head.)
The dew falls away. (Bring down palms.)
Good morning! Good morning! (Put open palms around your head.)
The little birds say.
*This is the perfect song to demonstrate the exclamation point and talk about exaggeration!

Tuesday, March 15, 2016

MATH AND GAME STICKS

Math Sticks - Use the sticks for making sets, counting, tally, creating shapes, addition, subtraction, patterning, and so forth.  They can also make bundles of ten (rubber band ten sticks together) and use them to demonstrate place value.
                                 
Games – Use sticks to make game pieces. Write skills on most of the sticks and write “BOOM!” on two or three. Place in a can. Children take turns drawing sticks and reading the information. If they choose “BOOM!” they must return all their sticks back to the can.


*Fiddlestick is a similar game. Color the ends of the sticks different colors. Write skills on the sticks. Place the sticks with the colored end in the can. Choose a color. Pass the can around, and if a child chooses the designated color they yell, “Fiddlestick” and return all their sticks to the can.

Skill Sticks – Instead of flash cards, write skills (letters, numbers, words, math facts, 

phrases, vocabulary, etc.) on sticks.
                  
Puppets – Use children’s photos, drawings, or magazine people to make puppets children can use to retell a story, role play, or in other creative ways.  

                                              
Construction Sticks -Give children sticks, tape, clay, glue and see what those little engineers can create.

Monday, March 14, 2016

LITERACY STICKS

"Stick" those literacy standards with these props.

Pointers - Glue a large googly eye to the end of a stick. Tell children to “keep their eye” on the word as they track a line of print.
*Can their eye find the capital letter at the beginning of the sentence?
A word wall word they can read? A noun?
*Fake jewels and other small objects can also be used to make pointers.

*Children can "kiss their brains" with the heart.
                      
Space Man - Glue a picture of a space man on a stick. Children can use “space man” between their words as they write.

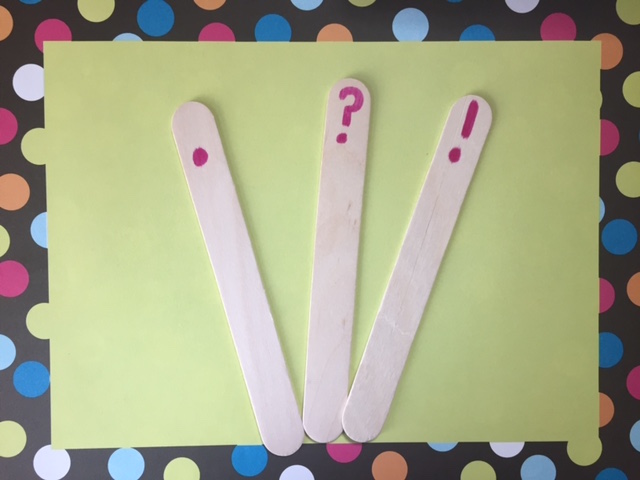
Punctuation Sticks - Draw a large period, question mark, and exclamation mark on the ends of three sticks. Write a sentence on the board. Put sticks one at a time at the end of the sentence for the children to read.
*Write the ABC’s or numbers on the board in sets of 3. Can children read
these with appropriate expressions?
*Let children use the sticks as they read with a buddy.
                                   
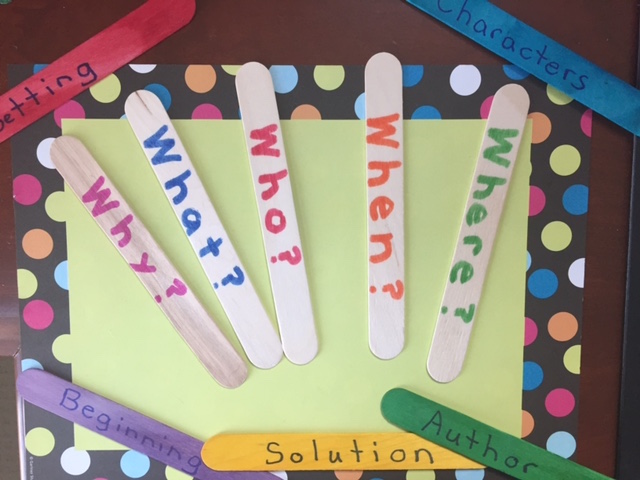
Comprehension Sticks – Write “Who?” “What?” “Where?” “When?” “Why?” on sticks and insert them in a sock. Throw the sock over your shoulder before reading to prompt the children to be active listeners. After reading the story, let children choose a stick and tell that part.
*You could also write “author, illustrator, title, beginning, middle, end” or “characters, setting, problem, resolution.”
                                                   
Letter Pops - Glue magnetic letters to the end of craft sticks. Children can use these to match letters with print in the classroom.
*Children can get together with friends and make words.
*Match uppercase and lowercase letters.
*Pass these out for children to hold up as you sing alphabet songs.
*Place in the classroom library. Children choose a letter and then match it up in the book.

*Put letter pops in a can in a center.  Children choose a stick and write the letter.
*Make shape pops or number pops.

Sunday, March 13, 2016

JUMBOLAYA JUMBO CRAFT STICKS

You are going to think, “Here she goes again!” or you might say, “I think they need to put her away!” You know I do this blog because I love you and I want you and your children to have more fun learning. This blog also serves as therapy for me! Seriously, I need a hobby! I can’t paint, sew, play golf, play bridge…but I can take something like jumbo craft sticks and come up with lots of fun learning opportunities.

Why? Jumbo craft sticks fit my criteria of cheap, simple, and easy. They are inexpensive, virtually indestructible, and can be transformed into a game or management tool in five minutes. In a plastic/screen world, sticks provide a natural element and something children can hold in their hands.

I hope over the next few days one or two of these ideas will “stick” and work in your classroom. Today you’ll find management sticks, tomorrow literacy sticks, and the next day math, games, and art sticks.


Song Pops - Cut 3" circles out of construction paper.  Write song titles on the circles and glue to craft sticks to make "song pops."  Place in a can and when you need to wiggle and smile pull out a song pop and sing and dance!

Lucky Sticks - Have each child write their name on a stick. Place the sticks in a cup on the teacher’s desk. When there is a special job to be done the teacher chooses a stick. After that child has had a turn, her stick goes in the teacher’s desk. When all sticks have been selected, they all go back in the cup for another turn.

                           
Question Sticks - Children write their name in the middle of a stick. Color one end green and one end red. Put the sticks in a can or cup with the green end up. The teacher asks a question, swirls the can around, and then chooses a stick. That child may answer the question or “phone a friend” for help. Place the stick in the can with the red end up after they’ve had a turn. When all the sticks are red on top, turn them over and start again.

Buddy Sticks - Put like stickers, letters, etc. on the bottom of sticks. When you get ready to do a partner project let children choose a stick. The person whose stick matches theirs becomes their partner.
*Put a letter, shape, numeral, and sticker on the four ends of the stick. Children will be surprised by the category you call for them to match up.

Happie Sticks - Write special things children can do if they finish their work early on sticks. Children can choose one at a time and do the activity.
For example: make a book, play a computer game, read a story, do a job for your teacher, play a board game, make something in the art center, etc.
                             
Reward Sticks - Instead of tangible rewards, let children choose a stick with a non-tangible reward on it. For example: sit at the teacher’s desk, take off your shoes, no homework, 15 minutes of free time, chew sugar-free gum, sit by a special friend, choose a game for the class to play, etc.

Fiddlestick – Tie a 20” piece of string to the middle of the craft stick. Children keep this in their desk and when their hands get “wiggly” they can wind and unwind the string on the fiddlestick.

Blending Sticks – Color the left end of the stick green, the middle yellow, and the left end red. As you stretch out sounds in CVC words the children touch the green for the first sound, the yellow for the middle sound, and the red for the end sound. Have them slide their finger over the stick as they blend the sounds and say the word.

Saturday, March 12, 2016

MARCH ENGINEERS

Hop on the STEAM bandwagon this month with these activities. Students could do these independently, with a study buddy, or in a small group.
                                 
Flying Objects – Let children design kites, paper airplanes, or other objects that will fly.
Hint! There are lots of good websites and videos where you can learn how to make paper airplanes. 


Egg Drop – Give children a lunch bag and ask them to collect recycled materials at home.  Divide them into small groups and give each group a raw egg. Can they design a container (using the recycled materials, tape, etc.) that will protect the egg if they drop it?


Stand on a chair and drop the egg.
What happens if you drop the egg from the top of the climber on the playground?
*Let students predict which group’s container will be the most effective.
                           

Leprechaun Trap – Challenge children to use recycled materials to create a trap for leprechauns.  They could do this at home with their parents or as a small group project.
*Encourage them to explain their contraption.
*Write creative stories about what they would do if they caught a leprechaun.

*Let them create a leprechaun trap with unit blocks or Legos.