photo 3am_dj_home_zps919fb85e.png photo 3am_dj_about_zps7cce4c75.png photo 3am_dj_website_zps73051235.png photo 3am_dj_ss_zps6759ec2a.png photo 3am_dj_bs_zps43e27832.png

Wednesday, November 30, 2011

THE GIVING BOOK


Mercy me!  What to do with all those advertisements and catalogs!  Here’s an idea you will love!  And, it might encourage children to think about others rather than themselves.

Encourage your students discuss why they like to give gifts to others.  How does it make them feel when they do something special for someone they love?  Explain that they will each get to make a book of things they would like to GIVE to others.  You can use construction paper or cut wrapping paper into 8 ½” x 11” pieces.  Lay two sheets of white paper on top of a piece of wrapping paper.  Fold in half and staple.  Provide children with catalogs and store advertisements.  Let them cut out objects they would like to give others and glue them in their “Giving Books.”  Encourage them to label the presents with the recipient’s name.
 Adaptation:  Use a gift bag to make a giving book.  Cut the front and back off the bag.  Cut paper the size of the bag and give a sheet to each child.  After children draw or cut out pictures of presents they would like to give, staple their pictures in between the front and back of the bag to make a class book.

Tuesday, November 29, 2011

CHOIR OF ANGELS


This is an easy idea if you need a quick costume for a school program.  Cut the rim off a paper plate.  Attach a red construction paper bow.  Cut a slit so it can open and be placed around the neck.  Now, your students can shine their halos!

Monday, November 28, 2011

FREE GIFT WRAPPING

Wrapping Paper – With tissue paper, paper plates, paint, and cookie cutters you’ll be all set to create your own wrapping paper.  First, fold a paper towel and place it on a paper plate.  Pour paint on the paper towel.  Let children dip the cookie cutters in the paint and print on the tissue paper.
*Let children paint with pine boughs grocery sacks or newspaper to create wrapping paper.
*Use fruits or vegetable prints to create one of a kind wrapping paper.
 Gift Tags – You’ll need card stock, an ink pad, fine tip markers, and ribbon to make these gift cards.  Cut card stock into 2” x 5” rectangles.  Fold in half.  Children press their thumb on the ink pad and then print on the front of the card.   Let them add details with markers.  Punch a hole and tie on a ribbon.
 Greeting Cards  - Let children use fingerprints or handprints to make “one of a kind” holiday cards.  They can also make a colorful collage by gluing bits of
wrapping paper to a blank card. 

Sunday, November 27, 2011

A TASTE OF THE SEASON

Snowman Soup – You’ll need instant hot chocolate with miniature marshmallows, zip sandwich bags, wrapped candy canes, and red ribbon to make this treat. 
Put the package of the instant hot chocolate in the zip bag.  Tie on a candy cane with these directions:
         Here’s a little snowman soup –
         Complete with stirring stick. 
         Add hot water, sip it slow.
         It’ll warm you up real quick!”
Hint!  This would be a great gift for school helpers and volunteers.

Wreath Sandwich - You will need bagels, cream cheese, green food coloring, and fruit loops to make this snack. First, dye the cream cheese green. Spread it on the bagel and add red fruit loops for berries.
 Menorah Snack - Children will need a small banana, pretzel sticks, and a piece of red licorice to make this menorah. Peel the banana and insert a piece of red licorice in the middle. Insert 4 pretzel sticks (candles) on either side.
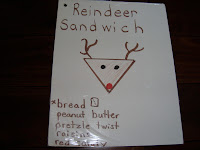
 Reindeer Sandwich – You will need bread, peanut butter, pretzel twists, raisins, and a red M & M to make this yummy sandwich.  Cut the bread into two triangles.  Spread peanut butter on the bread and then decorate with raisin eyes and a red candy nose.  Break pretzels in half and add for antlers.
Note!  If children have peanut allergies spread with cream cheese or another topping.

WOE is me! 

A week ago I was invited to do a workshop at the Lehigh Carbon Community College in PA.  Several teachers gave me great ideas, but when I looked for my notes today they weren't in my suitcase!!   I did find a few suggestions from my friend Mary Ann DiSapio who had attended a SMART Program in Minneapolis.  She showed us some simple jumps, helicopter spins (arms out and spin around), pencil rolls (roll in the floor), balance beam, and crawling activities.  I definitely want to learn more about this!  
Where are my notes?

Saturday, November 26, 2011

DECK THE ROOM


How about using handprints to make a wreath or tree for your classroom door?  


Hint!  Children could also dip their hands in green paint to make these decorations.

Friday, November 25, 2011

THE TWELVE DAYS OF CHRISTMAS

Do you know what today is?  Yep!  It’s November 25th and that means Christmas is just a month away.  Over the next 12 days I’ll post art projects, gifts children can make, songs, recipes, and lots of FUN ideas so you can create some special memories this holiday season.

Let's get started with "Holiday Hands" that you can use to decorate your classroom, make cards, etc.  You can trace around children’s hands and cut them out to make these designs.  Or, have children dip their hand in paint and print.


*Use fabric paint and make holiday shirts with children’s handprints.

Note!  I know you haven’t even finished your turkey leftovers, but as a teacher I know you need ideas sooner rather than later so you can collect materials and integrate them in your plans.

Wednesday, November 23, 2011

Thanksgiving Eve

My husband's at the Smithsonian with our grandson and my daughter and her husband had to take Kalina to the doctor due to a cough.

And...I have a few minutes before I need to start cooking.

 I was lucky to be invited to sing at K.J.'s school this week.  I am a grandmother and a "grandmother teacher."  I sing, dance, laugh, and tell them how precious and wonderful they are --and they I say, "Good-bye."

After singing with the kindergarten children I had a few minutes to sit and visit with one class.  I told them how my grandson liked to hear stories about when I was in kindergarten.  One of my favorite memories is the day I painted my legs.  Yes, I might have been a little like Junie B. and Ramona.

Next, I sang with the first graders and focused on their social studies theme of yesterday, today, and tomorrow.  We sang songs children might have sung 100 years ago like "Coming Round the Mountain" and "Over the River and Through the Woods."  We talked about how things were different then and how they are the same now.  I had had found an old Sally, Dick, and Jane book when I was reading to K.J. so I read that to them.  "Go!  Spot!  Go!"  They all laughed and I was able to praise them for being much readers than I was when I was in first grade.   I told them to ask their grandparents to tell them some stories about when they were in first grade.  We ended with "May There Always Be Sunshine" because clothing, transportation, and housing may change, but the way families LOVE each other will always be the same.

I hope you will "feel the love" over the next few days!

Monday, November 21, 2011

THANKSGIVING BLESSINGS


SAY THE BLESSING AND PASS THE DRESSING!

This is a special week because I’ll be visiting my daughter and her family.  Being with K.J. and Kalina is the sweetest thing in our lives!

Each day this week I’d like to ask you to think of something you are thankful for.  And each day, “Pay it forward,” by doing a random act of kindness.  Put the GIVING back in Thanksgiving, and you know you will be the one to be blessed!   (I recently heard a brain expert on a radio talk show explain how generosity sparks the “feel good” center of the brain.  Beats taking drugs!)

I am thankful for teachers like YOU who love your students and try to make each day full of happy memories.

Check back with me on Friday because the 12 Days of Christmas will start then.  I’ll have great ideas for gifts your students can make, cards, decorations, songs, and more.

I wish you peace, a grateful heart, and a special time with those you love!

Sunday, November 20, 2011

BOOKS ARE FRIENDS

One exciting project that my husband and I have been involved in is providing books for Habitat Homes.  If you’ve never been involved in a Habitat building project, you’ve missed a great opportunity.  It’s a FEEL GOOD for sure!
I got the idea for putting books in new Habitat homes from the International Reading Association, and I thought it was such a fantastic idea that I suggested it to our local Sea Island Habitat.  They have involved a local high school to build the bookshelves, and then we get the privilege of delivering books to the new homeowners.  To most of you, the idea of not having books in your home seems as foreign as not having indoor plumbing.  But, it’s a thrill to see the faces of the children when they open the books and make friends!

Indigo Books, a local book store, has created a great book list and gives us a nice discount.  I'd be glad to share the list with anyone who is interested.  

I also heard about a great project from another teacher this week.  She taught at a Title 1 school, so her students didn't have much to begin with.  However, they did a Christmas project for another low income school in their area.  The children all brought in old books and toys and then had a "Santa's Workshop" to clean them up, wrap them, and make cards.  The teacher said it was so heartwarming to see the enthusiasm of her children sharing what little they had.

Saturday, November 19, 2011

LOVELY LEXINGTON

Yesterday I shared ideas from Tennessee, and today I have a few great ideas from Lexington, Kentucky.  Lexington has got to be one of the most beautiful cities in the United States with its white fences, pastures, horses, and stables. 

Eyes on Me  (Neysa Puckett, South Irvine, KY)
Teacher says:  1,2,3, all eyes on me.  (Make goggles and point to self.)
Children respond:  1, 2, eyes on you.  (Children make goggles around their eyes and look at the teacher.)

Scented Markers  (Donna Laemmle)
Donna said they always read “The Kissing Hand” the first day of school and then drew a heart with a scented marker on the children’s hands.
*Scented markers would also be fun for drawing smilies, stars, letters, words, etc. on children’s hands - with parents’ permission, of course.

Cell Phone Reading (Amy Madon, Lexington, KY)
Let children use old cell phones to “read to a friend.”  They can read the words, read the pictures, tell about a sight word they know, etc.  Great for oral language development.

havefunteaching.com (Kari Seasor)
Kari said this site has songs, videos, worksheets, etc. that her kids love.

Sketch to Stretch  (Jenny Ianiero, PA)
Jenny sent me this picture of a worksheet she adapted for her first graders.  What a meaningful way to build comprehension and Common Core State Standards. 
Yeah!  I know it's going in the wrong direction, but when I tried to flip it some of the picture disappeared.  You'll just have to turn your head to the side to read it! 

Friday, November 18, 2011

TERRIFIC TENNESSEE


Did you know that I was born in Tennessee?  Maybe that’s why I have a special bond with the teachers there!  The Kindergarten Conference in Nashville this week was TERRIFIC!  I’m thankful some of the teachers wrote down these ideas I can share with you!
Bubble Words (Alysia Pitts, Woodbury, TN)
Use a bubble font to make sight words and  place in a clear sheet protector.  The children roll out play dough to make the words.  (If you don’t have a bubble font you can just create your own words like I did below.)
*msalysiakindergarten.blogspot.com
Hannah Montan Cheer  (Janelle Bush, Tracy City, TN)
(Tune:  “Best of Both Worlds”)
Hold hand like a microphone and sing…”You did a good job!”

Justin Bieber Cheers  (Janelle Bush)
(Tune:  “Baby””)
Rock hands like a cradle and sing a child’s name such as, “Kellie, Kellie, Kellie, oooh!”
“Eenie, meenie, minnie, mo.  You did a good job.  This I know!!”

Question of the Day  (Mary McCarroll)
First, do a drum roll by slapping hands on thighs.
Second, count backwards from 10, 9, 8…0
Third, ask a question.  Put a T chart with “yes” and “no” on the board.  Children can place name cards or write their name under their answer.

Christmas Card Puzzle  (Bobbie Jean Hurde)
Cut up old Christmas cards and place them in a brown bag or zip bag.  Children shake up the bag and then put the puzzle together.

Ziploc Bag Quilt  (Elizabeth McIntosh, Whiteville, TN)
Put 16 ziploc bags together with duct tape so the tops of the bags are still open.  Slip cards into the bags with skills you are working on.   Create a second set of cards to match.  Children draw a card and then use a fly swatter to swat the card that matches the one they selected.  The same quilt can be used for upper and lowercase letters, pictures and sounds, math facts, and so forth.

Reading Station Puzzle  (Mandy Collins, Rossville, TN)
You will need cardboard puzzles to create this center.  Write sight words on the backs of the puzzle pieces.  Also write the sight words on the cardboard puzzle frame.  Children match words on the puzzle piece to the frame to complete the puzzle.

Word Bubble Map  (Linda Jo Kincaid)
Use bubbles to help children blend sounds and read words.  Make a bubble for each word family similar to the one shown.  Write the answers on the back.

Thursday, November 17, 2011

GOT MONEY?

There’s a little light shining in the academic world, and that’s the National Kindergarten Alliance (nka.org).  They are dedicated to preserving childhood and supporting teachers who care about the social, emotional, physical, as well as intellectual needs of all their students. Liz Blek provides a fantastic newsletter quarterly for members with practical and meaningful ideas.  For those of you who need materials for your classroom or want to attend a conference, take a look at this list that Liz compiled.  This might be like opening a treasure chest for you!

Kettering Foundation
www.kettering.org
The Kettering Foundation studies the relationship between the public and the education system, exploring practices that can help regain a sense of growth in public schools.
 
W.M. Keck Foundation
www.wmkeck.org
Support for organizations providing civic and community services, health care, early childhood, and pre college education
  
Dreyer's Large Grant Foundation
www.nestleusa.com
Grants will be given to K-12 public education schools and programs that help students succeed in core academic subjects and graduate to post secondary education and/or vocational training.

Teacher's Pet
www.jmsims.org
This grant is geared specifically toward teachers' smaller projects

Deluxe Corporation Foundation
www.deluxe.com
Deluxe Corporation supports after-school academic enrichment programs across the United States.


www.donorschoose.com/grants

HELP!  If any of you have other resources, please email them and I will add them to this post.

Okeedookee!  Now that I've suggested how you might get some funds, let me tell you about the Early Childhood Summit at the College of Charleston this summer.  It's going to be AWESOME, and best of all you'll get to visit the NUMBER ONE TOURIST  CITY in the United States!  I'll be presenting along with Sharon MacDonald, Clarissa Willis, Lynda Weaver, and some outstanding faculty members at the College.  There's even a special session presented on outdoor learning.  They should have the website up with details in the next few days.  I'll keep you posted!

Wednesday, November 16, 2011

LETTER TIN


Place a set of magnetic letters inside a cookie tin.   On the inside cover make three lines with a permanent marker.  Have the children take out the letters and place them around the lid in alphabetical order.  Call out a sound and have the children select that letter and place it on the first line in the lid.  Call out a second sound.  Call out a third sound.  Blend the sounds and read the word.

Hint!  Adapt the number of letters to the ability of the students.
It would be great if each child had her own letter tin for large group
practice, take home activities, etc.  These would also work well for small
group instruction or individual tutoring.

*Use for other phonics lessons.  “What other words can you make by changing the first sound?”  “Can you make a word by changing the end sound?”

*Younger children could use letter tins for identifying letters or making their names.

*Older students could use these for spelling words and other word games.

*Thanks to Alice Becket of Bellmawr, NY, for sharing this idea!

Tuesday, November 15, 2011

OVER THE RIVER

Over the River – 4th Thursday in November
(Traditional Tune – Happy Everything CD)


Over the river and through the woods       (Pretend to hold reins of a sleigh

To grandmother’s house we go.                   and drive as you bounce up and down.)

The horse knows the way                           (Put hands behind back and nod

To carry the sleigh                                    like a horse.)
Through the white and drifted snow.                 
Over the river and through the woods,       (Pretend to drive sleigh.)
Oh, how the wind does blow.                       (Wrap arms around self and shiver.)
It stings your toes and bites your nose       (Touch nose and point to toes.)
As over the ground we go.

Through the country and cities far             (Pretend to drive a car.)
In sun or wind or rain.
We might go by train                                  (Pull down on train whistle.)

We might take a plane.                               (Fly hand like a plane in the air.)

Or maybe a bus or car.                                (Hold out right hand, then left.)

Through low valleys and mountains high         (Look down low and then up.)
Now, grandmother’s house I spy.                  (Hand over eyes.)
Hurrah, for the fun!                                    (One fist in the air.)
Is the turkey done?                                   
Hurrah for the pumpkin pie!                        (Cheer with other fist.)

Comparisons – Use a Venn diagram to compare what it would be like to visit grandmother a long time ago and how we visit now.  How are things the same?


Graphs – Make a graph of how they will travel to their Thanksgiving dinner.  Car?  Plane?  Train?  Bus?  Boat?  Stay at home!

Family Celebrations – Holidays are a good time to talk about diversity.  Not all families celebrate Thanksgiving, but most families do celebrate something.  Ask children to bring in photos or celebrations they have in their home.  Put their pictures together to make a class book. 

Monday, November 14, 2011

THANKFUL BOOK


We Give Thanks

(Tune:  “Michael Row Your Boat Ashore” – HAPPY EVERYTHING CD)

We give thanks for food we eat.
Hallelujah.
We give thanks for food we eat
Hallelujah.
We give thanks for families…
We give thanks for friends so dear…
We give thanks for all the earth…

Let children suggest other things they are thankful for and insert the words in the song.
Here is a link to run off the above book. 
drjean.org/html/monthly_act/act_2007/11_Nov/1booksNov/weGiveThanks.pdf


Thankful Books – Make blank books for the children so they can draw pictures of what they are thankful for.  You could use paper plates or napkins for the cover of the books.

Family Quilt – Involve your families in making a “Thankful Quilt.”  Give each child a 10” square of heavy paper.  Let them take it home and decorate it with photos or drawings of things their family is thankful for.  As the children return their squares, punch holes in the corners and tie the squares together with yarn to create a quilt.  Hang in the classroom. (At the end of the month, take the squares apart and make a book for your classroom.)

Food Drive – Plan a food drive at your school and distribute the canned goods to a local food bank.

Sunday, November 13, 2011

TIMMY TURKEY'S TALE

Someone sent an email asking about this story.  Here it is!  You can make it in about 15 minutes today and enjoy telling it to your class tomorrow, and the next day, and the next day....
Timmy Turkey File Folder Story
 Directions:  Cut the shape of a turkey out of the front of a file folder.  Insert colors of construction paper inside the file folder according to the story. (brown, blue, red, green, yellow, purple, and multi-color)  Glue the words to the back of the folder so you can read and remove one sheet of paper at a time.
*Encourage the children to join in on the chorus!

Once upon a time there was a beautiful brown turkey named Timmy.  One day as he strutted down the road he heard a bluebird say:
                  Ha, ha, ha!  He, he, he!
                  You’re the funniest turkey I ever did see.
Timmy Turkey replied:
                  Oh, dear, oh, dear!  Oh, me, oh, me!
                  Why am I the funniest turkey you ever did see?
The bluebird answered:
                  You should be blue like me.   It’s such a peaceful color.
So Timmy went home a dyed himself blue.  (Remove the brown paper to reveal a blue turkey.)
The next day as Timmy strutted down the road he heard a red hen say:
                  Ha, ha, ha!  He, he, he!
                  You’re the funniest turkey I ever did see.
Timmy replied:
                  Oh, dear, oh, dear!  Oh, me, oh, me!
                  Why am I the funniest turkey you ever did see?
The redbird answered:
                  You should be red like me.  It’s such a bright color.
So Timmy went home and dyed himself red.  (Remove the blue paper to reveal a red turkey.)
The following day as Timmy was strutting down the road he heard a green frog croak:
                  Ha, ha, ha!  He, he, he!
                  You’re the funniest turkey I ever did see?
Timmy sadly replied:
                  Oh, dear, oh, dear!  Oh, me, oh, me!
                  Why am I the funniest turkey you ever did see?
The frog croaked:
                  You should be green like me.  Green is the color of life!
So what do you think Timmy did?  That’s right!  He went home and dyed himself green.
(Remove the red paper to reveal a green turkey.)
Timmy was strutting down the road a beautiful shade of green the next day when he heard a yellow cat say:
                  Ha, ha, ha!  He, he, he!
                  You’re the funniest turkey I ever did see!
Timmy answered:
                  Oh, dear, oh, dear!  Oh, me, oh, me!
                  Why am I the funniest turkey you ever did see?
The cat laughed and said:
                  Who ever heard of a green turkey? 
                  You should be yellow like me.  It’s such a happy color.
Yes, you’re right!  Timmy went home that night and dyed himself yellow.  (Remove the green paper to reveal a yellow turkey.)
The next day Timmy was strutting down the road again when he heard a purple parrot squawk:
                  Ha, ha, ha!  He, he, he!
                  You’re the funniest turkey I ever did see!
Timmy said:
                  Oh, dear, oh, dear!  Oh, me, oh, me!
                  Why am I the funniest turkey you ever did see?
The parrot squawked:
                  Yellow’s no color for a turkey. 
                  You should be purple like me.  Purple is the color of royalty.
Timmy went home immediately and dyed himself purple.  (Remove the yellow sheet of paper to reveal the purple turkey.)
Once again Timmy was walking down the road when he heard his turkey friends laughing.  They said:
                  Ha, ha, ha!  He, he, he!
                  You’re the funniest turkey we ever did see!
Timmy cried and said:
                  Oh, dear, oh, dear!  Oh, me, oh, me!
                  Why am I the funniest turkey you ever did see?
The other turkeys replied:
                  Who ever heard of a purple turkey? 
                  You look so silly!
Timmy slowly walked home and as he walked he thought to himself, “I have dyed myself blue, red, green, yellow, and purple, and I have pleased no one.”  Then he got a brilliant idea!  He got all the bottles of dye and made all his feathers different colors.  (Remove the purple sheet of paper to reveal the turkey with the colorful feathers.
The next day as Timmy Turkey strutted down the road everyone laughed and cheered!
                  Ha, ha, ha!  He, he, he!
                  You’re the most beautiful turkey we ever did see!
                 
And that’s why you always see turkeys with beautiful tail colors!

Saturday, November 12, 2011

THANKSGIVING STORY BRACELET

Every year I receive requests for the “Thanksgiving Story Bracelet.”  You will need to purchase the beads and pipe cleaners and demonstrate how to make the bracelet before asking the children to do it.  Practice reading the poem several times as children touch each color.  Encourage the children to tell the story of the first Thanksgiving independently using the beads as a clue.  Send home a copy of the poem so the children can share it with their families.

With this bracelet you will know    (Start with a pipe cleaner.)
The first Thanksgiving that was long, long ago.
The Pilgrims set sail from far away
On the Mayflower with tall white sails.   (Insert a white bead.)
They sailed many days across the ocean blue.  (Add a blue bead.)
The seas were rough, but the ship came through.
At last they spotted land so green.  (String on a green bead.)
They were so happy they cheered and screamed.
The first year was so hard and black.  (Now a black bead.)
Many died and wished that they could go back.
But the Native Americans gave them a hand
And helped them survive in the strange new land.
They decided to celebrate in a special way
And that became the first Thanksgiving day.
They prepared a feast with turkeys brown  (Add a brown bead.)
And red cranberries that they had found.   (Time for a red bead.)
Yellow corn that they had learned to grow  (Insert a yellow bead.)
And orange pumpkin pies, don’t you know!   (Last an orange bead.)
But before they ate the turkey and dressing,
They all held hands for a thankful blessing.  (Twist the ends of the
                                                pipe cleaner to make a bracelet.)


Friday, November 11, 2011

SIGN WITH ME!

Sign Language Center
You can make this simple SIGN LANGUAGE CENTER with a pocket folder.  Glue a copy of manual signs for letters on the inside of the folder.  (Download this at aslpro.com.)  Write alphabet letters on index cards and place them in the pocket.  Children choose a card and then try to reproduce that sign.  For older children, write high frequency words or spelling words on index cards for them to practice spelling manually.

Signing Songs
Learn to sign simple songs using manual signs.  "Old MacDonald" or "I Know an Old Lady" would be a good place to start because you could just sign the animals for each verse.  Alphabet songs, "The Color Farm," "Days of the Week," and other concept songs could be enriched with sign language.

Classroom Management
Tired of talking and having your students ignore you?  Try teaching them the signs below and you'll be surprised how the noise level in your classroom decreases.  (Go to aslpro.com to watch video clips.)

Pay Attention            palms pointing towards face

Stand Up                  2 fingers standing on palm and then point up

Sit Down                   2 fingers sitting and then point down

Walk                         walk fingers

Wait                         hands to side and wiggle fingers
Stop                         chop hand on palm
Restroom                  make “t” and wiggle 
Water                      make “w” with fingers and place near your mouth

Use sign language as a quick review.  You can ask questions and all the children can quietly respond with:

Yes                          wiggle fist up and down

No                           index and middle finger down to thumb
Understand              wiggle index finger near brain
Don’t Understand     shake head “no” as you wiggle index finger


Reinforce manners with these signs:
Please                        palm open on chest and circle around
Thank you                  fingers on chin and then down to palm

Sorry                        make fist and rub on chest in circular motion

And here's one of the best signs of all!
I LOVE YOU!